Header and footer on one page. How to remove headers and footers in Word. How to remove or change the header and footer in the text Word
Programs related to the Microsoft Office suite, such as Word and Excel, provide the user with ample opportunities for editing documents. The inscriptions, printed on each sheet in the header or at the bottom, save a person from having to drive in information twice. However, there are times when this data is not needed and needs to be erased.
How to remove a footer in Word 2003
Technologies do not stop developing, as well as software for computers. You may notice that the versions of Word and Excel released in 2003 are strikingly different in interface from their younger counterparts. There are also differences in the functionality of the programs; they also affect the headings. How to remove headers and footers in Word 2003, this simple algorithm will tell you:
- Activate the submenu "Headers and Footers" from the drop-down menu "View" by double-clicking on the text to be deleted. Notice that the cursor and labels are inside the dotted box.
- Highlight all unnecessary information with the cursor.
- Press the Del key or use the Cut command.
It is worth highlighting that after these actions, the header data will disappear from all the sheets of the document on which they were previously created. However, if you only remove labels from the top margin, the bottom records or page numbers will remain intact. To completely remove them from open file you will need to repeat the process for the dotted field located below by double-clicking on it.
How to remove headers and footers in Word 2010
More than 10 years have passed since the release of the text editor in 2003. For that microsoft time Office has been modernized both functionally and externally. Work with sections Microsoft Word 2007, 2010, and then 2013 release became somewhat more convenient, although the visual differences from the previous version are striking. Nevertheless, in these programs you can perform the same actions, but different ways... For example, this instruction will help you figure out how to disable headers and footers in Word 2010:
- It is not difficult to distinguish header data that is common for the entire document or its parts from the main text. The color of the letters and logos, if present, will be more subdued.
- Click on the label twice. You will not see the frame for this version, the dotted line serves as the border for the main text.
- A new submenu "Constructor" will appear on the taskbar, where you can edit the entry if desired. However, to remove information or part of it, you need to select the text and press the Del key.
A similar algorithm works not only for the 2010th, but also for the 2007th version of the editor. For these programs, in addition to standard actions with headers and footers, other parameters have been added. For example, the Quick Blocks submenu will help automate the process of inserting information and visually diversify the document. Among the available options, you can choose not only the top or bottom labels, but also the side ones, located on the right or left, depending on the markup.
Working with headers and footers
There are frequent cases, especially when it comes to student papers, when it is required to correct the document only partially, leaving the main material unchanged. This is where questions begin to arise regarding working with the editors Word and Excel. For those who are just starting to work with these programs, it is often not clear how to remove the footer from the second page, leaving it on the rest. However, the possibilities of these renowned editors allow these and similar actions to be carried out.
How to remove a header in Word
The data located at the top, as a rule, is designed to report any important information, coordinates, headings names. They can be the same for each section, or different, if necessary. The header area often contains the following information:
- name of the organization;
- title of work;
- company logo;
- name, address and telephone number of the author;
- date of writing the document;
- a short summary or quote.
When this or other information is not needed and needs to be removed, knowledge of the intricacies of a text editor comes to the rescue. How to remove a header in Word is clear from this algorithm:
- Double-click the left mouse button, hovering over the lighter text on top.
- In the "Design" tab that appears on the left, select the "Header" submenu, and then go down to the very bottom to select the "Delete" command.

How to remove the footer in Word
The information at the bottom of the document is more common. There may not be any data in the page header, but the footer, especially for large files, is almost always present. The fact is that at the bottom of the sheet: left, center or right, page numbers are placed. Occasionally this information is supplemented by the title of the work and the name of the author, the title of the section. It is easy to remove such information along with the numbering of sheets in the following way:
- Click on the text at the bottom of the page (double click).
- Select all unnecessary and remove using the Del key or in the submenu "Footer" select the command "Delete".
How to remove a footer from the last page
At the end of writing a term paper or thesis the authors indicate the sources used. The same design is acceptable for scientific papers or books. The header data required for the previous sections is out of place on the last sheet of the file. To rectify the situation, follow this algorithm:
- Place your cursor after the final sentence, select the Page Layout tab, then the Breaks submenu, and then Next Page.
- Find the headers and footers in the created final sheet, double-click on them.
- In the "Constructor" tab that appears after clicking, disable the "As in the previous section" option.
- Activate the Delete command within one of the submenus for the header or footer.
- Type the body text on the closing page.

How to remove a header and footer from the first page
The title page of any document should be designed in a certain way, no unnecessary information, be it a page number or a section heading, should not be present on it. Newbies starting to work in a text editor should know that you can automate the process of removing unnecessary data from the first page. How to remove headers and footers in Word, the instructions will tell you:
- Before creating the title page, place the cursor in front of the beginning of the first sentence of the body text.
- Go to the Page Layout tab, go to the Breaks submenu and click Next Page.
- Double click on the header on the next sheet, after the cover sheet. Disable the "As in the previous section" option.
- Make a couple of clicks on the inscription on the first page and delete it (Del or using the appropriate submenu).
Video: how to remove headers and footers
Of the additional formatting options, the most commonly used option is to create headers and footers. Headers and footers are areas located on the top and bottom margins of pages in a document. Headers and footers typically contain information such as document title, subject, author name, page numbers, or date. When using headers and footers in a document, you can place different text in them for even or odd pages, for the first page of the document, change the position of headers and footers from page to page, and so on.
For working with headers and footers in Word 2007, use the Header and Footer panel of the Insert ribbon.

After insertion, the header and footer is editable, and the "Design" contextual ribbon appears (Working with headers and footers).

The edited header can be added to the Header and Footer Gallery using the Save Selection To Header / Footer Gallery option.
Setting up a header
The Design ribbon of the Working with Headers and Footers contextual tool allows you to quickly customize the header and footer, such as:
different headers and footers for odd and even pages;
separate header and footer for the first page;
hiding the main text while working with headers and footers;
insert and edit page number;
control of the position of the header;
insertion of various objects into the footer: current date and time, pictures, building blocks, ClipArt objects.
Headers and footers can be customized separately for different sections. But, for this you need to break the connection between them, tk. by default, all headers and footers are linked. To do this, you need to go to the header and footer that you want to arrange in a different way, and press the button "As in the previous section".
If, on the contrary, there is a need to bring the headers and footers in different sections to the same form, then the button "As in the previous section" must be "pressed".
You can quickly switch between the headers and footers of the document by double-clicking on the desired element (header / footer or on the main text).
To remove headers and footers, use the "Delete header / footer" item of the corresponding header buttons.
Pagination
To number pages, use the Page Number button (Insert ribbon, Header and Footer panel).

You must select the option of placing the number on the page itself and, if necessary, adjust the format of the number itself.
You can save page number items as needed by adding them to the building blocks collection. To do this, after inserting and configuring the number, click the "Page number" button and select the command "Top / bottom of the page" - "Save selection as page number".
If it becomes necessary to remove the number only from the first page, you need to do the following:
open the "Page Layout" ribbon;
open the "Page setup" panel window;
on the Paper Source tab, select the Distinguish first page headers and footers check box " .
Practical work No. 2 Formatting a text document. Working with headers and footers.
purpose of work - studying the functionality of the word processor Word 2007 and acquiring practical skills in formatting text documents.
Changing the character formatting options affects (in descending order of priority level):
a) a selected fragment of text;
b) the unselected word pointed to by the text cursor;
c) characters that will be typed immediately after changing the formatting parameters (if the cursor does not move).
Task number 1
Open the Proba.docx file you created earlier
In the second paragraph, make the following changes using the various formatting options (formatting requirements are shown in parentheses):
Input characters (Times New Roman, 14, K) appear where on the screen (Arial, 12, red, strikethrough), where is the cursor, (Arial Narrow, 10, underlined) which is shifted to the right, (Times New Roman, 12, superscript) leaving a string of characters. (Times New Roman, 12, subscript) When reaching the right margin of the page (Times New Roman, 10, underlined, F, dark red, small caps, sparse by 0.25pt) the cursor automatically moves to the next line. (Monotype Corsiva, fill color yellow, 12) THIS PROCESS IS CALLED (Arial Unicode MS, 12, F, all caps) Overflowing Text (Times New Roman, 12, K, red, start with uppercase), and pressing the key ( Comic Sans MS , 20 ) E nter (Times New Roman, 12, spacing - sparse by 2pt, offset of each character down by 3pt, relative to the previous one) creates a new paragraph, (Times New Roman, 12, spacing - condensed by 1.5 pt) and not a new line . (Times New Roman, 12, double strikethrough, recessed)
As a result, your text should look like this:

Task number 2
Divide the third paragraph of text into two columns. As a result, the text should look like this:
Task number 3
Insert page numbers into your document:
Insert - Page Number - Top pages- Page X of Y- Bold 3
Task number 4
Insert headers and footers into your document:
Insert - Footer - Conservative
Task number 5
At the beginning of the fourth paragraph, set the Drop Cap. As a result, you will receive the following type of text:
Exit the program and save the changes in the document
Setting up headers and footers.
Headers and footers
A header or footer is graphic or textual information that appears at the top or bottom of a page (above the top or below the bottom margin). Most often, headers and footers indicate the title of the chapter, the section number, the author of the book and the element of graphic design. The latter is added in order for the user to remember the graphic element, which, as a rule, carries a symbolic meaning. Especially striking examples of this can be seen in works with rich artistic design, for example, in the "adventure / fantasy" genre.
A well-designed and visually aesthetic header is the business card of a document. Taking a little time to create a header and footer can significantly increase the attractiveness of your document and slightly improve its readability.
A header and footer can be created for each section of the document. But keep in mind that working with a header and footer is available only in page layout mode. Odd and even page headers and footers can be different, and the header and footer text can be formatted with little or no restrictions.
Adding a header
1st method.
Go to the "Insert" tab and in the "Headers and Footers" group click the "Header" button;
In the drop-down list of ready-made headers and footers, select the desired one. After clicking on it, you will go to the area for creating a header (the "Design - Working with headers and footers" tab will automatically open, and special groups and buttons for working with headers and footers will be displayed on the ribbon), while the main text will turn gray and will be unavailable for editing;
Figure 1. Ribbon with an open tab "Design - Working with headers and footers".
Enter the required information in the header area. By default, it is entered left-aligned. To change this use the following methods:
Go to the "Home" tab and in the "Paragraph" group click on the required text alignment buttons;
Use keyboard shortcuts: for left alignment -
Press the key
After defining the header and footer, to close the window for working with headers and footers, click the "Close window for working with headers and footers" in the "Close" group or double-click anywhere on the page.
2nd way.
Right-click in the top margin area, then click Change Header.
Adding a footer is similar.

Figure 2. Selecting a header.
Editing headers and footers
1st method.
In the window open document double-click in the area of \u200b\u200bthe desired header. The header and footer area will go into the formatting process, and the main text will become unavailable for editing (it will turn gray);
Make the necessary changes.
2nd way.
"Insert" tab - in the "Headers and Footers" group, click the button to change the document header;
In the window that opens, select the tab "Change the header (footer)";
After making your changes, click Close Header & Footer Window or double-click anywhere on the Stage.
Hide body text when working with headers and footers
Sometimes it is necessary to focus solely on working with headers and footers, and the content of the work area can be distracting, especially if it is rich in drawings, decorated text and photographs. In this case, you can hide it. For this:
Open the "Design - Working with headers and footers" tab using one of the above methods;
In the "Options" group, uncheck "Show document text"

Figure 3. Hiding the main text.
Transition between headers and footers
Sometimes, when editing a header area, you may want to quickly navigate from header to footer (or vice versa). For this:
In the Transitions group, click the Go To Header and Go To Footer buttons to navigate to the respective header and footer editing areas.
If a document is split into several sections, each section may have independent headers and footers. In this case, the transitions are carried out as follows:
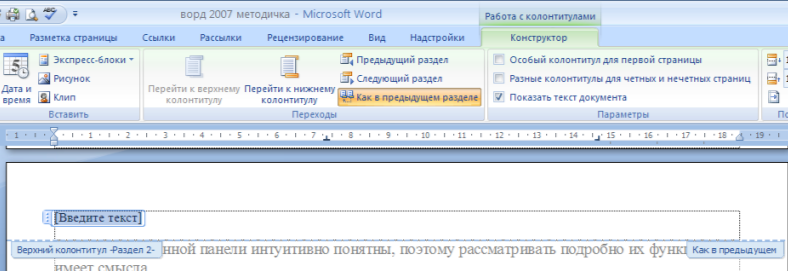
Go to the "Design - Working with headers and footers" tab;
In the Transitions group, click on the Back and Next Entry buttons to navigate forward and backward, respectively.
![]()
Figure 4. Buttons for switching between independent section headers and footers.
If you want the headers and footers of the current section to be styled the same as the previous one, click the button "As in the previous section".
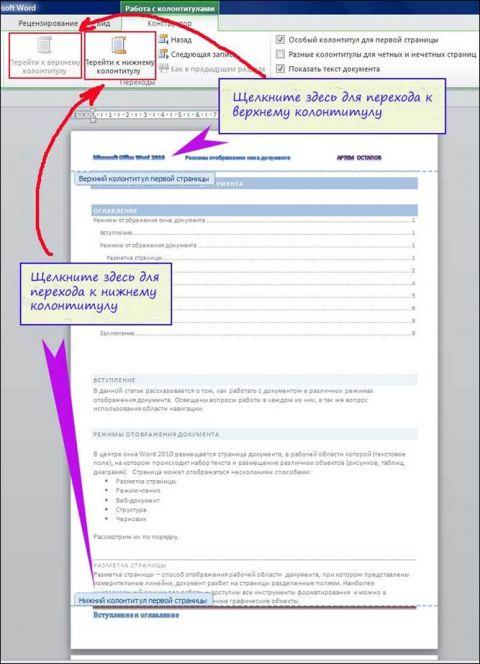
Figure 5. Transitions between headers and footers.
First page header
In most documents, it is customary to distinguish between the headers and footers of the first and other pages. This is due to the fact that the first header, as a rule, reflects basic information about the document, such as the author or title of a book, article. It is not at all necessary to reflect this in the headers and footers of the following pages, since they are often reserved for the titles of chapters and parts. In this case, you need to set a separate header and footer for the first page:
After creating the desired headers and footers, on the first page of the document, click in the header or footer area (depending on which one you want to create);
In the Parameters group, check the box next to Special header for the first page ”, and then enter the required information in the header area;
Exit the editing mode for headers and footers by double-clicking in the document work area.
Odd and even page headers and footers
Different headers and footers for odd and even pages are often used in books, where the title of the work is shown at the top of the left page of the spread, and the title of the chapter is shown in the title of the right page. The distinction between odd and even page headers and footers applies to the entire document. That is, a different header and footer for a separate section of the document can be set using the "Special header on the first page", but in the case of even / odd page headers and footers, the changes will be common for the entire document.
In the Options group, select the Distinguish odd and even page headers and footers check box.
Change the distance between the header and footer data entry field and the page edge.
The standard distance (default) between the header / footer data entry field (in the header area) and the edge of the page is 1.25 cm (about half an inch). The default value does not always match the desired one, so you need to set a different value:
Go to the "Design - Working with headers and footers" tab using one of the above methods;
In the "Position" group, in the fields for specifying the distance between the edge of the page and the data entry area of \u200b\u200bthe header, enter the desired value. For the header, in the "From Top to Header" field, for the footer, in the "From Bottom to Footer" field;
Close the header and footer editing area by double-clicking on the document work area. At the same time, you will close the "Design - Working with headers and footers" tab and automatically go to the "Home" tab.
Please note that if you move to a new line (by pressing "Enter"), then the height of the footer area is automatically increased by the line height (it depends on the font size and line spacing).
If you need to add a placeholder or set alignment, use the Aligned Tabs box. To do this, in the Position group, click Insert Aligned Tab. In this window you can:
adjust alignment relative to margin or padding;
align text left / right or center;
choose one of five placeholders (they are relatively infrequent, but are still used to create headers and footers of chapters and sections of the document).

Figure 6. Changing the distance between the page edge and the header and footer field.
Inserting additional elements into a header or footer
You can add not only text data to the header, but also various pictures, shapes, date and time, etc.
In order to insert this or that element into the header area, do the following
Double-click in the header area;
In the "Insert" group, select and insert the desired object by clicking on the corresponding group button;
Close the header and footer editing area.
There are four buttons in the "Insert" group:
"Picture" - places a picture in the header;
"Date and time" - inserts the current date and time into the header;
"Picture" - places a picture in the header;
"Express Blocks" - places auto text elements in the header and footer.

Figure 7. An example of the design of headers and footers.
Removing a header or footer
If you have poorly composed a header and footer and it is easier for you to delete it than to edit it, you can easily do it.
1st way:
Go to the header / footer editing area;
Highlight the entered data and then delete it by pressing the "Delete" key.
2nd way:
Insert Tab - In the Headers and Footers group, click the Header (Footer) button;
3rd way:
Double-click in the header and footer area.
In the Headers and Footers group, click on the "Header (Footer)" button
In the window that opens, click on "Remove Header (Footer)".
After watching this two minute video, you will know how easy it is to number the entire document. Page numbering in word program 2003 is very easy!
To number your work from the first to the last sheet, starting with the number 1, enter the Insert Menu - Page Numbers. In the dialog box, make settings for the position of the page number in the document: at the top or bottom of the page, left, right or center. Check the Number box on the first page. Go to the Format tab to set the settings on the Start from 1 switch. Here you can also configure the number format. Save the settings by clicking OK. And again OK in the main dialog box. Your document is now numbered.
Delete paginationcan ,
by double-clicking on any number on any page with the left mouse button.  And then select the number itself in the same way. Press the Delete or Backspase key. Exit Header and Footer mode by double-clicking anywhere in the document.
The figure can format like plain text, after selecting it and going to the Format Menu - Font. You can make it larger or smaller, bold or italic, white on black, using the buttons on the formatting bar. But it will still be different in color from the text in the document.
 So that the numbering is outside the page frame
, place the cursor in front of a number and move it with the Tab key.
So that the numbering is outside the page frame
, place the cursor in front of a number and move it with the Tab key.
To start the numbering from the second page from the number 1, do not check the box NUMBER ON THE FIRST PAGE. And in the FORMAT tab, select a convenient number format. In the START WITH switch, correct the digit to zero. Don't forget to click OK.
COLONTITIES
Headers and footers adorn your work and radiate professionalism. In headers and footers, we can write any text and format it like any other text in Worde. The content of the header and footer can formatlike regular text. You can align left, right or in the middle using the buttons on the Format Bar. Make it bold, italic, or underlined. But still, it will not be as pronounced as the rest of the text in the document.
Headers and footers may contain
document's name
section title
author's name
date of creation
page number
contact
quote
table
drawing
etc
The title of the document can be written in the header, and the page numbering in the footer. Or in the footer on the left is the name of the document, and on the right is the page number.
Go to Menu View - Headers and Footers and put a tick in front of the Headers and Footers item. Decide where you want to place it, top or bottom. Place your cursor in the header or footer. Or use the Header / Footer button on the header / footer toolbar.
Different headers and footers in one document
To in title page headers and footers were distinguishable from others
,
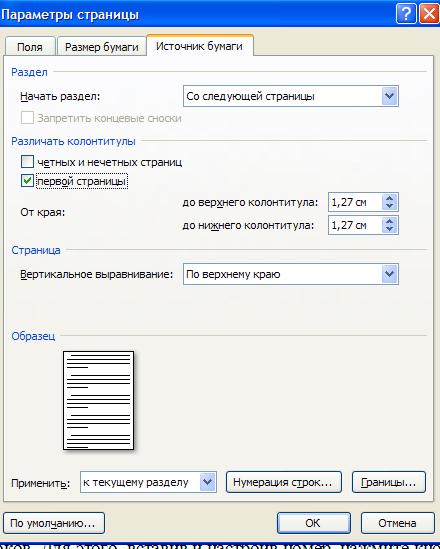
do the following. In the File Menu - Page Options in the Paper Source tab, select the Start section switch From the next page. In the Distinguish headers and footers box, select the Home page checkbox and click OK. Or go to Menu View - Headers and Footers and configure page parameters from the Headers and Footers panel by clicking on the button  Page settings. Double-click at the top or bottom of the first page in the header and footer fields and make them blank or not like the others. Create a separate header and footer for all other pages.
Different headers and footers on even and odd pages . In the File Menu - Page Setup on the Paper Source tab - Distinguish between odd and even page headers and footers, check the box. Create a header and footer once on an even page and once on an odd page and get auto-complete throughout your document.
Page numbering from page three in Word 2003
Watch the video in which I show you how to make numbering from any page in your document. With this method, you can only do pagination where you need it.
Let's share your text Document into two sections: pages without numbers and with numbers. Let's establish a gap between them. To make it clearer for us, activate the Nonprinting characters button on the Standard toolbar.
Place the cursor on the last line of the second page. Let's go to the Insert Menu - Break. In the dialog box, select the radio button New section from next page. Click OK. The cursor will jump to the next page and appear extra line, which must be removed immediately so that the main text does not shift. The section break icon will also appear, which we see, because we have visible unprintable characters... In normal mode, the gap is not visible. If needed remove page break,
place the cursor at the beginning of this break and press the Delete button.
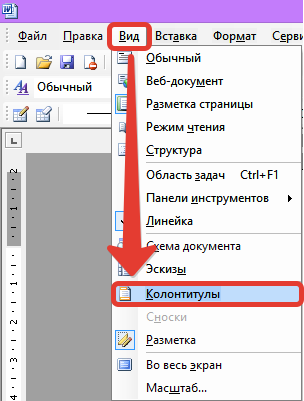 We enter the mode of creating a header and footer Menu View - Headers and footers. To go to the footer, click in the footer or use the Header / Footer button in the header bar
We have Section 1, Section 2, Header and Footer Bar and Label Same as previous.
When you hover the cursor over the buttons on the Header and Footer, the short name of the button pops up. Button AS IN THE PREVIOUSis now active, which means that the connection between the sections is preserved. We need to squeeze it out so that we have page numbers only in the current second section.
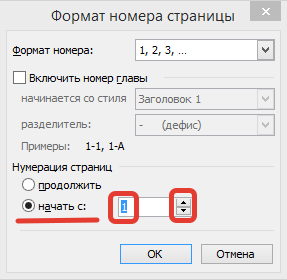
Click the Format Page Number button in the dialog box. Select the Start from 1 radio button. If you want the numbers on the first two pages to be invisible, select the Start from 3 radio button. OK. You can now click the Insert Page Number Field button.
Exit the header / footer creation mode by double-clicking the left mouse button anywhere in the document.
Remove pagination at the end of the document
Place the cursor on the sheet where you want to remove the page number. Enter the header and footer mode Menu View - Header and Footer. Go to the header or footer. It depends on where the figure is worth. On the panel for creating headers and footers, release the button As in the previous one, and then delete the number itself. This will only remove the pagination on the pages you want.
If there are several such sheets, then go to the desired header and footer of each sheet, cancel As in the previous one and delete the number.
Now you know how pagination is done when working with a Word document and how pagination is removed from some pages.
How to number all lines in a Word 2003 document
 When working with a document in the program Word numbering lines are done in order to view and delete empty lines. In some cases, in order to precisely indicate the place (line) in the document, which contains the necessary information.
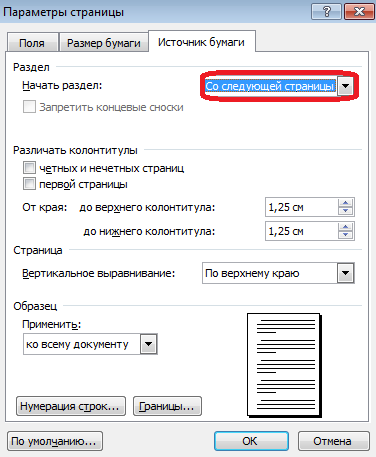
Go to Menu File - Page Setup on the Paper Source tab. Click the Line Numbering button. A dialog box will open where you need to check the Add line numbering box. The settings in this window help you start counting from the digit you want. Indent as far from the text as you want. Take a step as needed. For example, if step 1, then the numbers will be 1,2,3,4, ... If step 2, then the numbers 2,4,6,8, ... If step 3, then 3,6,9, ... It depends on your goals ... And yet, if you just need to number the lines in a row, then use step 1, that is, do not change anything.
Other settings.
If you set the switch opposite the item On each page, then on each new page line numbering will start over.
If the switch is In each section, then, accordingly, in each new section (if you have them) there will be a new line numbering.
If you put the switch on Continuous, then line numbering from the beginning to the end of the document will not be interrupted.
Click on the Ok button in this  window, and after it closes Ok in the previous window. Immediately after this, the lines in the document will be numbered. Moreover, if you add or delete lines, the numbering will change automatically.
You can cancel line numbering by unchecking the Add line numbering box.
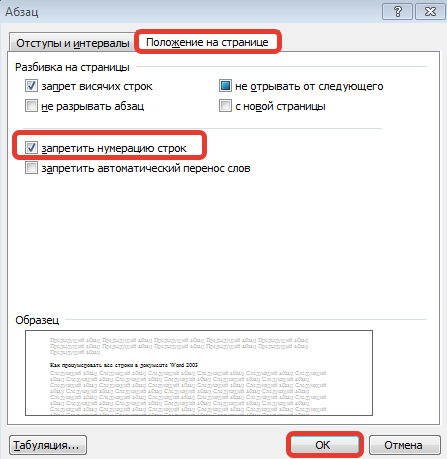 If it is necessary in a part of the text that is already numbered, do lines without numbering, then first you need to select this part. Go to Menu Format - Paragraph, Position on Page tab. Check the Disable line numbering checkbox. OK.