The custom header for the first page does not work. Word remove headers and footers from the last page of the document.
A header or footer is a line at the edge of a typesetting strip on paper or documents. In the standard sense of this term, the footer contains the title, title of the work (document), the name of the author, the number of the part, chapter or paragraph. The header and footer is placed on all pages, this applies equally to printed books and text documents, including microsoft files Word.
To enter page numbers
Below is a list of the different types of links between headings and the page pie of a document. The same page titles are associated with page titles equal to the pages of the pages that are associated with the pie page. To create a “page title or pie” in the following sections, repeat steps 3 and 4 for each section. To return to your document, click Close on the Header & Footer toolbar. The previous page title or cake is repeated in the current section. ... Select Insert - Field Command - Page Number to enter the page number at the current cursor position.
The header and footer in the Word is an empty area of \u200b\u200bthe page on which the main text of the document or any other data does not and cannot be located. It is a kind of page border, the distance from the top and bottom of the sheet to where the text begins and / or ends. Headers and footers in Word are set by default, and their sizes can vary depending on the preference of the author or the requirements for a particular document. However, sometimes a header or footer is not needed in a document, and this article will discuss how to remove it.
However, a field command entered in this way will change position when text is added or removed. For this reason, you should insert a page number in your header or footer line, which always maintains the same position and can be repeated across all pages.
To start at a specific page number
Select "Insert" - "Title" and " footer"-" Header "-" Insert "-" Footer "and" Footer "- add a header or footer to all pages with the current page style. At this point, you can add additional functionality to the page numbers. You write text Documentwhich must start with a page number.
Note: Traditionally, we remind you that the instructions described in this article are shown in microsoft example Office Word 2016, but it also applies to all previous versions of this program. The material below will help you remove the footer in Word 2003, 2007, 2010 and newer versions.
The requirements for many documents are such that the first page, which is the title page, must be created without headers and footers.
To format the page number style
Use different styles for page numbers
- Click in the first paragraph of the document.
- Select "Format - Paragraph - Text Stream".
- In the Breaks section, select Paste.
- Select Page Styles to set a new page number.
- Double-click immediately before the page number field command.
In the first page style footer, the page number field command will be formatted to use Roman numerals. In the next page footer, the page number field command will be formatted differently. The two page styles must be separated by a "page break".
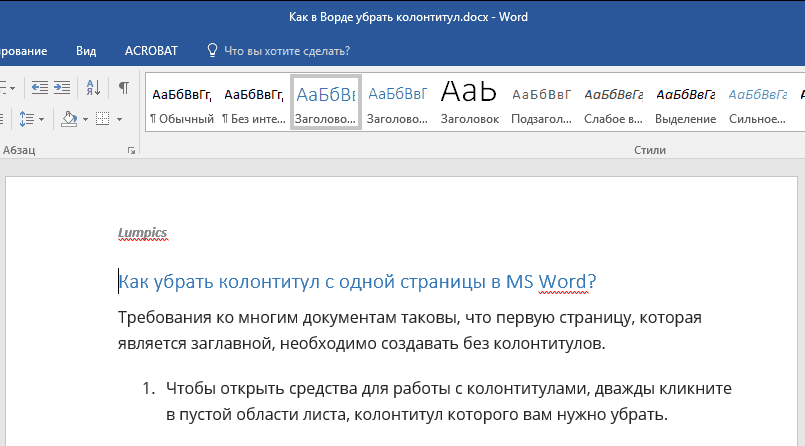
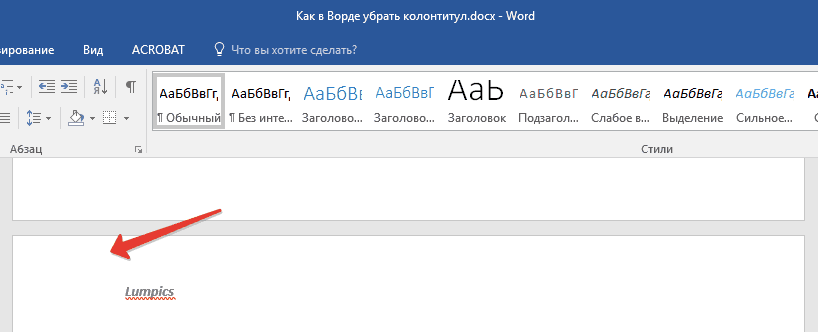
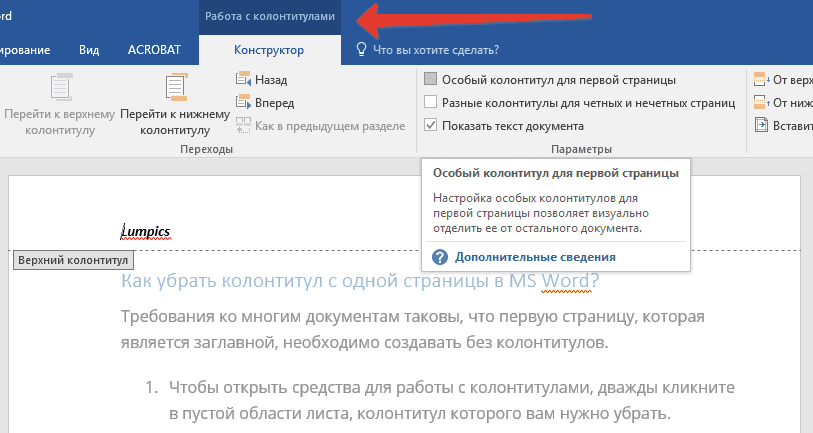
1. To open the tools for working with headers and footers, double-click in an empty area of \u200b\u200bthe sheet, the header of which you want to remove.
An automatic page break is inserted at the end of the page when the page style uses a different "next style". You can apply "manual page break with or without page style change." Once selected, you can enter a page break with or without a style change or with a page number change.
- Select "Edit" from the context menu.
- On the "Control" tab, you can see the "next style".
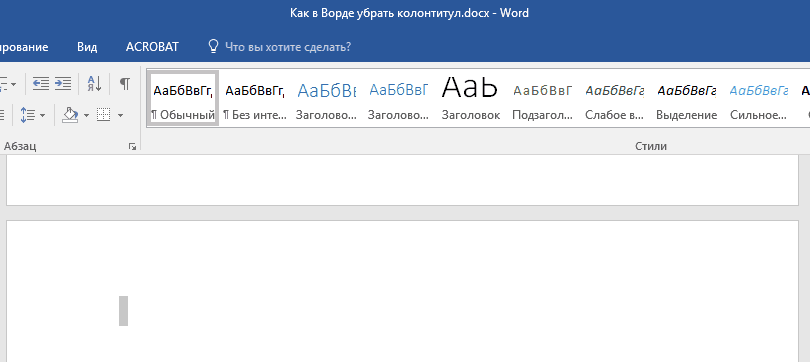
2. In the opened tab "Constructor"located in the main tab "Working with headers and footers" check the box next to "Special header for the first page".

3. Headers and footers will be removed from this page. Depending on what you require, this area you can leave it blank or add another header and footer exclusively for this page.
To apply a different page style to the first page
If you're just using a cover page with a different style from other pages, you can use the automatic method.
- Click on the first page of the document.
- Choose "View" - "Styles and Formatting".
- In the Style and Formatting window, click the Page Style icon.
- Double-click the First Page style.
Note:To close the window for working with headers and footers, you need to click on the corresponding button on the right on the toolbar, or by double-clicking the left mouse button on the area with text on the sheet.
How do I remove headers and footers not on the first page?
To remove headers and footers on pages other than the first one (this can be, for example, the first page of a new section), you need to perform a slightly different procedure. First, add a section break.
To manually change the page style change, follow these steps
Click at the beginning of the first paragraph of the page where you want to apply a different page style.
- Select "Insert" - "Manual Break".
- The Insert Break dialog box appears.
- In the Style list box, select a page style.
- You can also set the New page number.
Menus are very important tools as they make it easier and faster to navigate through the pages of a website. We will see how to create new menus, insert them into theme poses, add new elements and sort them according to the desired sequence. As we learned in the previous lesson, static pages, although rarely modified, should in most cases occupy an important position on a website. Think about who we are: it is a kind of showcase through which our companies are shown to end users.
Note: It is important to understand that a section break is not a page break. If there is already a page break in front of the page from which you want to remove headers and footers, it should be removed, but a section break should be added. The instructions are outlined below.
1. Click in the place of the document where you want to create a page without headers and footers.
An extraordinary content-rich tool that can tell our story, our roots, our services and our mission. He agrees that this page, like many others, should be easily accessible to the user. It is for this reason that every site that respects highlights a menu, that is, a collection of links to the main pages.
The purpose of the menu is to provide better navigation in your own portal, making it easier for the user to find information and improving the usability of the site. From this it follows that menu items should point not only to the most important static pages, but also to any categories and articles.
2. Switch from the tab "The main" in the tab "Layout".

3. In a group "Page settings" find the button "Breaks" and expand its menu.
The menus are divided into horizontal menus and vertical menus. Horizontal menus, most often used primarily on the latest generation sites, are usually located close to the header and are named so because the links are horizontally aligned. Conversely, vertical menus are usually placed in the side column of pages and link in a vertical list.
Menu creation and positioning
The choice of location and type of menu depends, of course, on the chosen theme. In this tutorial, we'll see how to activate menus and enter voices that resemble the main pages of the site. Connect to the back office, and in the side menu, go to the "Appearance" section.
4. Select an item "Next page".

5. Now you need to open the mode for working with headers and footers. To do this, double-click on the header or footer area at the top or bottom of the page.
Then click on the menu item. The control map is very simple and intuitive. Let's immediately notice that since there is no menu, all features are disabled. So let's get down to creating a new menu. We enter in the name of the menu the name that we want to associate with the created list, and click the "Create" button. A message will tell us if the process was successful and, if successful, all features will be activated automatically.
On the left side of the board, the Object Location function is available. The field lists all the positions that you can enter into the menu. If a theme implements multiple locations for menu placement, it is obvious that you will be able to create multiple lists, each of which will be organized at different points on the page. Select the menu item you just created from the drop-down menu and click Save. Thus, we have assigned a specific menu item to a given location in the theme. You just need to customize the list by adding all the links of interest.
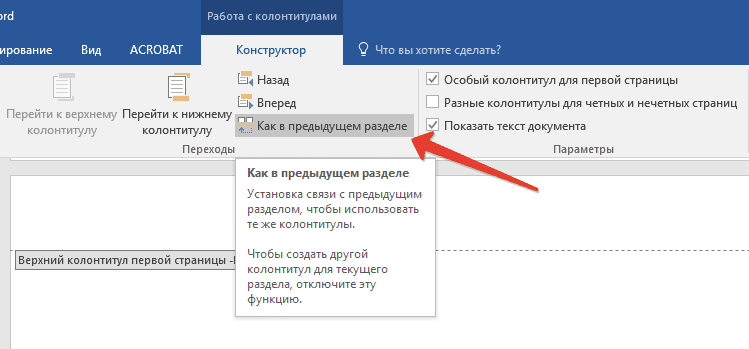
6. Click "As in the previous section" - this will remove the link between the sections.
7. Now select the item "Footer" or « Page header» .

As we expected on the home page of this tutorial, the menu is intended to make it easier and faster for users to browse through the portal. For this reason, it is essential that the entries it contains point to strategic sections of the site. A Custom Link widget is available in the left column of the Menu tab. With this application we can enter a menu item pointing to an external link to our site. Click the Add to Menu button.
At this moment, the first menu item will appear in the middle window. If we want to add a link to the internal page of the site, go to the "Pages" field. We can choose to view newly created pages, all pages of the site, or search for the page of interest by entering a title. Find the page you want to insert, click the checkmark and click "Add to Menu".
8. Select the required command from the expanded menu: Remove Footer or Remove Header.
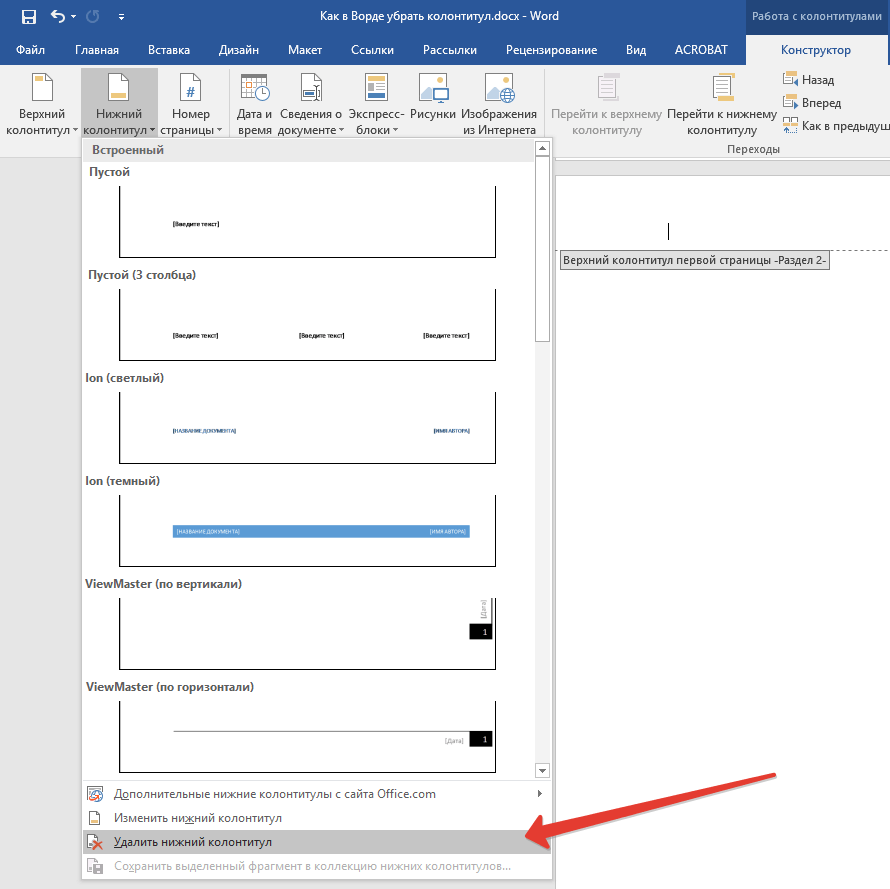
Note:If you need to remove both the header and footer, repeat the steps 5-8 .
Sorting and removing menu items
Again, we will see a second menu item in the middle box. To insert a link to a category, go to the same window and follow the same browsing procedure for pages. Let's see how to customize the items inside the menu. After you fill in all the links of interest, see how to organize them in the menu.
For example, in the picture below, the last entry you entered is a sample page. To edit or remove a menu item, click the down arrow. The box will open completely, showing the basic communication parameters and entries "Delete" and "Cancel".
9. To close the window for working with headers and footers, select the appropriate command (the last button on the control panel).

10. The header and / or footer on the first page following the break will be removed.
If you want to remove all the headers and footers that follow the page break, double-click on the header and footer area on the sheet where you want to remove it, and then repeat the above steps 6-8 ... If the headers and footers on odd and even pages are different, you will have to repeat the steps for each type of page separately.
Page to inform us
Once the graphical aspect of the portal is over, in the next tutorial we will define the categories and insert the first articles. In the previous tutorial, we learned how to install and configure a theme to change the graphical aspect of an e-commerce portal. We will then introduce the concepts of modules and placement, which will be best explained in the next lesson. Like any site you respect, even an e-commerce portal is required to enter a company presentation page. It is good that the description highlights the strengths of the company and indicates why the client should rely on our e-commerce in favor of the interests of a direct competitor.
That's all, now you know how to remove a footer in Word 2010 - 2016, as well as in earlier versions of this multifunctional program from Microsoft. We wish you only positive results in your work and training.
A header or footer is a text string containing information related to the publication that appears on each page. Usually a header or footer is placed near the top of the sheet, but it can also be placed at the bottom or side of the sheet. The footer can contain the title of a book, chapter, or information about the author.
Clarity, simplicity and transparency: these are key concepts that need to be communicated to clients for success. Complete installation software already includes some sample pages that you can edit and customize. The top of the screen displays a list of categories that should be associated with separate pagesspecified in the box below. We immediately notice that there are five sample pages. To change who we are or bring to the appropriate line, click on the "Edit" icon on the left.
We will have access to the configuration screen. In the "Meta name" field we leave the name "Who we are left unchanged". This is the title that will be associated with the page and will appear in the header of the browser tab. In the Keywords field, we include the main terms that represent our business.
The Word text editor supports headers and footers and provides the user with a lot of tools to work with this function. These tools work fairly predictably and usually do not cause any difficulties for users. However, there is one problem with headers and footers in Word, users very often cannot figure out how to remove a header and footer in Word. We will talk about this in this material.
In the text box below, we include the content of the page. In fact, you can include text in bold, italic, italic, underline, images, etc. After writing the business presentation and mapping some image, let's set up the Show feature and click Save to make the changes you've made.
Other main pages of the site
You can link a category on each page. Below we can see how to create a category "Information" with which we will link to all pages satisfied with information related to the trade portal. At this stage, we are ready to edit all the other pages of our site and associate each of them with the corresponding category.
How to remove a header or footer in Word 2007, 2010, 2013 or 2016
If you are using a text editor Word 2007, 2010, 2013, or 2016, there are several ways to remove headers and footers. The easiest option is to double-click on the header and footer on any country of the document. Word will then allow you to edit the header and footer. Select with the mouse all the text in the header and press the DELETE key... After the header is removed, just double-click on the empty space of the sheet. This will remove the headers and footers from all pages of your Word document.
Another way to remove headers and footers is that you you need to go to the "Insert" tab click on the "Header" button (or "Footer" depending on which header you are using) and select the menu item "Delete header".

It should be noted that if different headers and footers are used for different sections of the document, then you can delete headers and footers from only one section at a time.
How to remove headers and footers from the first page in Word 2007, 2010, 2013 or 2016
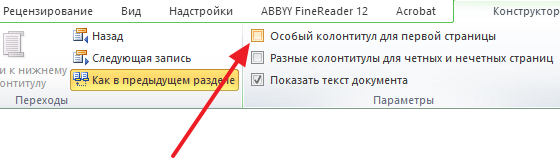
Sometimes it becomes necessary to remove headers and footers only from the first page. This is easy enough. For this double click on the header and footer on the first page and go to the "Constructor" tab. Here you need to check the box opposite the function "Special header for the first page".
After enabling this function, the header and footer disappears from the first page of the document. After that, just double-click on an empty space on the sheet to exit the editing mode for headers and footers.
How to remove headers and footers in Word 2003
If you are using a text editor Word 2003, then you will have only one way to remove headers and footers. First you need to go to editing headers and footers. For this open the menu "View - Headers and Footers".

After that, a floating panel for editing headers and footers will appear. Now you you need to select the text in the header and delete it by pressing the DELETE key.
![]()
After the header and footer has been removed, click on the "Close" button.