How to make a landscape view of a page in a Word. All ways: How to make an album page in Word. How to number pages in Word
If you create in Microsoft Word files with a large number of pages, it often becomes necessary to move one or more sheets to another location. For example, these are reports, term papers, a diploma. And it doesn't have to be a lot of pages. For example, you made a crossword puzzle, and then decided that first it should go, and then the questions themselves - which means that you need to put a sheet with the crossword puzzle in front of them.
To help you determine the page you want to open, information entered in the Drawing Properties dialog box is available in the Open dialog box. From the Views menu in this window, click Properties and the program will display all the properties of the page presentation.
ABOUT different ways save the project. Page Properties: The first time you save a page, you are prompted to save information about the properties of the drawing page, such as title, author, keywords, description. If you enter this information when you open the page later, the description and other information appears in the Open dialog box. Project Preface: You can save the drawing project as a preface, or the first page, or all pages of the drawings to better identify the project before opening it. Saving a drawing project for the first time.
And here the question arises: how to transfer so that what is printed in the document does not move and remains in place. In this article, let's figure out how you can swap the pages in the Word and, at the same time, not disrupt the placement of the rest of the information.
We will use ourselves in a simple way Is copy-paste. But before you start, you need to add section breaks to the text, and then you don't have to worry that everything printed will crawl somewhere.
Forms show different ways changing their appearance, namely: connection points. Some shapes have connection points where you can insert one-dimensional shape endpoints such as a connector. Connection points and connection method of two forms.
An example of a shape with a specific control handle. An example of creating a semicircle starting from a line drawn with the Pencil tool. Using the eccentricity knobs. Rotate grips: Appears when a shape is selected with the Rotate tool and indicates where to draw to rotate the shape. The center of rotation is marked with a pin that can be moved to change the center of rotation.
The article, I already wrote. You can read it by following the link.
Because breaks do not appear in your document, you must turn on the visibility of nonprinting characters. On the "Home" tab, click the button, or use the key combination "Ctrl + Shift + 8". They are turned off by pressing the button again.
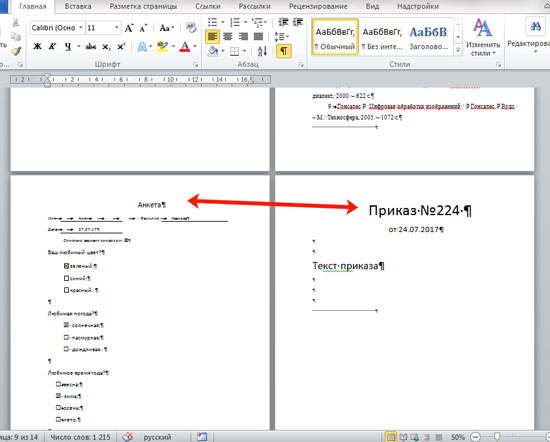
For example, let's swap the order and questionnaire pages. Need to add clear sheet after the content and before the questionnaire, and then insert the necessary there.
Rotation mode of any shape. Some shapes, including all connector types, have start points and end points. Illustration of selection handles and extreme points on shapes. Removing vertices can change the number of segments in a shape and therefore its appearance. Operations performed on vertices on a rectangle.
Select all forms on the page. From the Edit menu, choose Select All. If there are more than 25 forms on the page, they will appear in a purple line, indicating that they are selected. Choice of any detail. Select the page you want to copy. Perform one of the following actions.
On the page after which we add the blank, put italics on the last line. Next open the tab "Page layout" and click on the small arrow on the Breaks button.
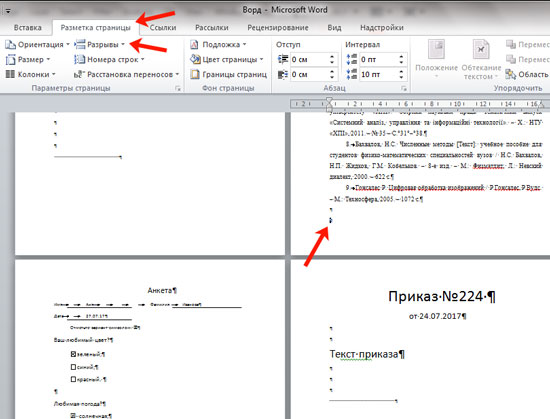
From the drop-down list, select "Next page".
To create an offset copy of the shape, on the Edit menu, click Duplicate. Copy and paste shapes from an existing drawing into a new drawing. In an existing drawing, select the shapes you want to use in the new drawing, and then on the Edit menu, click Copy.
Check in the new drawing, choose Copy from the Edit menu. Removes a shape from a drawing page. Click the Pointer tool, and then click the shape you want. Drag the shape to the desired location on the page. Select the shapes you want to move, then place the pointer in one of the shapes. If one of the objects you move is a group, the pointer will not look until it is positioned over one of the shapes in the group.

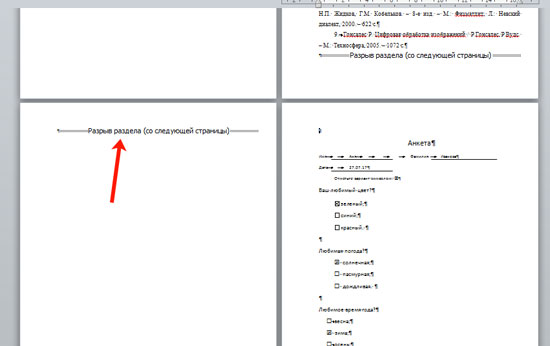
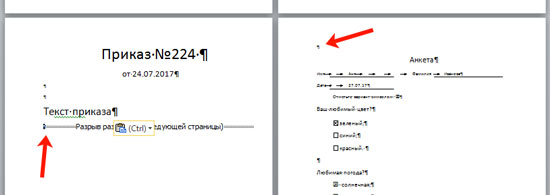
Now a break will be added in the place we need. Go to the next sheet and press "Enter" in a blank line to add another line.
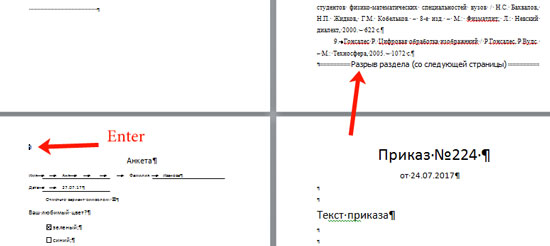
Do not touch the flashing italics, and add another section to the document in the same way as described above.
Then pull the shapes to a new position. Bringing "from close to closing" form into position.
- Select the shape you want.
- Do one of the following.
Align shapes to a specific position. Draw shapes at the chosen position. Specifying the coordinates of the form. Aligning forms in the primary form. With this option selected, you can move all of the shapes and keep them aligned by selecting and moving the guide. Rotate a 90-degree shape: Do the following: From the Shape menu, choose Rotate or Flip, and then click Rotate Left or Rotate Right.
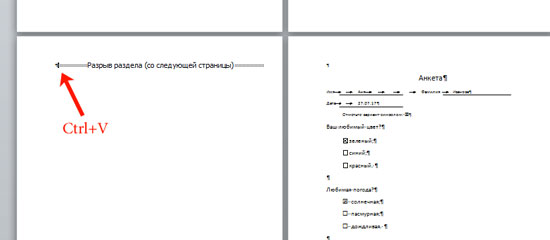
Open the sheet you want to transfer and highlight everything printed on it. Then you need to either cut it - "Ctrl + X" (the text will be cut from the sheet), or copy it - (everything you typed will remain).

We return to the created blank page and click the mouse in front of the inscription about the gap. Paste the copied fragment -.
Rotate the shape with the Rotate tool. The shape will rotate around the pin. Rotate the shape by inserting a rotation angle. To rotate the shape to the left, you enter a positive value and to rotate it to the right, a negative value. Reversing orientation or flipping a shape.
For 2D shapes, from the Shape menu, choose Rotate or Flip, and then Flip Vertically or Flip Horizontally; for figures. Select the shapes you want to group. From the Shape menu, select Grouping and then Group. To ungroup shapes, select a group and do the following: Group Shapes. Ungroup or ungroup shapes.
The order sheet will be in the right place. To remove the line occupied by the inscription about the break, put italics at the end of the text, in the example after the word "order", and press. If an extra line appears on the next page, click on it and press the same button.
Adding a form to a group. ... Select the shape and group you want to enter. From the Form menu, select Grouping and then Add to Group. Removing a shape from a group. ... Select the group and click the shape you want to remove from the group. From the Form menu, select Group and then Remove from Group.
Change the group setting to accept the new group forms. ... Select a group. From the Format menu, choose Behavior. Click on the form to add to the group and from the Format menu select Behavior. Determination of shape characteristics. Format, click "Special". If Type is specified as a group, then this form is a group.
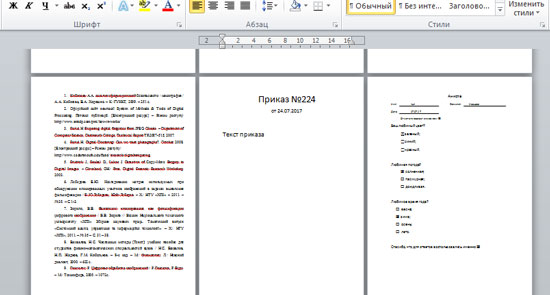
After that, everything printed will be located on the sheets as expected.

This is how we moved the page with the order to another place in the Word document. And thanks to the creation of sections, the text did not move and remained in place.
I will end on this. I think, using the described method, you also succeeded.
Editing a group in the group window. From the File menu, choose Open Group. Change the shape you want in the window group. To save your changes and return to the drawing window, click the Close Window button in the group window. Choose 1-dimensional or 2-dimensional shape.
Reconstruction of the shape by moving the vertex. Click on the vertex you want to move. When the pointer comes out just above the top, it will change its appearance. When a vertex is selected, it turns purple. Drag the vertex to the desired position.
Choose a spring or shape that contains the bow. Click on the arc control point and pull it until the bow gets the desired look. Changing the eccentricity of the spring. ... Press down on the spring reference point for the eccentricity handle. Performs one of the operations: to change the eccentricity of the arc, pull the eccentricity lever further or closer; to change the eccentricity angle of the arc, drag around the control point. Creates a free curve from several lines.
To design a document professionally, you need not only to understand how to customize the appearance of the text, but also to know , how to do it in Word landscape page.
Through word programs from the Microsoft Office package, you can design any type of document by applying to it different styles, formatting objects. Thanks to a word processor, you can significantly save time when editing large files and texts.
Select the created multiple lines. Blocking forms from selection. You can also enter a password for individual access to a new edit of the drawing.
- Select the shape you want to protect.
- In "Format" select "Protect".
They will follow the same steps as above. To protect or not to protect the properties of the form. Enhanced protection of the drawing project. From the View menu, choose Drawing Explorer Window. If the project is not password protected, right-click the project name and select Protect Document. All project pages will be protected. ... Unlock forms for selection.
Creating a landscape orientation in Word 2003
IN old version Word process of changing some parameters of the page is significantly different from new editions. That is why you should consider how to change the position of the page in this case.
Follow the instructions to change the orientation to landscape:
- In a new document, open any page and select the menu item on the toolbar called "File". Then open a window in the drop-down list to change the parameters;
- In this window, you can manually adjust the size of the margins, determine the size of the paper used. To change the position, find the corresponding field and select landscape, as shown in the picture above.
Remember! In the old version of Word, after changing the orientation of the page from portrait to landscape, it is imperative to change the margins, because the text will move and go beyond the edges of the sheet.
Right-click the drawing page name and select Protect Document, then click in the Shapes fields to deselect. From the Format menu, choose Protect, then click Select to remove the selection. Set the distance between the grid lines.
Sets the grid spacing in variable or fixed mode, following one of the steps. Fine adjusts the minimum distance between the grid lines, and the coarse one is smaller. For a fixed grid, in the Horizontal and Vertical grids list, select Fixed. For the minimum interval, enter the desired interval. ... Setting the units of measure for the ruler and subdivisions.
Changing orientation in Word 2007 document
This version of the word processor "Word" is the first to receive an updated user interface.
Now the program menu items on the toolbar are divided into logical blocks: for formatting the appearance of text, transforming markup, working with tables, pictures and other tabs.
To set the ruler units, follow these steps: On the File menu, choose Page Setup, and then click the Page Properties button. Select the shape you want to change. If the shapes are part of a group, select one or more shapes in the group.
From the Format menu, choose Text, Line, Fill, Drop Shadow, or Rounding Angle. Select the formatting option you want. Make sure the form is not selected. From the Format menu, choose Text, Line, Fill, Drop Shadow, or Rounding Angle. Adding a new color to the list of colors.
To change orientation in this version of Word, follow these instructions:
- Open the required Word file and find the page markup tab on the toolbar;

- Select an orientation item. A drop-down list will appear. Select the required type. After completing this action, all pages will become landscape pages;
You may also find it helpful to read these articles:
Change the shape, and then from the Format menu choose one of the Text, Line, Fill, and Drop Shadow options. At the end of the Color list, select Additional Colors. In the Colors dialog box. If you delete all shapes of a specific color, then save and close the drawing page, the specific color will be removed from the color list. Change colors in the color palette.
Changed colors appear in the color palette and in the Color list box in the Type, Line, Fill, and Drop Shadow dialog boxes. Any colored shapes in the original color change color. From the Tools menu, choose Color Palette. In the list of colors, select the color you want to change. Click the Modify button and do one of the following: In Standard Selection mode, select one of the base colors or Custom Selection mode to define your own color.
- Create and Insert a Formula in Word - Walkthrough
Album view in Word 2010 and 2013
Since all newer versions of Word have a similar interface, the orientation change is the same. For greater clarity, we will give an example of replacing the page position in new versions of the Word.
To make the plot available only on the current drawing page, from the View menu, choose Drawing Explorer Window. To save a template with an existing stencil so that you can open it on any drawing page, open the stencil. To create a new stencil to save a specific template, follow these steps: From the File menu, select Stencils and click Create Stencils. Click the Stencil Shortcut icon and select Drawing Explorer Window.
- Then click the icon in the title bar of the stencil and select Edit.
- Click again on the title icon and select "Drawing Explorer Window".
- Open the layout tab;
- Select landscape from the drop-down menu of the orientation field.

How to make only one page landscape
Word also has the ability to change the orientation of only one page of the document, for example, the second:
In the Details section, in the Name field, enter a name to print, and then select the desired print type. In the Behavior section, do one of the following: To adjust the template when you edit the drawing page scale, select the Scale check box. Line pattern or end of line unprotected will adjust to line thickness.
In the drawing explorer window, open the appropriate folder, right-click the new stamp and select Edit Template. Create the shape or shapes that you want to designate as a template. Click the "Close Window" button and then "Yes" to change the template.
- Open the page layout tab;
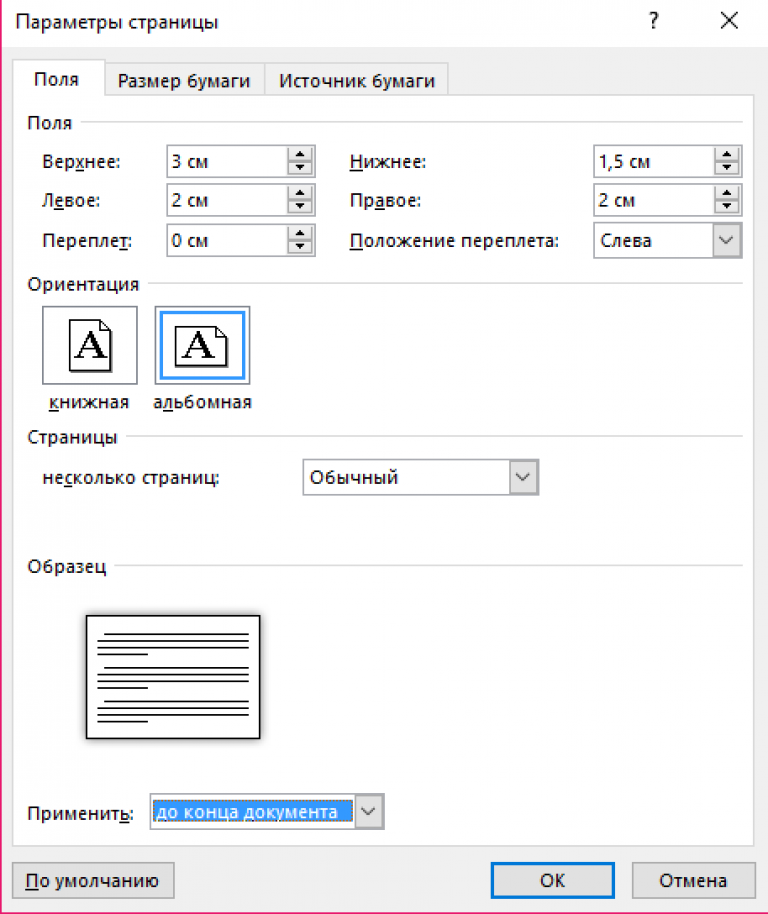
- Click on "fields" and in the window that appears, select custom fields. A separate window will open;
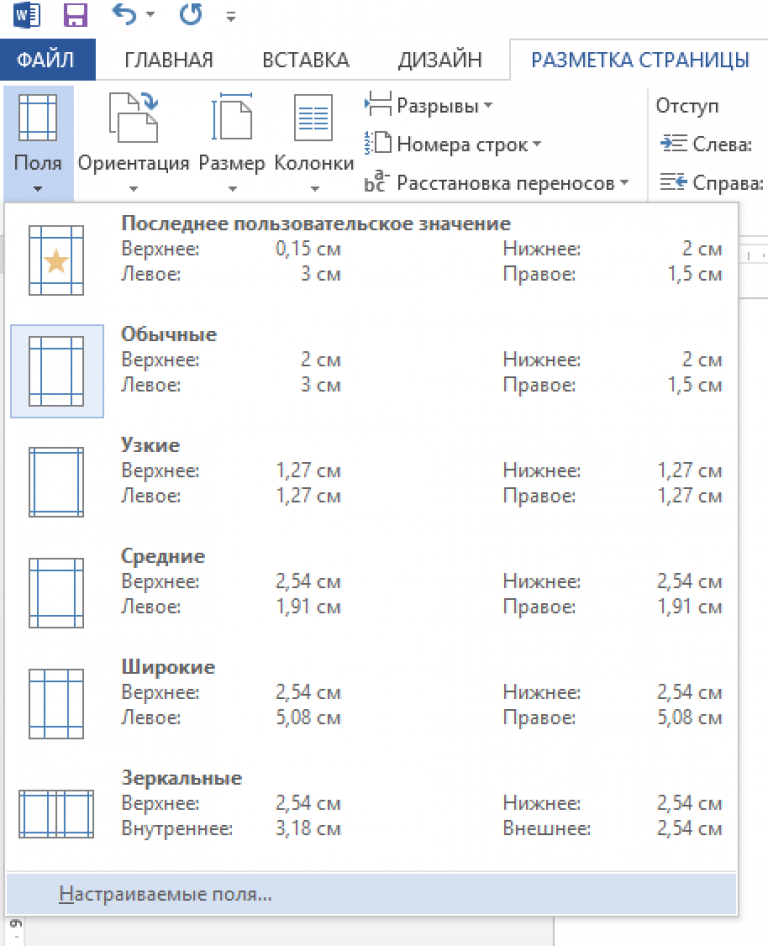
- In the window that appears, select landscape orientation;
- In the Apply field, select to apply to the end of the entire document. This way you can make several pages landscape. To make a few more pages with a book view, select the necessary sheets and follow the steps indicated in paragraphs 1-3.
Setting orientation for a single sheet