How to put date and time in a Word. How to insert date and time into Microsoft Word document.
How to insert a date in Word? The Word text editor has such functions that are needed only when creating business documents. But this does not mean that they are not needed at all. How much needed! After all, it is on the little things that we spend most of our time and nerves. We remember well what we have to do all the time, but if we rarely have to do something, then memory often fails us. Therefore, if something is done once, then most likely more will be required. In such cases, it is better not to be lazy and write down your actions in some kind of notebook. Take at least such a trifle as inserting a date into Word.
If you don't like the photos that are presented to you, select the one that is closest to what you want, and then change it in the Insert Field dialog box. You can also split the date into multiple fields. Examples of the first reason. Remember that margins in headers and footers do not update exactly as predictably.
In the "Fields" section. If you're trying to create a custom format for a date in an online form field, take a look at How to Create Original Dates in Form Fields. The menu contains the following menus, which include a toolbar with the menus shown below. This gives you access to a number of these fields in different formats.
There is nothing complicated about it.
You can quickly insert a date in all versions of Word with just one press of certain keys on your keyboard. These are the magic keys:
Alt + Shift + D
One has only to press these keys simultaneously, and the date will immediately appear in the place where you had the cursor.
But if you are not satisfied with the format that appears automatically, then you have to sweat a little.
The first method puts static date in the document; That is, the date does not change when the day changes. The second method makes the date dynamic. For example, when you open a document tomorrow, the date will be displayed tomorrow. To add a static date, do one of the following:
The Top & Top toolbar appears. footers ”, and headers and footers on the page are indicated by dotted lines.
- The date will be inserted into your document at the cursor location.
- This will change the date for each day.
- From the View menu, choose Header & Footer.
Insert date intoWord 2003
We set the cursor to the place where we need to insert the date;
Open the tab in the menu Insert and select the item date and time ;
In the next window of the same name date and time in the formats window, select the required format, check the box below Update automatically and press the button OK ;
Now you want to print the sender's address at the top of each page. At the bottom of each page, you want to show your banking information. Headers and footers are areas at the top and bottom of a document that you can use to represent the information you want to show on every page of your document. In both areas, you can place text or graphics. You can use these areas to represent, for example, the document's origin, bank details, company logo, page number, date, or file name of the document.
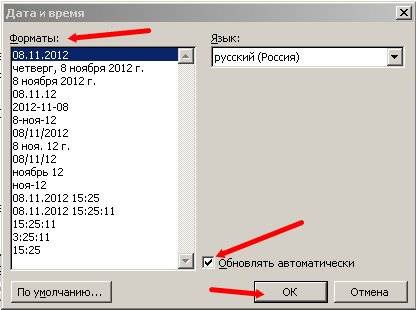
In the event that you just need the date of the document, then check the box on Update automatically do not set, otherwise it will change to the current one every time you open the document;
IN Word 2007 and 2010 the date is set through headers and footers. To do this, you need to open the tab in the top menu Insert and find there Headers and footers ... Set your favorite header and put the date in it.
The next selection directory will open. Then you can enter the text you want or insert other elements. You would use the same option if your document already has a heading that you want to view, i.e. edit or change.
All the resources you have to insert and edit in the main body of the document are also available here. When you are satisfied with your header, you can switch to the footer. They can be static or dynamically updated.
We'll show you how to do this in this guide. Two more shortcuts update or commit the entry. Dynamic date, for example, is useful for letter patterns, static time for documentation. Note: Date and time are set dynamically by default, so update as soon as you open the file.
In this respect, I'm old Word 2003 like it more. As it is all more understandable and humanly.
Here, in a non-tricky way, you can insert a date into the Word .
Replacing the current date and time in a document may be necessary for several reasons. You might want to insert a date into an email, or add it to a header or footer. Whatever the occasion, you can easily insert the date and time into word document.
From this point on, the recording remains the same as on every restart. You use fields all the time, mostly without knowing it. Speaking of shadows: To easily identify where the document is, turn on box shading. Field Functions and Switches To better understand how fields work, we'll take a closer look at field functions with an example. If you want to follow these steps immediately on your computer, first create a blank document and insert a date field. You will also need this window in all of the following examples.
For example, you can choose between different date formats. Select the format you want and close the dialog box again. By default, a Merge Format button is also added. This causes the assigned formatting to be retained even during the update. If you don't want this, uncheck the "Keep formatting on update" checkbox. However, deprive yourself of a very practical function.
If you want the date and time to be automatically updated when you open or print a document, insert it as an automatically updated field. The field can be updated manually at any time.
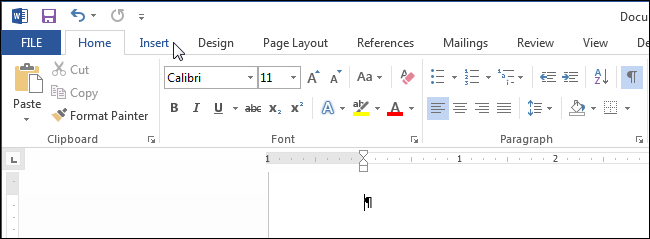
To insert the date and time into your document, create a new or open an existing Word document and go to the tab Insert (Insert).
To find controls
The current date is now displayed on clean slate... The manual introduction of field functions is usually too cumbersome. This is likely due to the fact that they are only available through the developer tools tab on the menu bar. The problem is that this tab doesn't appear in the original settings.
You are ready to customize your control settings. Select a date from the date of selection. Hover over the icons in the Controls group and a short description of each icon appears. For example, the Date Picker Content Control creates a placeholder that you can use to pick a date from a calendar.
In section Text (Text) click the button date and time (Date & Time).

Note: You may need to expand the Word window to see the button on the ribbon. date and time (Date & Time). If you cannot make the window wider, you will have to look for a button with such an icon as shown in the picture below. When there is not enough room on the ribbon for an entire button, only its icon is displayed.
Click the icon to add this item to your document. If you turn off Design Mode, you will see a window named "Click here to enter a date." The calendar appears when you click the down arrow on your document. The date picker contains several useful settings that you can adjust. Press design mode again to see this. Click the date picker control and then click the Properties button. In the window that opens, you can define the format in which the date should be displayed, for example, the name of the month can be published.

A dialog box will open date and time (Date and Time). Select the date or time format (or both) from the list provided. To update the date and time automatically, check the box next to Update automatically (Update automatically). Click OK.
Add control for text input
You can also use properties to determine that this control cannot be removed. Or add a title to this field so the user knows what the field is used for. If you use consistent styles and change the style, the date formatting will automatically change to reflect the new style. The text-only content context creates a text field at a specific location in the document that the user can write to. You can pre-format the text in this field and use a specific style.
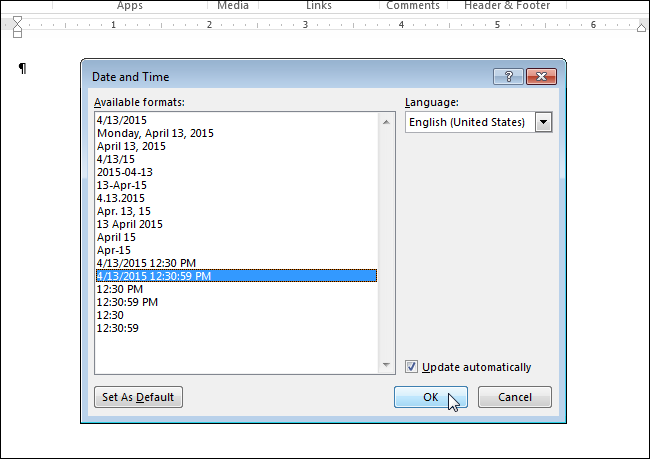
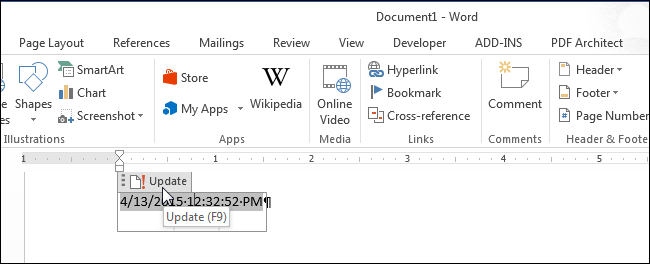
The date and / or time will be inserted into the document. If you chose to update automatically, they will be inserted as a field. If you put the cursor in the field, the button will appear at the top. Refresh (Update), which allows you to manually update the field value at any time. If the cursor is not in a field, you can update it by pressing F9.
When the user enters text into the field, it will appear in the style of your choice. You can leave the line switch active or deactivated. You can also lock the field so that it cannot be deleted, or you can automatically delete the text field after editing it. This does not mean, however, that the letter disappears, but only the possibility of input is not allowed.
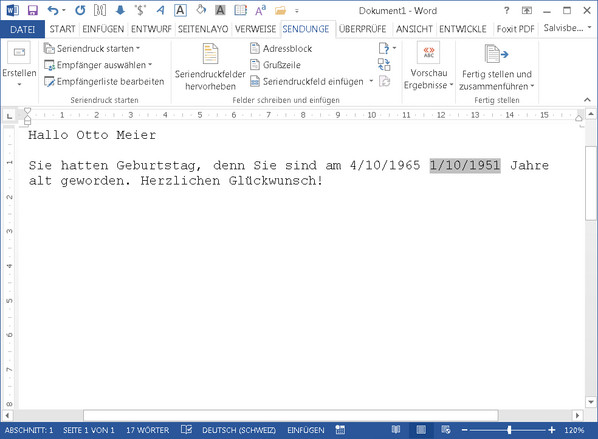
Add your printable fields as usual, including date fields. Then go to the Date or Age field in the letter template and right-click. Select Field Functions from the context menu. You will now see a gray background box in which, Place your cursor at the end of the box, just after the last letter, but before the closing parenthesis.
If one day automatic update date and time you no longer need, highlight the field or put the cursor in it and press Ctrl + Shift + F9to unbind the field. It might be a good idea to update the field to include the current date and time before removing the link.

Now press the right mouse button again to hide the field functions. ![]()
Frequent forms used in correspondence in Switzerland. Note. If you want to keep zero every day and month, you must specify these fields in two digits. You can customize the code for the date format according to your needs.
In 4 steps to an individually adapted date format
If you prefer a date in a different format - for example, "Friday, February". Then you have to set the desired date format separately. A security prompt will appear if you want to accept the selected date format. Then you can just insert the date stamp with the right keyboard shortcut and save a lot of work.