Non-printable characters in a Word. How to remove unprintable characters in a Word
Non-printable characters Word text editor are responsible for formatting text, sometimes they are called hidden characters. How these symbols appear and whether you need to know about them, we will talk about this in this article.
My acquaintances have repeatedly asked me to help in formatting the text, remove unwanted line breaks or text wrapping, etc. Problems. Such situations arise when the text is typed in another text editor (for example - OpenOffice.org Writer) or the text was copied from a site. In this case, you need to check the text for non-printable characters.
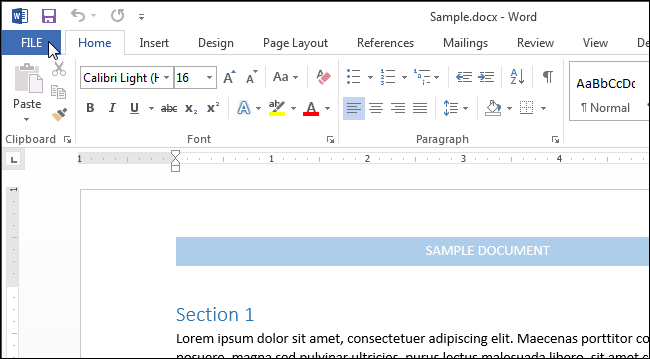
To display hidden symbols, press the button Show all signs on The main editor panel in section Paragraph... Additional characters appear in the text that are not visible during normal text input. It would be appropriate to give a table of common non-printable characters here.
| Symbols | Value | Key (keyboard shortcut), command |
| Spacebar | ||
| Enter | ||
| Tab | ||
| Shift + Enter | ||
| Ctrl + Shift + Spacebar | ||
| Page break | Ctrl + Enter | |
| Inserted into the document with the command: Page Layout-Section Breaks-Next Page |
Let's say when we press space (Spacebar) nothing is printed on the screen, but in fact a specific character is assigned to this key. The same happens when we press the key input (Enter) - at the end of a text fragment, a paragraph end character is placed.
Tab keyusually used to move to the next cell in a table, if you press Tab outside the table, the editor moves the cursor to the right several positions.
Symbol line break without paragraph break used to force the text to wrap on a new line within a paragraph. Additional indents that are used to highlight a paragraph in the text will not be added to these lines.
Symbol non-breaking space it is convenient to use in the case when two words should not be located on different lines. For example, we do not want the surname and initials to be on different lines, then we put a non-breaking space between them and we don't have to worry that they may appear on different lines in the text.
When the end of the page is reached, the editor automatically wraps the text to the next page. If you need to start typing a new topic from the next page, feel free to use symbols page break... To do this, press Ctrl + Enter or execute the command: Insert - Page Break.
Use in the same situations as page break. The difference is that different page formatting options can be used in each section. A section break is useful when you need to set a different page orientation (portrait or landscape) for pages within the same document.
Do you think this is what is called "obscene language"? Nothing like this. These are characters that simply cannot be typed in the Find box of the Find and Replace dialog box, and their correct name is non-printable. Try typing here, for example, a tab character: press the key
To search for special hidden characters, in the dialog box Find and replace click on the button More, then on the button Special (fig. 5.3). You will see a list different charactersthat Word can find, but which, as you can see, are damn hard to type (Figure 5.4).
Select any special character from this list, and its special, sometimes funny, designation will appear in the Find field (for example, At- for tabs). Click on the button Find Next, and Word starts searching for that character.
- Any character, Any digit, Any letter - can represent various information. These symbols are used as stencils of symbols in which you substitute the search terms you need.
- Cap Mark - Finds the caret character (l), which is a special character feature. If you just enter this character (L), Word will take it as a signal that a special character will be entered next.
- The paragraph mark (¶) is the same as the Enter character; you enter it at the end of each paragraph by pressing the key
- Tab character - Moves the cursor to the next tab stop.
- White space symbol - means any white space (space, tab, etc.).
Figure: 5.4. This list can be used to search for special characters
By the way, you can use special characters and normal text at the same time, i.e. if you need to find a word Numberpreceded by a tab character, enter a tab character (on the screen it will look like ^ t) using a list Specialand the word Number dial manually. It looks something like this:
^ tQuantity
You don't have to use the Special list if you can remember the list of service symbols. I refer to it all the time because I know that the ^ p keyboard shortcut replaces the key
- Paragraph mark ^ p
- Tab character ^ t
- Any ^ sign?
- Any digit ^ #
- Any letter ^ $
- Cover sign ^^
- Line break ^ I
- Page break ^ m
- Empty space ^ w
Besides the basic content, in word document there are characters that are not normally displayed on the screen. Some special word symbols uses for its own purposes. For example, characters that signal the end of a line or paragraph.
Word treats them as non-printable characters. Why display them in a document? Because when these symbols are visible, it is easier to understand the spacing and layout of the document.
For example, you can easily determine where you put two spaces between words or made an extra end of a paragraph. But to see the document as it will be printed, you need to hide these characters. We will teach you how to easily hide and display non-printable characters.
Note: The illustrations for this article are from Word 2013.
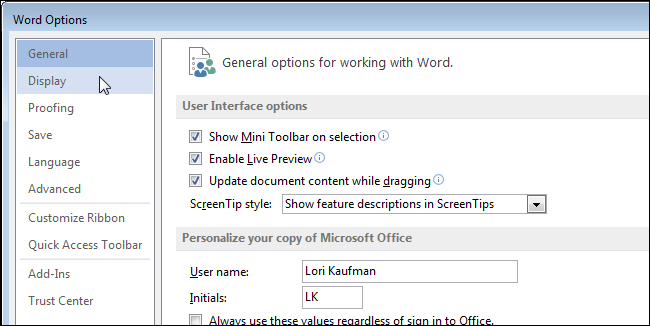
To display special non-printable characters, click the tab File (File).
In the menu on the left, click on Options (Options).

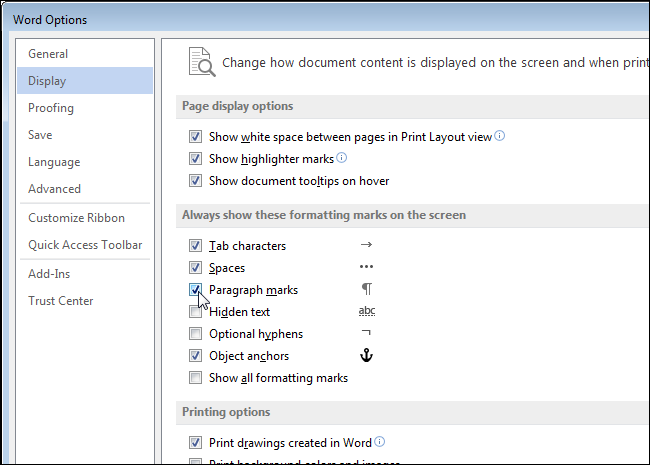
On the left side of the dialog box Word options (Word Options) click Screen (Display).
In the parameter group Always show these formatting marks on screen (Always show these formatting marks on the screen) check the boxes for the non-printable characters that you want to always display in your document. The (Show all formatting marks) parameter enables the display of all non-printable characters in the document at once, regardless of the above items.

You can also turn on the display of non-printable characters by clicking on the button that looks like an uppercase Latin letter P (only mirrored). This symbol is Paragraph mark... The button is in the section Paragraph (Paragraph) tab the main (Home).
Note: Reverse letter-like button P, performs the same task as the parameter Show all formatting marks (Show all formatting marks), which we looked at just above. Turning one on or off directly affects the state of the other.

Please note that the formatting characters you choose on the tab Screen (Display) dialog box Word options (Word Options) will be shown in any case, even if you choose to hide non-printable characters by clicking on the paragraph mark button.
When formatting and editing your work, it is helpful to learn how to view the text in non-printable character mode to correct incorrect or undesirable text formatting.
Non-printable characters (non-printable characters) - characters entered into the computer as a result of certain actions that allow formatting or fixing a certain structure of the document.
Working in the non-printable character display mode allows you to improve formatting or correct errors (remove extra spaces, paragraphs, tabs, etc.), as well as save you from "unpleasant surprises", for example, when you open a document file on another computer with other set parameters formatting.
Non-printable characters are not output when the document is printed on paper.
Turn on (turn off) display all unprintable characters :
Button Non-printable panel characters Standard.
· or Ctrl + Shift + *.
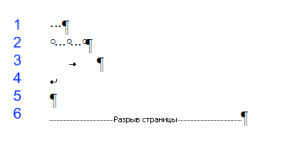
The most common are the following unprintable characters (shown in quotation marks "" their presentation on the screen when the button is turned on):
¾ « · "- sign spaces, inserted with the key Space... After pressing the key, the mouse cursor moves to the next position; when the button is off, characters do not appear on the screen.
¾ "¶" - sign paragraph, inserted with the key Enter... After pressing a key, the mouse cursor moves to the next line at the beginning of a new paragraph. When the button is off, characters do not appear on the screen.
¾ « → "- sign tabs, inserted with the key Tab... As a result, the mouse cursor moves to the next tab stop. When the button is off, characters do not appear on the screen.
¾ "º" - sign non-breaking space, inserted Ctrl + Shift+ (space). As a result of pressing a key combination, the mouse cursor moves to the next position. When the button is off, characters do not appear on the screen. Can also be inserted: Insert - Symbol - Special Characters - Symbol: non-breaking space - Paste.
¾ "-" - sign unbreakable hyphen, inserted Ctrl + Shift+-. As a result of entering a character, a normal-looking hyphen is inserted into the text. Can also be inserted: Insert - Symbol -Special symbols , select Symbol: non-breaking hyphen - Paste.
¾ "" - sign soft transfer, inserted Ctrl + -.After pressing the keys with the button off, no visible changes in the text occur. Can also be inserted: Insert - Symbol -Special characters, select Symbol: soft transfer - Paste.
¾ "¤" - symbol end of cell tables, that is, a sign that delimits information in a table cell on the right, or a symbol end of line tables. It is entered automatically when creating a table and is visible only when the button is enabled. You cannot remove this sign.
¾ "" - sign line break, inserted Shift+Enter.As a result, the cursor moves to the beginning of the next line of the same paragraph.
¾ "" - sign page break, inserted Ctrl+Enter.As a result, the cursor moves to the beginning of the next page. Can also be inserted: Insert - Break - Start: new page - OK or Enter.
¾ « ![]() "Or" "- sign section break, inserted Insert - Break - Start: new section, specify parameters - OK or Enter. As a result, the cursor moves to the beginning of the next section in accordance with the options selected for it.
"Or" "- sign section break, inserted Insert - Break - Start: new section, specify parameters - OK or Enter. As a result, the cursor moves to the beginning of the next section in accordance with the options selected for it.
¾ "…… .." - underline with a dotted line means that this text - hidden... The hidden text is set: Format - Font - Font: mutate þ hidden - OK... Displayed when non-printable characters are enabled or - separately, if you check the Tools - Options - View: Formatting characters þ hidden text - OK.
Have you ever wondered, dear readers, what will happen to your text after typing? Will someone edit it? If you plan to print the text on paper, and then safely forget about it, then you do not need this article. If you are planning certain manipulations with the text (increasing / decreasing the font, increasing / decreasing the spacing between lines, etc.), then this article will be very useful to you.
Imagine a situation that the text you typed is changed: the font was increased. How will he look after such an operation? Will the beginnings of the sections shift? Sure?
To know the exact answer, you need to apply certain rules when typing.
First of all, enable the non-printable characters view mode.
The mode of viewing non-printable characters can be activated by pressing the button Show all signs»In the toolbar on the tab the main, in Group Paragraph( Ctrl + Shift + *) (see fig).
 Non-printable characters are:
- Space
- Non-breaking space
- Tab
- Force line completion
- End a paragraph
- Page break
- Section break
1.Space - everything is clear with this, it is needed to separate words from each other.
2. Non-breaking space... There are times when, when changing the text, the initials from the surname are torn off (appear on different lines). Non-expandable (non-breaking) space (hotkeys - Ctrl+ Shift + Space) does not break words in different lines between which it is inserted (it is convenient to use in cases: 2012; Petrov A.A., 234 rubles) and keeps the value of this space unchanged for any paragraph alignment (it does not stretch, unlike a regular space) ...
3.Tab... This is a large separate topic, so I'll write in detail about tabs here.
4.Force termination strings (Hotkeys - Shift+ Enter) used when you yourself need to complete a line within a paragraph; when you need to skip a line. After pressing the keyboard shortcut Shift+ Enter, no new paragraph starts!
5.Paragraph end key appears after pressing the key Enter... In this case, all the signs of paragraph formatting appear (spacing before, after, line spacing, and so on).
6.Page break... A very handy feature. It is used for large, several chapters, texts. If you want each new chapter to start with new page, you can achieve this in two ways.
1st method - as simple as the world, used by novice users - this is the key Enter. Clicked a certain number of times, reached a new page and you're done. Now imagine that several lines have been added to the first page of your text. What happened to all the new chapters? That's right, they have shifted. Therefore, it is better to use the second method. It consists in the fact that after each chapter a non-printable character is placed Page break using a keyboard shortcut Ctrl +Enter. After this symbol, all information will be located on a new page.
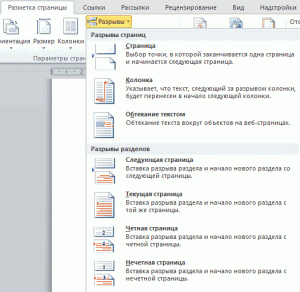 7.Finally, a very useful non-printable character - Section break... When is it needed? Let's say you have a large document that uses different Page settings (let's say two types of orientation - Bookstore and Landscape). If you change the page orientation, then it changes for the entire document. It remains to apply the section break. Tab Page layout, Breaks... (see fig). You can set a column break, section break, indicate where the next section will begin (on this page or not the next). In addition, the concept of a section is also used in setting page parameters, which can be applied to the entire document or only to a specific section.