The asus rt g32 router does not connect. Instructions for configuring wireless routers Asus RT-G32 C1, RT-NXX
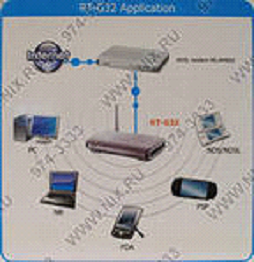
Now many home users have not one, but several personal computers... In order for every home computer (laptop, WiFi-enabled phone) to have Internet access, you can use a router.
Different router models are configured differently, but in general:
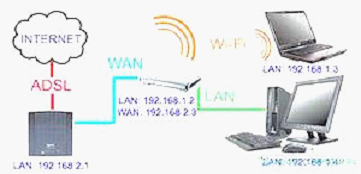
- The router has a "WAN" socket - a cable provided by your Internet provider is connected there,
- Several (usually 4) "LAN" sockets - you need to connect your home computers to them.
- If your router supports wireless wiFi connection (in this case, a small antenna is included with it), then it will be possible to connect a laptop or mobile phone (if they support WiFi connection) wirelessly.
Since a router is a device that allows multiple devices to share the network, it must be configured to work safely on the network. The factory settings do not provide an adequate level of security and are only used to ensure the initial operation of the device.
When using a router MANDATORY:
- change the password for accessing the router settings.
- set WPA or WPA2 authorization and WiFi access key.
- change the addressing of the local network of the router to 192.168.123.1 or any other not included in the network ranges 10.0.0.0-10.255.255.0, 172.16.0.0-172.22.255.0, 192.168.0.0-192.168.8.0
If you do not follow these steps, then anyone can connect to your router via WiFi and use the Internet at your expense. In addition, since the router shares the channel provided by the provider between everyone who is connected to it, the Internet access speed of your computers will decrease depending on how actively the "guests" of your router use the Internet.
In addition, by using a router with unsafe settings, you violate the laws of the Russian Federation and public interests protected by law, because provide communication services without an appropriate license and legal basis, which entails administrative and / or criminal liability .
Setting up a router
1. The setting address on Asus routers by default looks like: "192.168.1.1"
It must be entered in the address bar of the browser (Mozilla / Opera / Chrome / Internet Explorer)
Enter your login and password (Standard login: admin, password: admin)
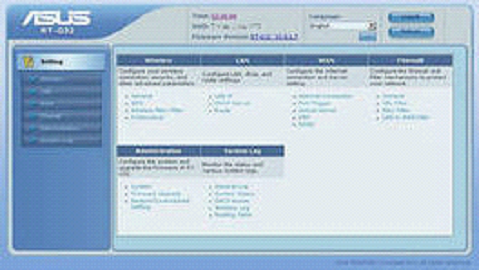
If everything is typed correctly, you will see a picture similar to this:
2. Since the addresses: 192.168.1.х are official in the Volkhov-Online LLC network and their use may interfere with the correct operation of the network, it must be changed. To do this, select the "LAN" item on the left. Then change the address of the router for example to "192.168.123.1":
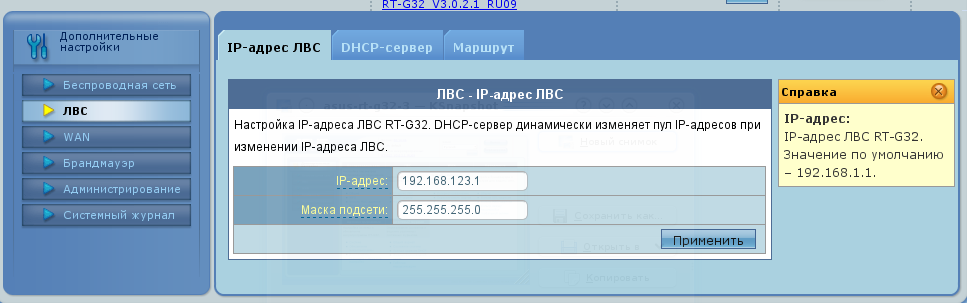
To save the changes, click the "Apply" button
After the router restarts, you will have to reconnect to the administration page by typing the address 192.168.123.1
3. If your router has WiFi functionality, you MANDATORY you need to configure the rules for accessing the wireless network, for this go to the item "Wireless network" -\u003e "General"
In the window that appears, match the data with the images.
In the "SSID" field, enter the name of your wireless access point (any name you like, from English letters and numbers, no spaces). By this name you will find your point on a laptop or other WiFi device /
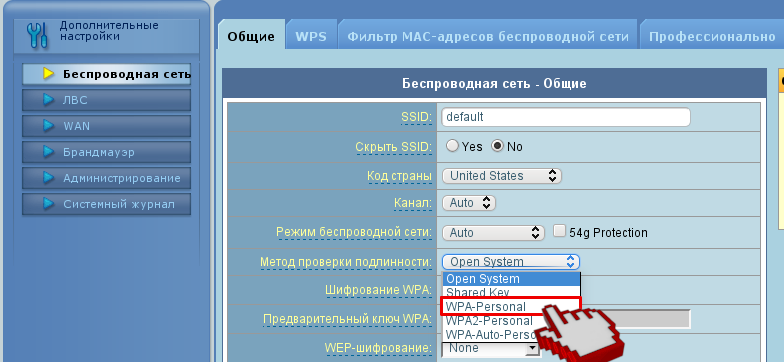
"WPA pre-shared key" you must set your own, Latin characters, numbers, and special characters ( [email protected]# $% ^ & *). You will use this key to connect your WiFi devices.
After completing the configuration, click "Apply".
If you do not perform these actions, your point will be available to an arbitrary number of those wishing to use your Internet access channel for their own purposes.
5. Internet connection is configured in the "WAN" -\u003e "Internet Connection" section

10. The last thing you need to do is change the password for accessing the router, for this you need to go to the Administration-\u003e System section:
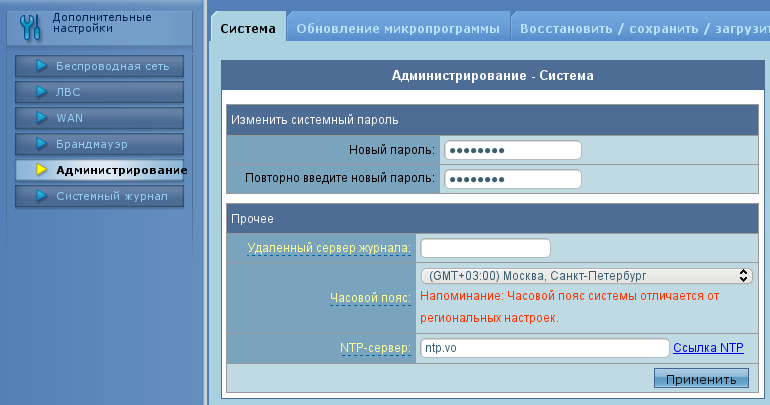
Enter a new password, confirm it and click the "Apply" button
The router is a representative of the budget category. It is clear that one should not expect special characteristics from him, however, he copes well with his direct purpose. In the material presented to you, the basic setup of the asus rt g32 router will be considered, but we will start, traditionally, with brief overview complete set, appearance and basic characteristics.
Rich package this device you can't name it, everything is standard for its price category, namely: device, power adapter, LAN cable, disk with software, and a manual with documentation.
Appearance and main characteristics
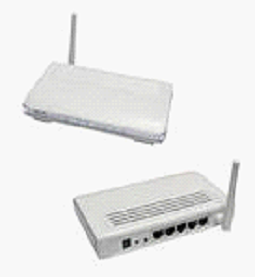
As for the appearance of the device in question, it is typical for the budget segment, but at the same time creates a pleasant impression. The color of the router is white (matte plastic, glossy front panel). It is worth noting the low weight of the device, about two hundred grams.
Setting up the asus rt g32 router is implemented intuitively and will not cause problems for inexperienced users. In addition, the included disk contains a program for quick setup, and the device itself, on the back side, has a button, one press of which will set up a Wi-Fi connection, with WPS protection technology.
As for the speed characteristics, here the router of stars from the sky is not enough, but for a standard connection at a speed of up to 20 Mbit per second is quite enough. The difference in speed between wireless and wired is not significant.
Here is a list of the functions implemented in the device asus rt g32 router:
- - NAT firewall;
- - IP address filter;
- - URL filter sites;
- - MAC address filter;
- - the rest, basic functions for routers.
- What we liked about the asus rt g32 router:
- - user-friendly interface, user-friendly menu, easy customization;
- - pre-installed protection against Internet attacks;
- - support for Internet TV;
- - the mode of operation of the router as a repeater of the wireless signal.
What did not like about asus router rt g 32:
- - small coverage area, which is a consequence of the low power of the Wi-Fi antenna;
- - for some reason, the power button is not implemented, as a result, failures have to be eliminated by rebooting.
As for the compatibility of the device with providers on our market, there are no restrictions. It's a pity that the frankly weak router processor can significantly reduce the connection speed when using encryption.
I apologize in advance for the offtopic, but the information below will be useful to someone. Analysis of user reviews for the asus rt g32 router: there have been cases of overheating of the device, the PPTP mode cuts the Internet speed to 2 Mb per second, when using a torrent client, freezes are possible, with certain settings or connections, the speed is limited to 150 Kbps. In general, it is not recommended to use this router for providers providing services via VPN protocol, since in such modes there is a slow and unstable operation. If you plan to use a high-speed tariff (more than 40 Mbps), then the asus 32 router is clearly not for you. The wireless coverage area is enough for a small room of 60-70 squares.
 connecting a router asus rt g32
 Configuring the asus rt g32 router
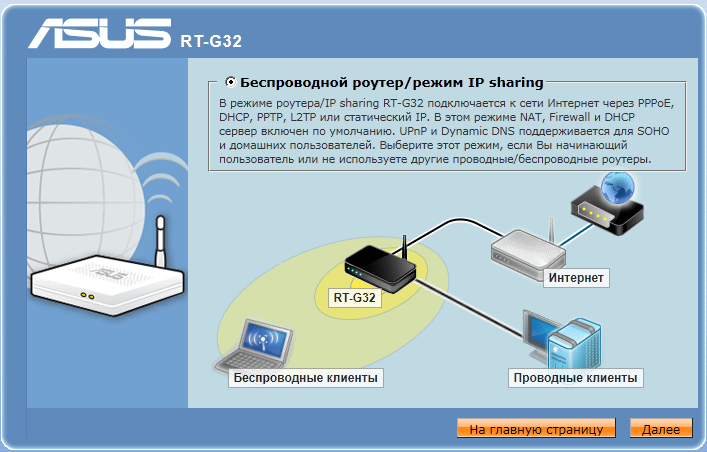
On this we will move on to consider the main aspect, namely: connecting an asus rt g32 router and its detailed configuration. The capabilities of the router allow you to work in various modes, of course, in some cases, you will have to change the settings of the wireless connection of the device so that it matches your conditions. With the help of the EZSetup program it is possible to set up the protection of the wireless network.
Installing an asus rt g32 router should not cause problems. It is produced as follows:
Wired connection. An Ethernet cable is included as standard. Since the router can detect a crossover cable, any cable can be used. Installation order:
- - using an Ethernet cable, we connect the modem to the WAN port of the router;
- - use another Ethernet cable to connect the computer to the LAN port of the router.
Wireless connection:
- - turn off the router and modem;
- - using an Ethernet cable, connect the modem to the WAN port of the router;
- - if there is no IEEE 802.11b / g / n WLAN adapter on your computer, you will need to install and configure it. In the default setting of the SSID of the router “Default”, the authentication system is applied open, and encryption will be disabled.
To install asus rt g32 router you may need a graphical interface. When you connect your computer to the router with a cable, the login page automatically opens. If applicable wireless connection, then you need to select a network:
- - go to the tabs: Start - Control Panel - Network Connections - Wireless Network Connection;
- - select the "Network" tab in "Choose a wireless network". We are waiting for connection;
- - after the connection is established, launch the browser.
With the question of how to connect an asus rt g32 router and install it, we figured it out. Let's move on to how to configure the rt g32 router yourself. We open any browser, in the address bar you need to enter: 192.168.1.1. After that, enter your username and password to it.
Login and password standard for all routers asus: admin-admin.
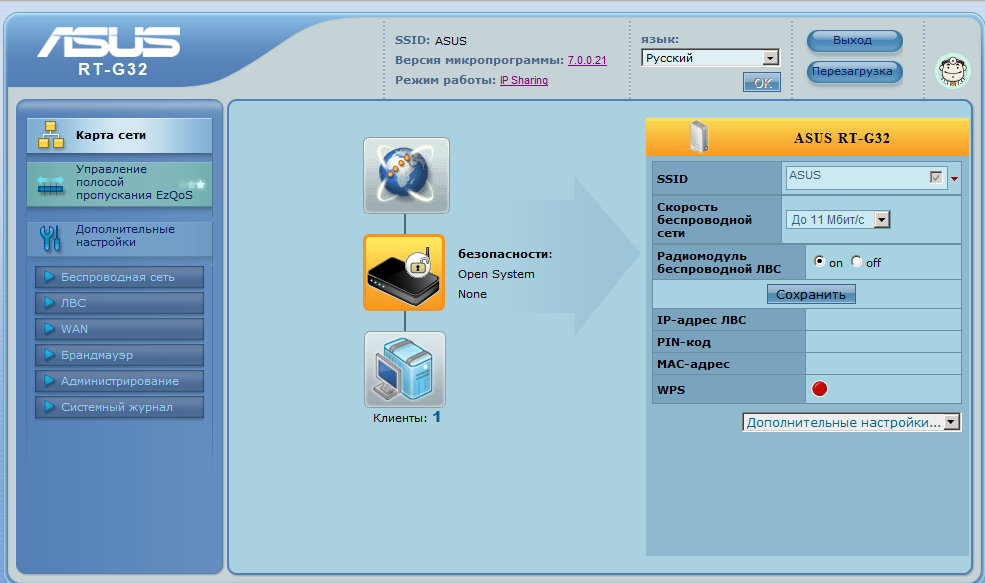
Web interface
After that, the main settings window should appear. First of all, you need to configure network access through a router on your computer. Go to the WAN settings tab, select its type, for example, L2TP. If at the "Completed" stage, the router hangs, and this happens, then in the column for selecting the IPTV STV port, put NONE.

For users with little experience, there is a mode for automatically configuring the WAN IP address. It is done this way: go to the network and access control center, there, in the local connection, in the properties, select "Automatic". After that, you will need to enter the login and password of the provider used, no one should have any problems here. The Heart Beat L2TP / PPTP server is similarly specified in the connection properties of the provider used. Then click "Apply". This concludes the consideration of the question of how to connect the rt g32 router.
Wi-FI setup
Next, we will consider how the rt g32 router is configured to work via a wireless network. Go to the "General" tab of the wireless network settings. Here you need to assign the network key: WPA-Personal - WPA-TKIP - "Apply". This is done to protect against unauthorized connection to the network. After that wifi setting the rt g32 router is now complete and the device is ready to work with the internet. To connect, you will need to select "Internet access" on the taskbar and connect to the configured network. Next, the key is entered.
Asus rt g32 router firmware
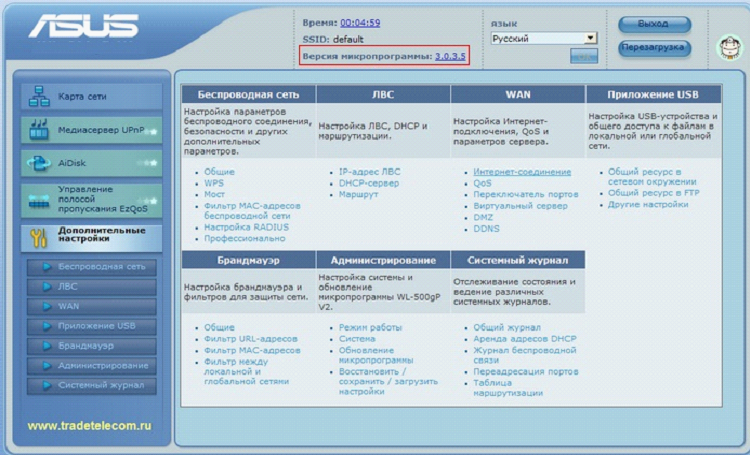
The thoughts of many experienced users of the asus rt g32 router are busy with how to increase its functionality. The easiest and most affordable way is to flash the asus rt g32 router. It is worth noting that the device in question is a real long-liver in the world of electronics. During its existence, it managed to go through two modernizations. The first model had an outdated Wi-Fi module. Latest version the firmware for this version is 3.0.2.1. Distinctive feature the second revision had a weak processor that limited the connection speed to 5 Mbit per second. The latest firmware version for this revision is 7.0.1.26. And finally, the third revision turned out to be the most successful. For this version, a good solution would be to install the firmware 2.0.2.6 to the firmware version 7.0.2.61.
configuring the asus rt g32 router
What software to install is everyone's business, we are also interested in how the rt g32 router is flashed. The sequence of actions is as follows:
- open the browser and go to the web interface. Let me remind you that it opens by entering the address in the line: 192.168.1.1.
- enter your username and password to it. The default admin is admin.
- then go to the router menu. In it, go to the following tabs: administration - update - firmware. Select the required firmware file, then click send. Then you just need to wait for the router to update.
Finally, a couple of lines regarding precautions when flashing the device wifi router asus rt g32.
In no case is it allowed to turn off the power while the router is updating the software. Keep in mind that if you turn off the power at such a moment, you will only be able to restore the router in service at the service center, in addition, note that the use of third-party software will automatically void the device's warranty service.
1. Connect the cable as shown in the figure. WAN cable - the incoming Internet cable (UTP cable ("twisted pair") with an RJ-45 connector at the end) is connected to the corresponding port WAN router, LAN - ports for connecting your computers:
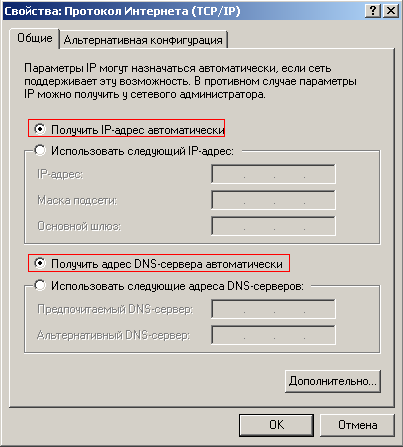
2. Go to the window for setting the TCP / IP protocol on your PC or laptop.
If you have Windows XP installed, go to Start - "Settings -" Network connections, then select Local Area Connection - right-click on it and select Properties. Then select the TCP / IP protocol and click the Properties button.
For Windows Vista / 7 - Start - »Control Panel -» Network and Sharing Center - »Change adapter settings, then select Local Area Connection - right-click on it and select Properties. Then select the TCP / IP protocol and click the Properties button.
As a result, the following window will appear:
3. Open a browser and enter the IP of the router: http://192.168.1.1 (the default IP address). Press Enter, enter your login and password in the authorization form (by default, login: admin, password: admin) and click OK:

If the router is turned on for the first time or has been reset to default settings, you can see the page:
In this case, just click the "Home" button.
4. Once in the web management interface, you will see the following window:
At the top of the window, you can change the language of the web interface by selecting desired language from the list and clicking OK.
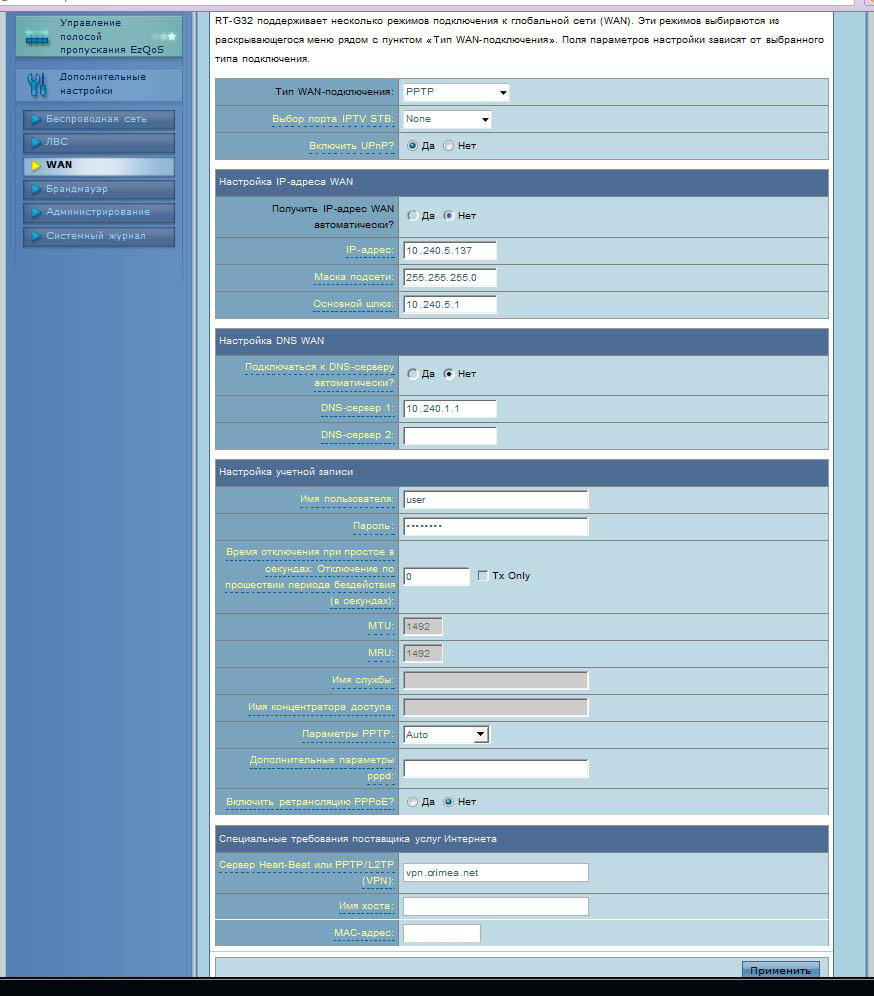
Fill in the fields in the subsections “WAN IP address setting” and “WAN DNS setting” (IP address, Subnet mask, Default gateway, DNS server 1) with the values \u200b\u200bgiven to you at the conclusion of the contract.
Examples of specified values \u200b\u200b(Your settings will differ from the ones below, correct values see your contract):
IP address: 10.240.5.137
Subnet mask: 255.255.255.0
Default gateway: 10.240.5.1
DNS Server 1: 10.240.1.1
Also specify the username and password (see the agreement), and in the Heart-Beat Server or PPTP / L2TP (VPN) line, specify - vpn.crimea.net.
After filling in all the values, click the Apply button below.
5.1. Adding routes - press the LAN button in the menu, select the Route tab.

Set "Use DHCP routes" - YES, "Enable multicast routing" - YES, "Enable static routes" - YES. Next, in the IP-address of the network or host, enter 10.240.0.0, Netmask - 255.254.0.0, Gateway - the value specified in the contract, Metric - 1, from the Interface drop-down list, select WAN. After entering all the values, click the Add button, and then the Apply button.
6. If you want to use to connect a PC or laptop with a router Asus wireless (Wi-Fi) connection - please go to the "Wireless" section.
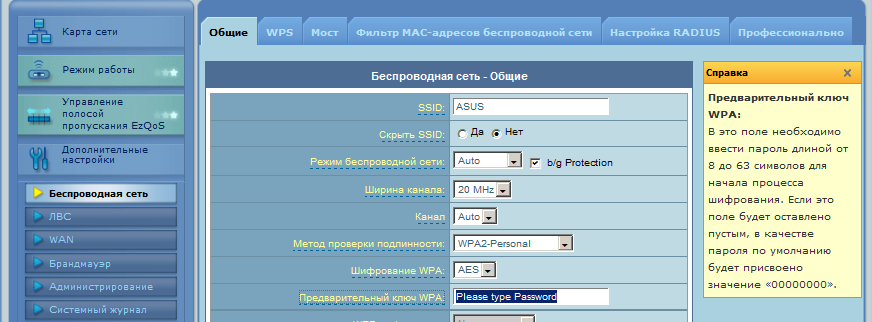
Here it is enough to select WPA2-Personal from the drop-down list in the "Authentication Method" field. Leave the WPA encryption value to AES. And in the "Pre-shared WPA key" field, enter a key from 8 to 63 characters long (the more difficult - the more reliable !!). Change the value in the uppermost field "SSID" as desired. After filling in all the values, click the Apply button below.
7. Next, configure the parameters of the wireless network adapter on your PC or laptop.
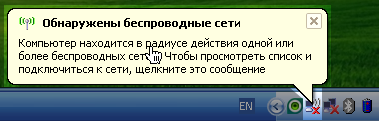
If your wireless adapter is enabled, there should be a corresponding icon in the lower right corner of the screen:
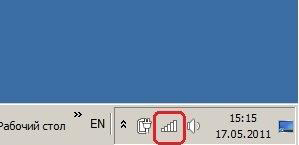
Click on the above icon and select your wireless network from the list (its name corresponds to the value in the “SSID” field specified in step 6). Right-click on the required network and select Properties from the context menu.

Here we make settings similar to those made on the router in step 6. Security type - "WPA2-Personal", Encryption type - "AES", Network security key - enter the same value as on the router in the "Pre-shared WPA key" field. After making all the changes, click the OK button. After that, your PC should connect to the selected wireless network. By clicking on the icon wireless networks in the lower right corner of the screen, we can manually connect or disconnect from the selected network by right-clicking, selecting Connect or Disconnect, respectively.