Correct reconfiguration of the router. Data for the router
To find out the data for organizing the connection of the router to the Internet, you need to enter the information provided by the provider on the settings page. But if you do not have such information, then what to do? In order to find out these data, you need to insert the Internet connection cable into the computer, removing it from the router (it is better to do all connections with the equipment disconnected from the power supply).
Go to the item " network connections"As well as on. There should be an item "local network connection" or "Internet connection", double-click on it. A window with connections will open.
There you select "Internet Protocol Version 4" by double-clicking on it. A window with properties will open.
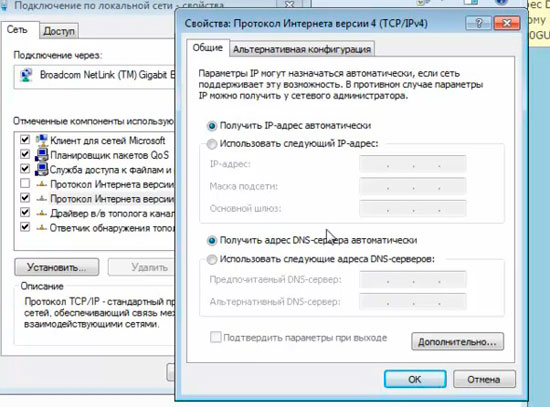
This image shows the option when everything is connected automatically, such a connection will be when you connect the computer to the router. And if you connected the Internet directly to your computer, then there should be some data that you will use to configure the router. You can also see an alternative configuration.

All information can be rewritten. After that, check the boxes "get IP-address automatically" and "Get DNS server address automatically", this is necessary to work with the router. By clicking "ok" you close open windows. After that, in the router settings window, you enter the received data.
Good afternoon friends! Today I have a very important topic that does not tolerate delay and requires your participation.
The guys from Dr. Web prompted me about the manifestation of the activity of a new virus and 2014-02-26 entering a new one into the virus database Trojan-Trojan.Rbrute, the purpose of which, consists in hacking Wi-Fi router ordinary users, such as you and me.
And right now we need change the settings of our Router!
Read the full article from the Dr.Web website on how Trojan.Rbrute infiltrates windows and what it can do.
I wrote in detail about Dr.Web anti-virus in, and at the same time, you will learn the trick how to get Dr.Web Security Space 9.0 for free for 90 days!
Damn it! Millions of ordinary people, ordinary Internet users, are exposed to the risk of infecting their system without even knowing it! I do not agree with this state of affairs and will strive to post information about such low and illegal activities ...
And already today, already now we will close his access to us once and for all!
This nit, unceremoniously gets into our computer, laptop, which we could not even think of and begins to manage, like at home.
In this connection, I considered it necessary to immediately notify you about this infection, with actions to practice, let's figure out what and how to do right now so as not to become a victim of Trojan.Rbrute!
What kind of Wi-Fi router do you have?
I want to note that Trojan.Rbrute has so far learned to break not all routers, but only some of their models; however, here is a list, if you do not see yours, this does not mean that you are safe! I think it's a matter of time.
D-Link: DSL-2520U, DSL-2600U
TP-Link:TD-W8901G, TD-W8901G 3.0, TD-W8901GB, TD-W8951ND, TD-W8961ND, TD-8840T, TD-8840T 2.0, TD-W8961ND, TD-8816, TD-8817 2.0, TD-8817, TD-W8151N , TD-W8101G
ZTE: ZXV10 W300, ZXDSL 831CII
And some other models ...
The settings that we need to change are located in the control panel of the router, they live at a specific address.
How to enter the control panel of a Wi-Fi router
For example, my TP-Link TL-WR841ND (ru) has an address to the control panel: 192.168.1.1 this digital key just needs to be copied and pasted into the address bar of the browser.
Common addresses for other manufacturers of routers (if there is no access, see the instructions for the router):
D-Link: 192.168.0.1
ASUS, TP-Link, Netgear, Linksys: 192.168.1.1
Belkin: 192.168.2.1
After entering the address, we will be asked to enter a login password to enter the admin panel.
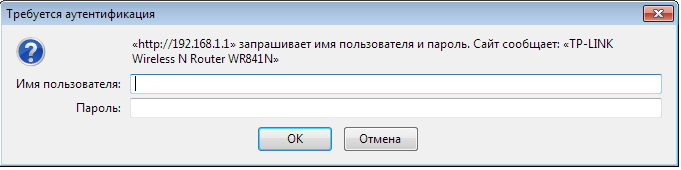 By default, everywhere they appear as: Admin, Admin
Knowing them, Trojan.Rbrute infiltrates the settings of your Wi-Fi router and starts managing there.
It is the Login Password that we need to change! Thus closing access to the heart of Router!
What should be the password
There is a trick, the more complex the password, the more reliable the protection, the case is taken into account, so I advise you to make a complex password and not give Trojan.Rbrute a single chance!
Here is an example of using upper and lower case in a password, also alternating alpha and numeric characters: (FuRy9z5F6 example), change Admin to similar and this will be the best for the security of your data.
Using the TP-Link router as an example, watch the video on how to change the Login-Password of the English version of the admin panel:
Today we have done a very important job, changed the settings of the router, practically closed the access to the Trojan.Rbrute Trojan on our computer. However, this is not all, soon I will write a post on how to update the firmware of a router, why is it necessary? Does everything work fine for you?
Guys, it is vital to update the firmware of the Wi-Fi router, you are updating the databases of your antivirus! Here, too, the new firmware is a patch for the leaky protection of your system ...
In updates to their products, manufacturers patch bugs and emerging security vulnerabilities.
In general, yesterday I changed my login-password and updated the firmware to my alien, read how I bought it.
During the update, I ran into certain difficulties and spent half a day restoring Wi-Fi.
If the power of the router is not enough for stable Wi-Fi coverage of an apartment, house or office, there is a need for additional devices. There are three ways to strengthen the weak signal of the main router: install an additional antenna, repeater, or another router. Each method has advantages and disadvantages, let us dwell on the third option in more detail.
How to set up a router
To configure the router, connect a computer or other device with an installed web browser to it:
- you can connect a computer with a cable by connecting the PC network card to a free LAN port of the router;
- you can connect wirelessly to a Wi-Fi router using a laptop, tablet or smartphone.
By default, the wireless network is assigned a name (SSID) identical to the model name of the router, and access to the shared Wi-Fi network is not password protected.
After establishing a connection with the router, open a web browser on a computer or a connected wireless device and type the IP address of the router in the address bar. For example, for a TP-LINK router, the address will be as follows: http://192.168.0.1
Entering the IP address of the router in the address bar of the browser will open access to the control panelThe illustrations are taken from the settings of the TP-LINK TL-WR 1045 router, from other manufacturers the control panel looks different, but the general principles, abbreviations and terms will be the same.
The correct IP address, username and password required to enter the control panel are indicated on a plate attached to the bottom of the router.
 The IP address, login and password of the control panel are indicated on the nameplate on the bottom of the router
 The login and password indicated on the plate refer only to the control panel, but not to the wireless network distributed by the router. After entering the login and password, the main screen will appear, displaying information about the state of the device and providing access to menu items for setting modes.
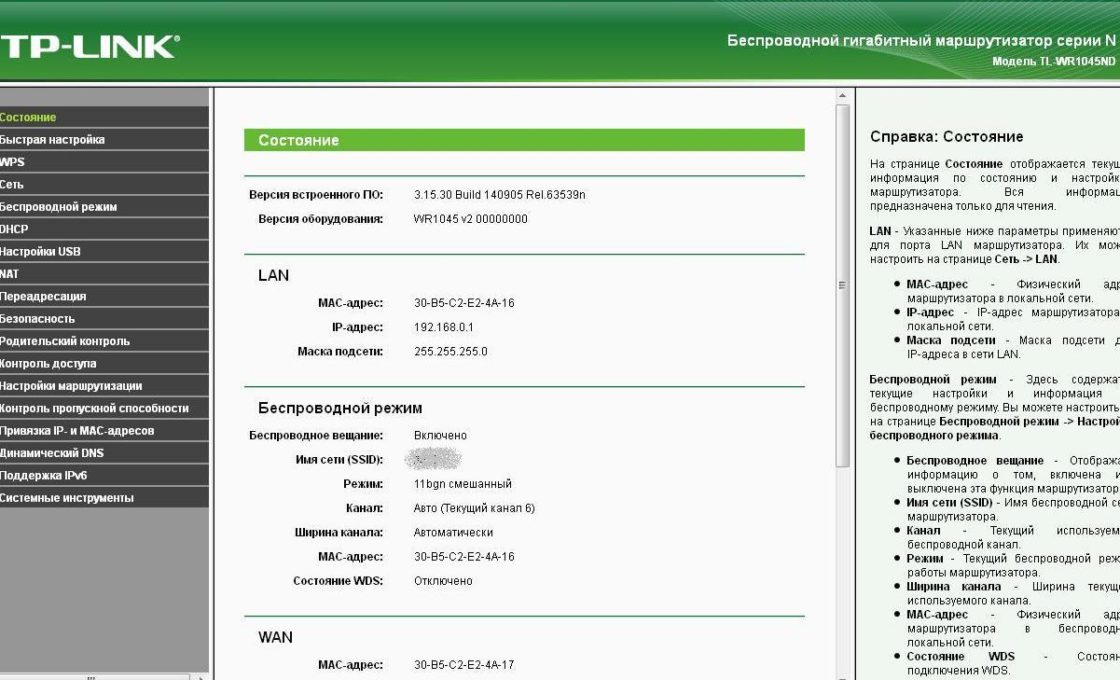 After entering the username and password, you will be taken to the main screen of the router control panel
Do not change the factory settings in the router settings unless necessary. After making changes to the router settings, restart the device.
Video: setting up a Wi-Fi router
Two ways to connect routers
Routers are connected into one local network either by cable or wirelessly. It is recommended to use devices from the same manufacturer.
Cable connection
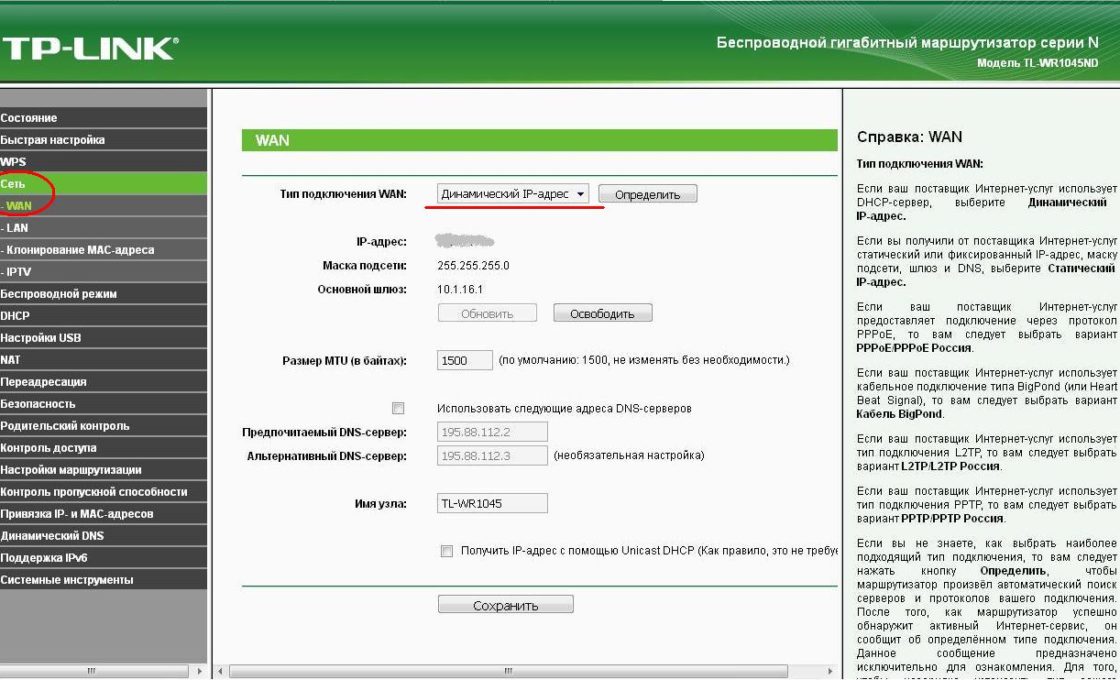
Twisted pair cable (UTP cable) is laid between the main and additional routers. In the main router, the cable is connected to the LAN socket, and in the additional router - to the WAN socket (this socket is highlighted in color and is sometimes called the Internet). With this connection, the additional router will be for the main network device, and the main one for the additional will act as a provider, distributing the Internet and providing a dynamic IP address.
Before installing an additional router, think over how the cable will be laid, and carefully measure the length of the future cable channel. When purchasing a cable, buy one meter longer than the measured cable duct and ask the seller to immediately crimp the ends of the cable into the connectors. If the cable duct runs outside the premises and is exposed to natural influences, then purchase a cable with a reinforced sheath.
Advantages of the method:
- reliability and stability of the cable connection;
- easy configuration of both routers;
- the installation location of the additional router is not limited to the wireless coverage area of \u200b\u200bthe main router.
Disadvantages of the method:
- the need to purchase and lay a cable;
- when moving the router, the cable will have to be moved to a new place.
Configuring routers with cable connections
If the main router is already configured to work with the provider and there are no complaints about the work, then nothing needs to be changed in the settings.
Make sure the DHCP function on the host router is enabled to automatically distribute IP addresses on the LAN. You do not need to change the starting and ending IP addresses.
![]() The DHCP server function of the main router must be enabled
The DHCP server function of the main router must be enabled
Setting up an additional router
It is recommended to immediately reset any changes made to the settings of the router to those preset by the manufacturer. To do this, turn on the router, find the Reset button on the back panel, press and hold it for 5–7 seconds. To protect against accidental reset of settings, the button is hidden inside the case and you can press it through the hole with a needle or an unbent paper clip.
 An example of the location of the reset button on the back of the router: the button is hidden inside, only the hole for pressing is visible
 In the additional router, two settings are checked and set:
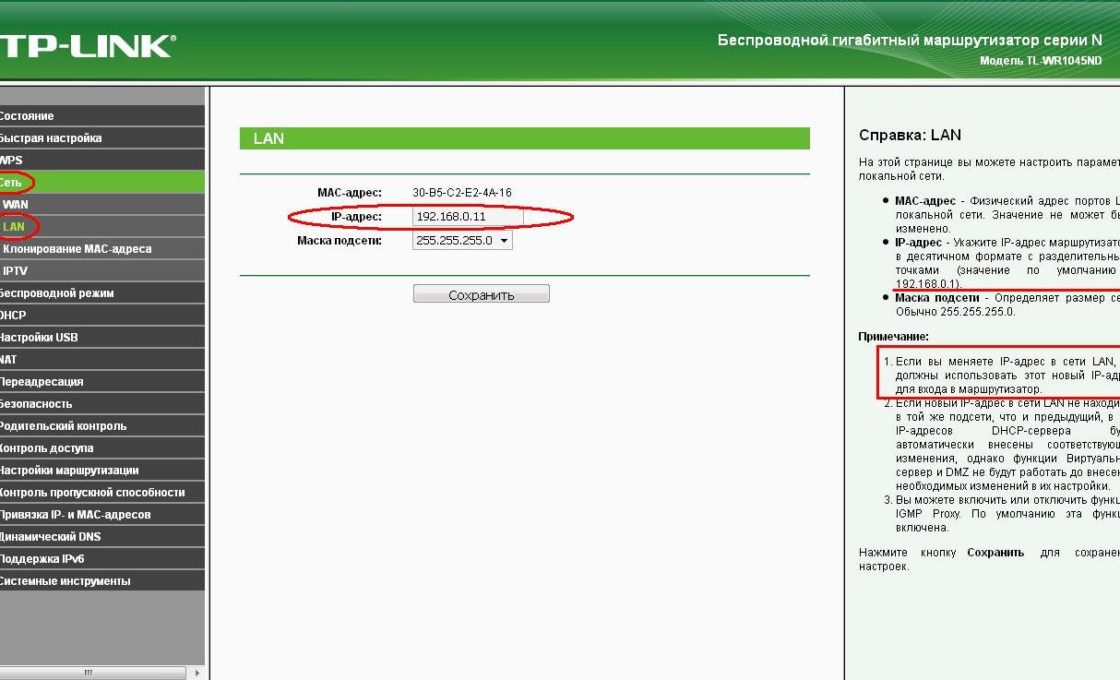 Making changes to the additional router's own IP address avoids the conflict of identical addresses in the same network
After changing the IP address of the router, enter the new address in the browser address bar to re-access the control panel.
There is a cable connection option in which the cable is connected to lAN port additional router. This option is complex to configure and does not offer any advantages over a WAN port connection.
Wi-Fi wireless connection
Advantages of the method:
- does not require physical connection of routers with a cable;
- allows you to easily move an additional router if necessary.
Disadvantages of the method:
- the relative complexity of the setup;
- slow down the speed of the wireless network.
 The main router receives the Internet from the provider and distributes it over the wireless LAN1 network; the additional router receives the Internet wirelessly from the main router and distributes it via the wireless LAN2 network
Configuring routers when connected via Wi-Fi
When connecting two routers in a local network over a wireless channel, a "bridge" connection is used, in English Wireless Distribution System (WDS), designed specifically to expand the Wi-Fi coverage area.
Understanding Bridge Connection (WDS)
When this type of connection is established, the main router works in standard mode, and the additional one acts as a Wi-Fi amplifier, receiving and distributing the signal further.
To connect the routers in the "bridge" mode, it is necessary to establish a permanent (fixed) communication channel between them and specify the physical addresses of the connected devices in the settings. To configure the "bridge", both routers are turned on, the main router is pre-configured for the provider, receives and distributes the Internet, and the additional settings are pre-set to factory settings by pressing the Reset button.
Configuring a Master Router for WDS Mode
We change the mode of automatic selection of the broadcasting channel to the fixed channel mode (for example, to the 11th channel).
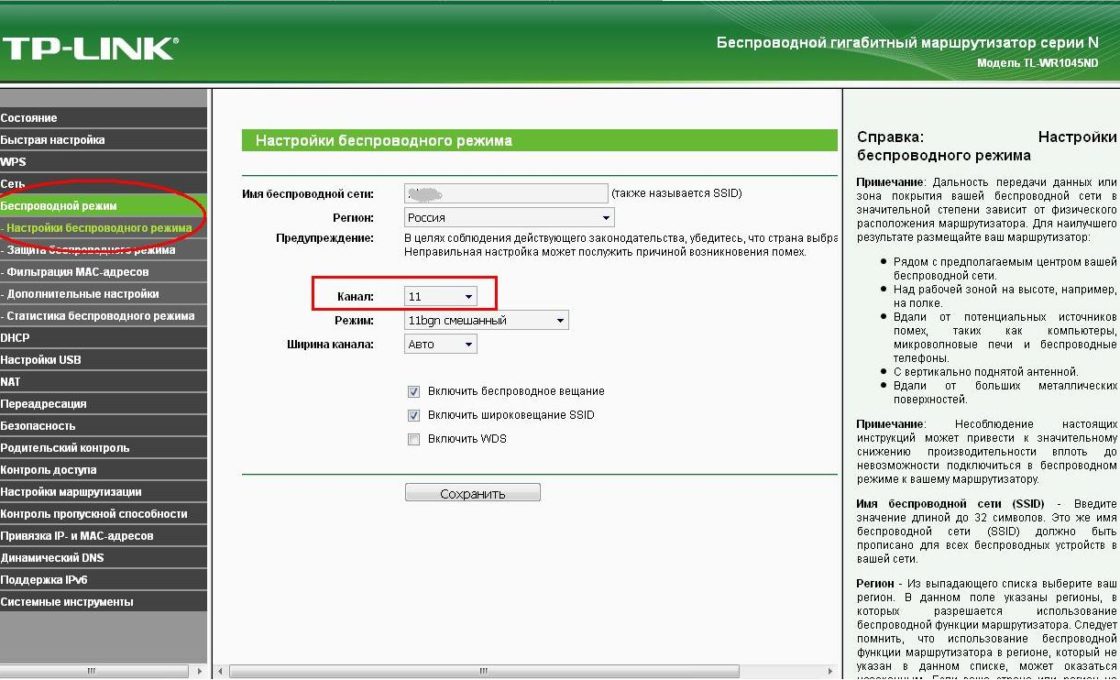 Selecting fixed broadcast channel # 11 instead of preset automatic selection
Setting a fixed channel number prevents the router from automatically scanning the air and choosing the least loaded channel. Therefore, if outsiders are working nearby wireless networks, you may have to manually experimentally select the least loaded channel or use special program to search for a free channel. The channel number must be simultaneously changed on both routers - the main and the additional.
Configuring an additional router for WDS mode
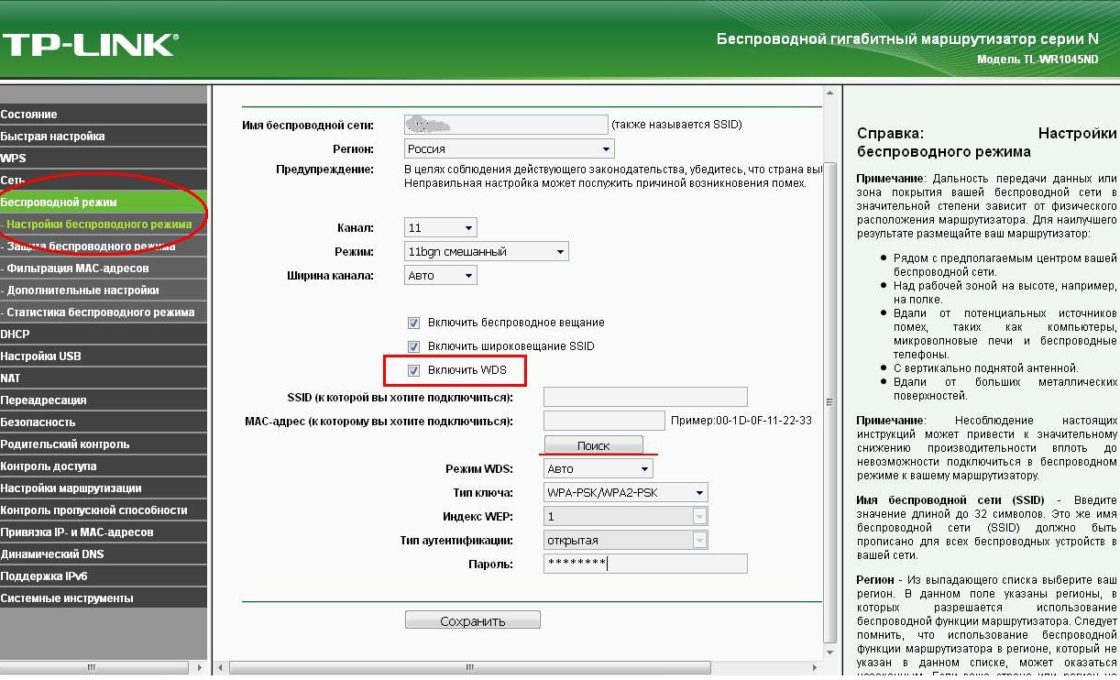
On the main page of the router's control panel, the line "WDS Status" should display "running". This means that the additional router is connected to the main router and is distributing the Internet.
Video: how to make a Wi-Fi network between routers (WDS)
Building a complex network requires knowledge and experience. If you are confident in your abilities, use our instructions. If you are in doubt about your abilities, it is better to seek help.
It happens that you purchased a router from your hands, but it initially had incorrect settings. It happens that your provider has changed, and therefore the old settings again do not fit - there is no connection. In all these cases, you need to know how to reconfigure the router.
It is quite easy to do this - you should not be intimidated. In most cases, you can do without the services of professionals.
So, first you need to reset all the settings of the router that were on it before. To do this, the router has special buttoncalled "Reset". To press it, you need some thin object: a toothpick, a rod from a pen, a needle, a paper clip, a pin, etc. Press the button and hold it for 10-15 seconds. After that, the router will completely reboot and be ready for reconfiguration.
This action and the following is performed on almost all device models. After that, it will be better to learn or remember the following things:
- Password and login. They are either standard (admin | password), or the password has been changed to a serial number. If the device was installed by couriers from the provider, then most often they put the serial number as a password for Wi-Fi and for access to reconfiguration.
- Connection type:
- Dynamic IP address;
- Static;
- L2TP;
Configuring Devices
To reconfigure devices of different models, you often need to perform almost the same steps. Let's start with them:
- We open any browser on the computer to which our device is connected.
- Using the address bar, enter: 192.168.0.1, 192.168.1.1. Most often, these are exactly these addresses, if you have another numeric code of a similar format indicated on the back of the router or in the instructions, but these do not fit, then try entering it.
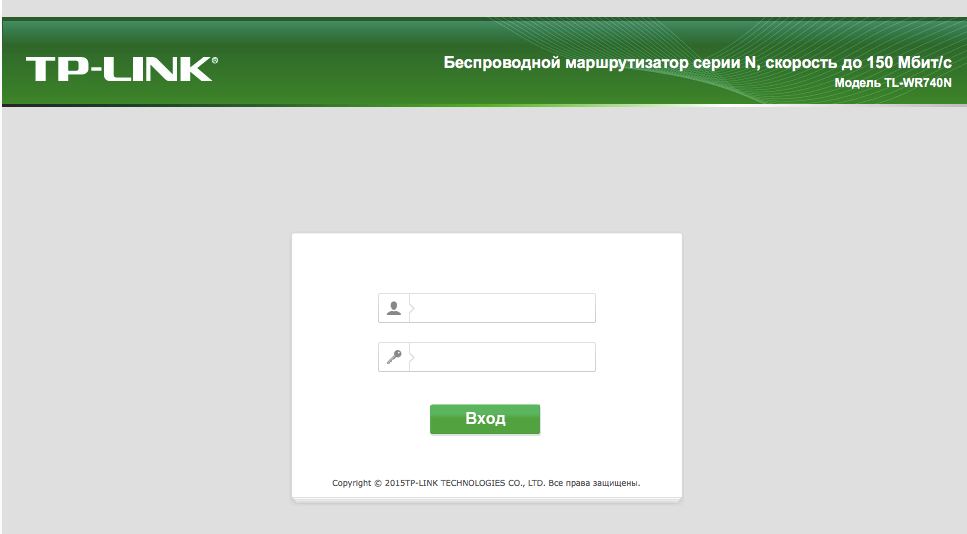
- Next, a window opens with the fields "Login" and "Password" (Login and Password), which must be filled in with the appropriate values. If we use certain types of connection, for example, dynamic IP, then this data may not be required, and authorization will occur automatically.
Then the algorithm changes slightly for different models.
TP-Link
- After authorization, we get to the web interface, where you need to select the "Wireless mode" tab, and then "Wireless mode settings".

Go to Wireless Settings
- Further, everything is quite simple. We indicate the name in the appropriate column, or rather, invent it, then open the "Wireless protection" tab.
- We set WPA / WPA2 as the encryption type and come up with a good password. These two steps will ensure that our data is effectively protected.
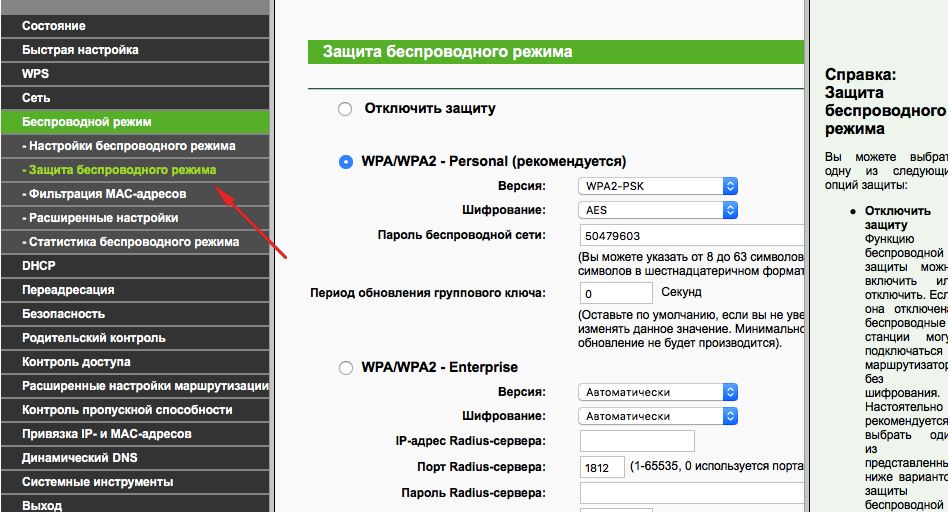
We put WPA / WPA2
- Now we go to the tab system tools, there we find the "Password".
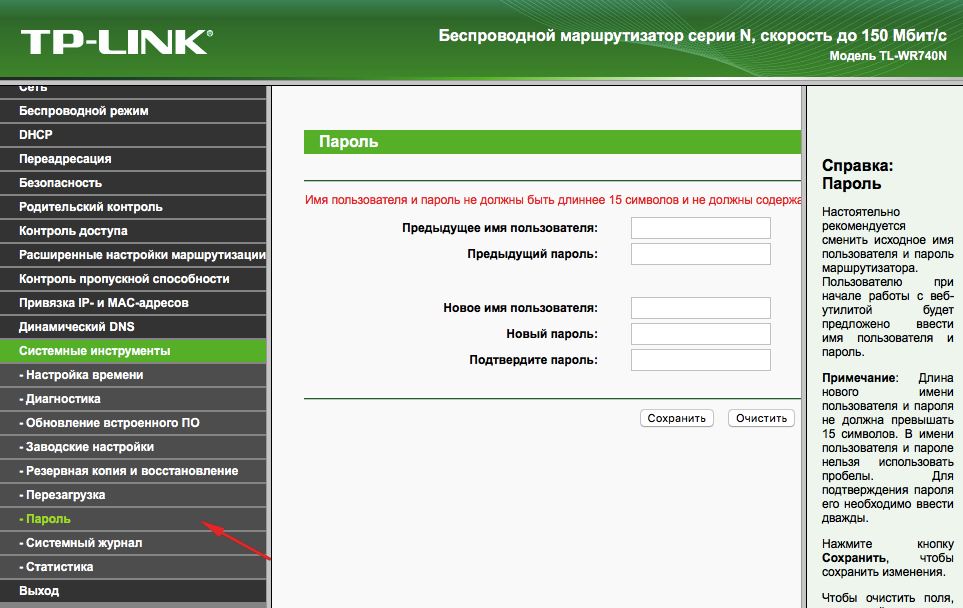
We specify the password
- We use the old password and old login to change them to new ones. It is advisable to write down the new ones, and then not lose them.
By the way
You can update the router's firmware using the TP-Link official website. To do this, simply find your model there and download the firmware update for it. Then connect the device to the PC via an Ethernet cable. And then in the "System Tools" tab, select the item that relates to the firmware update.
After that, find the "Select file" button there. Now just select the file that you downloaded from the official site.
Recovery
In the routers of this company, there is one rather convenient thing - the ability to create a backup copy. To do this, go to System Tools / Backup & Restore. Then we press the button with the appropriate name, the file with the bin extension will be saved in the PC downloads. Then you can return to the old settings from it.
D-Link
With this device, everything is just as simple, but there are minor changes. To change the password, here you need to find the "System" tab, and in it the "Administrator Password".
Setting up Wi-Fi here is done in much the same way. That is, we select the appropriate section, in the tabs, one by one we put the same data that we set in the instructions above. Well, or not the same - you decide.
To configure other connections, go to the "Network" section. Here we click "Add" and add the type of connection we need.
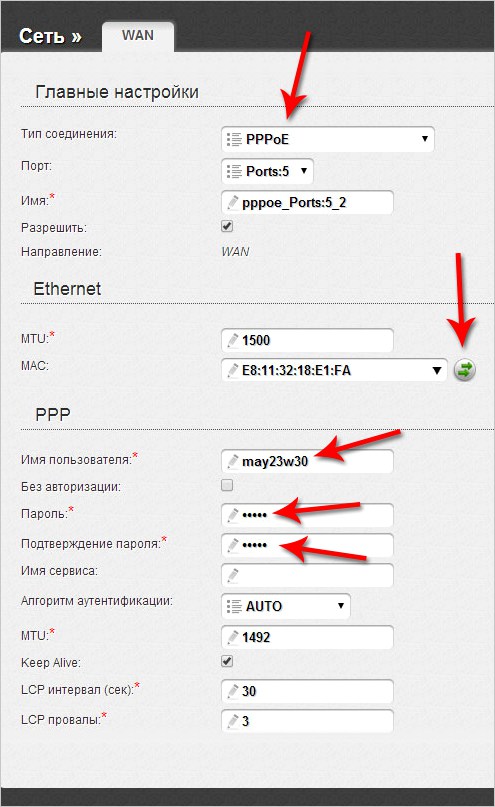
In the case of PPPoE, you need to enter the number of the network card in the MAC field. You can find out this number by calling technical support or in the state of being connected via a local network. The rest of the values \u200b\u200bare entered in the same way: username, login. Other default fields
For PPtP and L2TP, you need to enter two more values: "MTU": 1372; service name: IP / name of the provider or server. The rest of the settings remain the same.
When connecting automatic IP, re-enter the network card number using the MAC field. And then we select the automatic IP and DNS address in the corresponding lines. After all these steps, in all cases, you must click on Save and restart your computer.
Recovery
It is not necessary to do this work every time, as is the case with TP-Link. Simply from the System / Configuration section, select the save current, and then, when you need to reconfigure again, select the saved file on your computer. This will not help if you have changed the provider, then you need a complete reconfiguration.
So, as you can see, there is nothing difficult in reconfiguring the router. You just need to know how to open the web interface, from which everything is executed.