Laboratory work in computer science 1 course word. Laboratory work in computer science "work in a Word"
Laboratory work № 1 ... Working in Word
Topics: Window interface customizationWord
Font formatting(setting font parameters)
Exercise 1 on window setting Word.
purpose: learn how to customize the program window the way you need to do your work.
If you find it difficult to complete any task -
see the description of its implementation in the Informatics Manual, pp. 18-19.
1. Customize toolbars and rulers.
– Configure the Word window to reflect 4 toolbars:
at the top of the window - panels Standard, Formatting, Drawing;at the bottom - Forms.
– Remove from the screen Ruler (then take it out).
–Display on the panelbuttons - Formula editor, - Page numbers( see page.16 Manuals).
Answer : 1) How many and which toolbars are currently open on your screen?
2) What panels are present on the screen by default
(since their buttons are often needed for work)?
3) Is it possible to arrange a separate panel at the bottom, side of the window and how to do it?
2. Status bar (at the bottom of the window Word).
Answer: 1) what information is displayed in the status bar of Word, in its left zone, middle and right zones? What specific information does the status bar show here in the picture?
2) How to display the status bar on the screen (if it is not there) or how to remove it?
3.
Turn on a document display mode called Page layout (if not included). Then turn on the modes one by one: Usual,Web
-document, Structure
and
define what mode Page layoutdiffers from others.
4. In mode Page layout configure:
a) to display around the page text borderbeyond which the text does not go;
b) so that this frame is not reflected.
5.
Install suchpage settings
:
fields
- top and bottom 3 cm, left and right 2 cm;
book
orientation of the paper;paper size
- 20 27 cm.
6. Install scale page display on the screen 50%. Then change to 100%.
7. Typing. First, type a paragraph of text from several lines (to save time, type lines of arbitrary letters, sometimes inserting spaces between "words").
Now turn on the mode Non-printable characters
, then turn off. In doing so, determine
how the text will look different in this mode.
In mode Non-printable characters in the typed text do:
a) so that the first word is left alone on the 1st line (as a title);
b) so that again the 1st word returns to its place - it becomes the first word in the general paragraph.
Answer : 1) what the regime is used forNon-printable characters ? What does the sign mean in the text¶ ?
2) whether it is necessary to press when typing Enter
for a new line?
When and why you should press when typing Enter
?
3) how to undo an action that you did wrong when working in Word?
Is it possible to undo the last 3.5, 10 wrong actions?
8.
Techniques of work. The same operation
in Wordcan be done in 4 ways.
List them and demonstrate with any one operation.
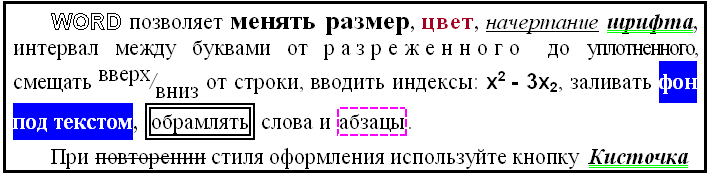
Assignment 2: type the text provided in the box. At the same time, arrange it exactly as shown in our sample.
1. For 1- th word " WORD " install the fontArial , bold, with an outline, \u003d 16 pt.
2. For the words "sparse", "condensed" set the sparse and condensed font.
3. Word design “ Brush ” copy from word “ font ” button. Answer: when is it convenient to use this button?
4. Insert a line at the beginning of the text and enter a title - Font formatting .
5. Turn on automatic transfer words.
6. At the end of the work, see how the text will look on paper after printing.
7. Save the document to your folder under the name" Job 1. doc " .
If you find it difficult to complete any task -
see the description of its implementation in the Informatics Manual, pp. 19-20.
PLACE TO DIAL TEXT :
Developed by: L.V. Sidorova Department of AISiT
A.M. Antonova, S.A. Varlamov
Workshop
by Microsoft Word 2007
Berezniki 2011
Ministry of Education and Science Russian Federation Federal agency of Education
Perm State technical University Bereznikovsky branch
Department of Automation of Technological Processes
A.M. Antonova, S.A. Varlamov
Workshop on Microsoft Word 2007
Methodical instructions for performing laboratory and independent work
for students of all forms of education in the direction 230100 - "Informatics and Computer Engineering"
Berezniki 2011
UDC 373.167.1
Reviewer:
K. t. N., Associate professor Erypalova M.N.
Antonova A.M., Varlamova S.A.
Workshop on Microsoft Word: guidelines for laboratory and independent work. Perm. state tech.un-t. Perm, 2011.100 p.
The basic principles of work in the text editor Microsoft Word 2007 are considered, all theoretical material is divided into 10 laboratory works, for each of which 10 options for individual tasks are proposed, before each laboratory work the basic tools and skills necessary for its implementation are listed.
© Perm State Technical University, 2011
Introduction ………………………… ....................................... .................................... | ||||
Laboratory work 1. First acquaintance with Microsoft Word ........................ | ||||
Starting Word | ......................................................................................... | |||
Main elements................................................ ............... screen | ||||
1.1.3. Tools ................................ and their buttons in the Word 2007 window | ||||
Closing Word ................................................ .................................. | ||||
1.1.5. Creation and discovery ............................................... ...... document | ||||
Saving the document ................................................ ..................... | ||||
Word Prompts ................................................ ................................ | ||||
Scroll bars ................................................ ............................ | ||||
Entering text ................................................ ........................................ | ||||
1.2.1. Options for .......................................... individual work | ||||
Laboratory work 2. ........................................... | Text formatting | |||
2.1. Skills are required .......... to perform laboratory work | ||||
Text selection................................................ .............................. | ||||
2.2.2. Transferring and copying ............................................ content | ||||
Working with the font ............................................... ............................ | ||||
Working with a paragraph ............................................... ................................. | ||||
2.2.5. Create a bulleted .................... and numbered list | ||||
Creating a tiered ................................................ .list | ||||
Useful items ................................................ .......................... | ||||
Tasks................................................. .................................................. | ||||
2.3.1. Options for .......................................... individual work | ||||
Test questions................................................ .......................... | ||||
Laboratory work 3. .............................................. ... | Page setup | |||
3.1. | ||||
Topics................................................. .................................................. | ||||
Page settings................................................ ........................ | ||||
Page background ................................................ .................................... | ||||
Paragraph................................................. ................................................. | ||||
Headers and footers ................................................. .................................... | ||||
Tasks................................................. .................................................. | ||||
3.3.1. Options for individual work .......................................... | ||||
Test questions................................................ .......................... | ||||
Laboratory work 4. | Tables ................................................. .................... | |||
4.1. Skills are required to carry out laboratory work .......... | ||||
Creating a table ................................................ ............................. | ||||
Table modification ................................................ ..................... | ||||
Table design ................................................ ....................... | ||||
Creating formulas ................................................ .............................. | ||||
Tasks................................................. .................................................. | ||||
Test questions................................................ .......................... | ||||
Laboratory work 5. | Drawing................................................. ................. | |||
5.1. Skills are required to carry out laboratory work .......... | ||||
5.2.1. Inserting pictures into a text document ....................................... | ||||
5.2.2. Working with a picture in a text document .................................... | ||||
Creating a pattern ................................................ .............................. | ||||
Diagrams ................................................. ........................................ | ||||
Organizational chart ................................................ ........... | ||||
5.2.6. WordArt style lettering .............................................. ................... | ||||
Tasks................................................. .................................................. | ||||
5.3.1. Options for individual assignments ........................................ | ||||
Test questions................................................ .......................... | ||||
Laboratory work 6. | Formulas ................................................. ................... | |||
6.1. Skills are required to carry out laboratory work .......... | ||||
Microsoft Equation 3.0 ............................................... ........................ | ||||
6.2.2. Creating formulas in Word 2007 ............................................. ........... | ||||
Tasks................................................. .................................................. | ||||
Test questions................................................ .......................... | ||||
Laboratory work 7. | Styles and Templates ............................................... ....... | |||
7.1. Skills are required to carry out laboratory work .......... | ||||
Preset Styles ................................................ ................................... | ||||
Creating Your Own Styles ............................................... .......... | ||||
7.2.3. Using tiered list in styles ........................ | ||||
Document viewing modes ............................................... ....... | ||||
Automatic table of contents ................................................ ............ | ||||
Templates ................................................. ........................................... | ||||
Tasks................................................. .................................................. | ||||
7.3.1. Options for individual assignments ........................................ | ||||
Test questions................................................ .......................... | ||||
Laboratory work 8. | Collaborate on a document, create |
|||
names of objects and links .............................................. .................................. | ||||
8.1. Skills are required to carry out laboratory work .......... | ||||
Accounting for corrections ................................................ ............................. | ||||
8.2.2. Inserting and using notes ............................................ | ||||
Names ................................................. ............................................ | ||||
Place the cursor in the document where you want to | ||||
which you want to insert a table with data ............................................ .... | ||||
button<Список иллюстраций>........................................................................... | ||||
inscriptions and you want to include all names in the list of illustrations, click<Параметры>, select the Style check box, and then
select "Title" from the list. .................................................. ......................... | ||||
Footnotes ................................................. ............................................... | ||||
Tasks................................................. .................................................. | ||||
Options for individual tasks ............................................... | ||||
Test questions................................................ .......................... | ||||
Laboratory work 9. | Macros ................................................. ................... | |||
Skills are required to carry out laboratory work .......... | ||||
Displaying the Developer tab ............................................... ... | ||||
Macro Recording ................................................ ................................. | ||||
Tasks................................................. .................................................. | ||||
Test questions................................................ .......................... | ||||
Laboratory work 10. | Merge ................................................. .................... | |||
Skills are required to carry out laboratory work .......... | ||||
10.2.1. Creating a recipient list ............................................... .......... | ||||
10.2.2. Creating a letterhead ............................................... ............ | ||||
Tasks................................................. ................................................ | ||||
Test questions................................................ ........................ | ||||
List of references | ||||
Introduction
MS Word is a multifunctional word processing program. Along with the properties typical of text editors, it has a number of characteristics inherent only in desktop publishing systems,
such as PageMaker and Ventura Publisher.
The tutorial is intended for students and novice users of this powerful and extremely popular editor. Their purpose is to show and explain with a specific example the sequence of actions that must be performed to create a particular document.
In this regard, the proposed work is devoid of a detailed and consistent description of all the features of Word. All material is divided into nine laboratory works, each of which is devoted to the development of a specific document or type of documents and contains the information necessary for this (descriptions of new terms, buttons, menu items, etc.). Additional and missing information can be obtained from the recommended literature, a list of which is given at the end of the work.
For a deeper understanding of the technology of creating and editing documents in MS Word, when performing practical tasks, it is recommended to use as much as possible all the concepts and examples described in the relevant topics of these guidelines.
Lab 1. Getting Started with Microsoft Word
1.1.1. Starting Word
The MS Word text editor can be launched in several ways.
1. From the main menu after pressing the button<Пуск> → All programs
Microsoft Officce → Microcoft Office Word2007 or<Пуск> → Microcoft Office Word2007.
2. If there is a shortcut on the desktopWord, then to call this program, you can double-click on this shortcut with the mouse.
3. If you already have on your computer any Word document, double-clicking on it with the mouse will also launch Word. This will open the document itself for editing.
1.1.2. Basic screen elements
The Word 2007 test editor window is quite complex (Figure 1). In its structure, except special buttons, includes standard window elements - title, size buttons, etc.
All programs of the office suite Microsoft Office 2007 use the ribbon interface. At the top of the window is a tape with tools located on it. The ribbon has several tabs, the transition between which is carried out by clicking on their names. Tab names are placed above the ribbon itself and replace the menu bar that is actually missing. Each of the ribbon tabs contains tools designed to perform a specific class of tasks:
1. Home - this tab is available by default when you start Word. It contains the main tools designed to perform basic operations for editing and formatting text.
2. Insert - designed to insert various elements into the document: pictures, tables, headers and footers, etc.
3. Page layout- contains tools for setting and configuring various page layout parameters: margins, colors and orientation, margins, etc.
6. Review - contains reviewing tools: inserting notes, editing text, etc.
7. View - is intended for setting the mode of viewing documents in the program window.
If you look closely, you can see that all the tools on the ribbon tabs are grouped. In the lower right corner of some groups
tools there is an icon, under which additional tools of this group are hidden.
At the very top of the program window, above the ribbon, there is a quick access panel. By default, this panel contains only three tools
rumena: Save, Undo, Redo. However, you can add other tools to the Quick Access Toolbar. To do this, you need to click with the mouse on the downward arrow located on the right edge of the panel, and in the drop-down list specify necessary tools.
At the bottom of the Word test editor window is the status bar, which by default contains the following items:
1. Page: "number" of "numbers" - indicates the current page number and the total number of pages in the document.
2. Number of words: "number" - shows the current number of words in the document.
3. The icon indicates that there are spelling or punctuation errors in the document, clicking on it will take you to the first error.
4. "Russian" - shows the language that is currently used for spell check.
5.
![]() view mode shortcuts: page layout, reading mode, web-document, structure, draft - respectively.
view mode shortcuts: page layout, reading mode, web-document, structure, draft - respectively.
Slider - designed to adjust the scale. If you click on the numerical value of the scale, the "Scale" window will open, in which you can specify more precise settings.
Ministry of Education of the Republic of Belarus Educational institution
"Belorussian state University Informatics and Radioelectronics "Institute of Information Technologies
Department of Microprocessor Systems and Networks
PRACTICAL COURSE
A guide for course trainees
advanced training in the discipline "Fundamentals of Computer Literacy"
Minsk BSUIR 2011
UDC 004.912 (076)
BBK 32.973.26-018.2ya73 M51
V. A. Polubok, A. A. Kosak, E. V. Nikolaenko, N. A. Pryanishnikov
Reviewers:
professor of the Department of Computational Methods and Programming of an educational institution
"Belarusian State University of Informatics and Radioelectronics",
doctor of Physical and Mathematical Sciences S. V. Kolosov;
associate Professor of the Department "Applied Informatics" of the educational institution "Belarusian State Agrarian and Technical University", Candidate of Technical Sciences A. I. Shakirin
М51 MS Word 2007. A course of practical training: a manual for students of advanced training courses on disc. "Fundamentals of computer literacy" / VA Polubok [and others]. - Minsk: BSUIR, 2011 .-- 52 p. : ill.
ISBN 978-985-488-716-6.
The manual contains the basic theoretical principles of working with a text editor Microsoft Word 2007. Describes the basic techniques of working with a text editor. Practical assignments and test questions are provided for each topic.
Practical lesson # 1 Microsoft Word 2007 interface. Creation | ||
and editing text document in MS WORD ...................................... | ||
Practical lesson # 2 Creating and editing lists and styles. | ||
Create templates and resumes ……………………………………………………... 18 |
||
Theoretical information ................................................ ..................................... | ||
Methodical instructions for performing work ............................................. ... | ||
Independent work................................................ ..................................... | ||
Questions for self-control ............................................... ................................. | ||
Practical lesson # 3 Creating and editing tables. | ||
Calculated tables. Formulas …………………………………………… 26 |
||
Theoretical information ................................................ ..................................... | ||
Methodical instructions for performing work ............................................. ... | ||
Independent work................................................ ..................................... | ||
Questions for self-control ............................................... ................................. | ||
Practical lesson # 4 Graphic objects in MS Word 2007. | ||
Creating and editing graphic objects ……………..…….…..…37 |
||
Theoretical information ................................................ ..................................... | ||
Methodical instructions for performing work ............................................. ... | ||
Independent work................................................ ..................................... | ||
Questions for self-control ............................................... ................................. | ||
Practical lesson # 5 Editing, reviewing and complex | ||
formatting in Microsoft Word 2007. Preparation | ||
document for printing……………………………...……………………………… 45 |
||
Theoretical information ................................................ ..................................... | ||
Methodical instructions for performing work ............................................. ... | ||
Independent work................................................ ..................................... | ||
Questions for self-control ............................................... ................................. | ||
Bibliography ……………………………………............ 52 |
||
Practical lesson number 1
Microsoft Word 2007 interface.
Creating and editing a text document in MS WORD
1.1 Theoretical information
1.1.1 General
The start window of the text editor Word 2007 looks like this (Figure 1.1).
Figure 1.1 - General view of the Microsoft Word 2007 window
IN new version the drop-down menu is represented by the Office button (Figure 1.2), the icon of which is located in the upper left corner of the window.
The whole upper part the window is occupied by the main menu ribbon. Having selected any of its items, we get at our disposal the necessary tools, presented in the form of icons.
Menu buttons are grouped Figure 1.2 - ButtonOffice vans by functional
signs. For example, Home consists of the following groups:
- Clipboard;
- Font;
- Paragraph;
- Styles;
- Editing.

taken out |
||||
most | often used |
|||
buttons. If the desired button is not |
||||
appears on the panel, then its |
||||
can be found by clicking on non- |
||||
big arrow on the right |
||||
the lower corner of a certain group |
||||
py. At the same time initially showed |
||||
the tooltip is called |
||||
Figure 1.3 - Tooltip | (Figure 1.3), it informs about |
|||
the purpose of the tools. | ||||
At the bottom of the window, the | ||||
we are status bar... By | ||||
default on this line (on the left | ||||
the quantity | ||||
pages and current page number, | ||||
number of words, language of text input; | ||||
(on the right side) - view mode | ||||
document, scale. To change | ||||
thread set of displayable items | ||||
tov, you must right-click | ||||
by clicking on the status bar | ||||
(Figure 1.4). By removing or installing | ||||
flags correspondingFigure 1.4 - Setting the status bar |
||||
menu items, you can customize the appearance of the status bar as you wish.
1.1.2 Formatting
Basic formatting tools are located on the ribbon tab
The main:
- Clipboard;
- Font;
- Paragraph;
- Styles;
- Editing.
1.1.2.1 Clipboard
There are four main buttons on the panel:

- Paste;
- Cut out;
- Copy;
– Format by sample.
The Paste button is active only if there is an object in the clipboard. The Cut and Copy buttons are active if there is any selected text fragment, picture, diagram, etc.
Button Sample formattransfers the formatting options of the specified object to the selection.
To transfer all formatting options to a new paragraph, you must perform the following operations:
1 Place the cursor anywhere in the paragraph whose formatting options we want to use.
2 Click the Format Painter button.
3 Select the text to which you want to transfer the formatting.
1.1.2.2 Font
Figure 1.5 - Tool window | ||
groups Font | ||
Through | instruments | |
groups Font (Figure 1.5) can | ||
but change the size, type and style | ||
fonts. When using ef- | ||
the underline effect can be immediately | ||
specify the line type. Here is | Figure 1.6 - Font window |
|
buttons are available to increase | ||
read / reduce | font size; apply superscript effect |
|
go / subscript; change the case of the text; its color; the color of the selection. The Clear Format button allows you to remove the changed formatting options.
If the specified formatting buttons are not enough to complete the task, using the Font window (Figure 1.6), you can configure additional formatting parameters.
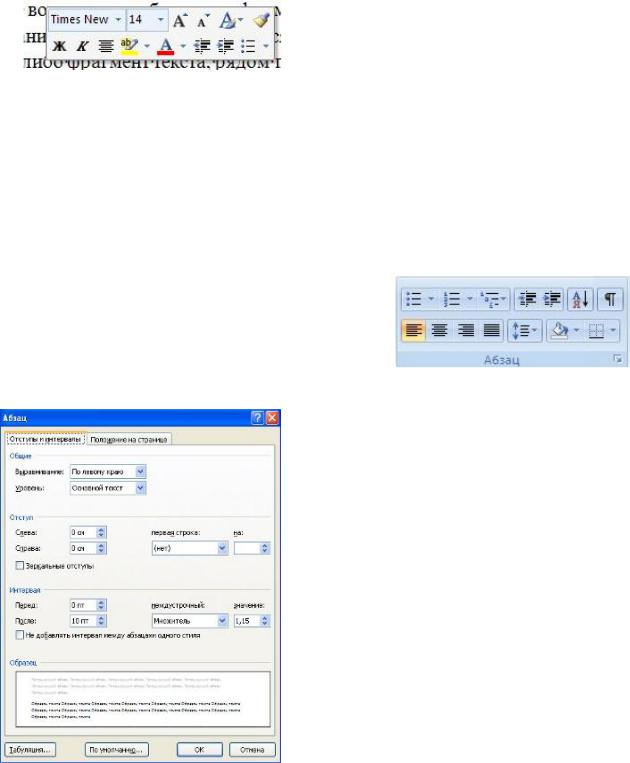
Figure 1.9 - WindowParagraph
Paragraph
Figure 1.8 - Panel buttons group
Word 2007 provides a convenient way to quickly format text. When any
a fragment of text, a message appears next to Figure 1.7 - Formatting windowtransparent formatting window (Figure 1.7).
When you move the cursor over this window, it takes on its normal color. The window contains the most common formatting commands.
1.1.2.3 Paragraph
The group of buttons on the Paragraph panel (Figure 1.8) is intended for paragraph formatting. There are also buttons for working with tables.
The first three dropdowns in the top row are for working with
labeled, numbered and multi-
leveled lists. Next are the increase / decrease buttons paragraph indentation (the so-called "red line"). The next button is used to sort the table values \u200b\u200balphabetically. The last button in the top row enables / disables non-printable characters. They are sometimes very useful for detecting a variety of formatting errors.
The bottom row contains buttons for aligning text in a paragraph (left-aligned, centered, right-aligned, justified). They are followed by a drop-down list for setting the line spacing. The last two dropdowns are
mostly for working with tables: filling cells and setting visible borders. The button for calling the Paragraph window (Figure 1.9) allows you to make finer settings for paragraph formatting.

Figure 1.11 - Configuring speakers
1.1.3 Page parameters
To change the page parameters, you need to go to the
masonry Page Layout / Pa-
page dimensions
The Fields button is used to set the values \u200b\u200bof the document fields. If none of the proposed standard options fit, you must use the paragraph
nude custom fields. In the
in the appeared window, you can make more detailed settings for the document margins (Figure 1.10).
The Orientation button sets the position of the text on the sheet:
Book, Landscape.
Figure 1.10 - Setting the document margins The Size button sets the size paper when printing. To select a custom size, use the option
Other page sizes.
The Columns button (Figure 1.11) is used to split the page text into several columns (similar to newspaper layout). The Other Columns option is used for flexible speaker settings.
1.1.4 Page and Section Breaks
When working with documents, it is often necessary to start new page, while the previous one has not yet been completely filled with text.
To start a new page, in
MS Word has a special option - Breaks (Figure 1.12).
This tab contains quite a lot of different options for breaking not only pages, but also sections.

Figure 1.12 - Menu of options for breaking pages and sections
Sometimes it becomes necessary to use different formatting options for different pages document (for example, one of the sheets of the document must have landscape orientation). In this case, the document must be divided into sections. Each section can be formatted completely independently of the other sections.
When you remove a section break, the preceding text becomes part of the next section and takes on the appropriate formatting, and the last paragraph mark in the document determines the formatting of the last section in the document.
MS Word provides
there are three options for breaking sections:Next page; Current; Even page; Odd page ... To see the section breaks (as, however,
and pages), you need to enable the option Displaying non-printable characters.
By default, MS Word works in the automatic text placement mode: if a word does not fit on a line, it is wrapped to the next one, but the program can also place word hyphenation. For this purpose, the option
Hyphenation... There are two options: Automatic tuning;Manual setting.
To create a graphic background, set the switch to Picture and click the Select button. Then specify the placement desired file Images.
The Page Color button allows you to set to change the color of the page. The Page Borders button sets
visible printed page borders.
The Paragraph panel contains two paragraph formatting options: Indent and Spacing (Figure 1.15), which adjust the free margin horizontally and vertically, respectively.
1.2 Methodical instructions for performing work
1.2.1 Document preparation
To set the margins in the document, run the command Page layout/
Fields / Custom Fields ; the dialog box “Page settings»With the following tabs:Margins, Paper Size, Paper Source ... Selecting a tabFields and set the size of the fields.
To save the text as a file, you need to run the command Office / Co-
store as…. (Please note that MS Word 2007 saves files in the .docx format by default. This format cannot be read by older versions of the program. Therefore, in order for the document to be compatible with previous versions of Word, you must save the file in "reduced functionality mode ", That is, in the format word document 97-2003), a window appearsSaving the document,where the name of the current folder is indicated, with the file names field, which contains the file names of the current folder, below - two fieldsFile name
file Type and Save, Tools and Cancel buttons. If you want to