Create styles for headings and tiered lists in Word. Word for the advanced.
In outline view, you can number headings or selected paragraphs of text. Word enumerates automatically.
To number the headings, go to the outline view and indicate the level to which you want to number. Then select the part of the document that needs to be numbered and call the command Multilevel list in the tab home and set the numbering method by selecting one of the icons in the bottom row. After pressing the button OK the result will be visible on the screen.
Footnotes
Footnotes used to explain the main text.
regular footnotes rendered at the bottom of the lane and endnotes rendered
at the end of a section or document. One document can contain regular,
and endnotes: usual - for clarification of input terms at the bottom
pages, and end - to indicate literary sources.
Each footnote has two parts: a text footnote marker. By
by default, all footnotes in the document are automatically numbered and separated
from the text with a horizontal line. There are two options for dividing
lines - short and long. The short dividing line is
5 cm and is drawn between the text of the document and the footnote. A long dividing line is drawn from the left edge of the page to the right and
used if footnotes go to the next page.
Insert a footnote
To insert a footnote into the text of the document, you should do the following
sequencing:
- Position the insertion point at the insertion position of the footnote marker.
- Activate the team Insert footnote from tab Links(fig. 13).
Figure 13 - Inserting a footnote
Word inserts a footnote mark into the main text and, if set
normal view, opens a panel for entering footnote text. To return to the document, you need to click on the text of the document.
In the same way, you can switch from the document window to the footnotes panel.
Changing a footnote
You can view and edit footnotes in your document either in normal view or in page layout view. Normally, the footnote text appears in a separate pane. If the footnote pane is not on screen, double-click the footnote marker in the body text to view its contents. Word will open a panel with the corresponding footnote text. You can then make changes to the footnote text like any other text.
In page layout view, input, edit, and
footnote formatting is done directly on the document page.
To remove a footnote, select its sign in the text. The text related to it and the character itself are deleted using the key . If footnotes are automatically numbered, they are renumbered after deletion.
Formatting a footnote
To format footnotes, click on the arrow in the lower right corner of the group Footnotes... A dialog box will open Footnotes(Fig. 14), where you can select the desired parameters, such as: position, format.
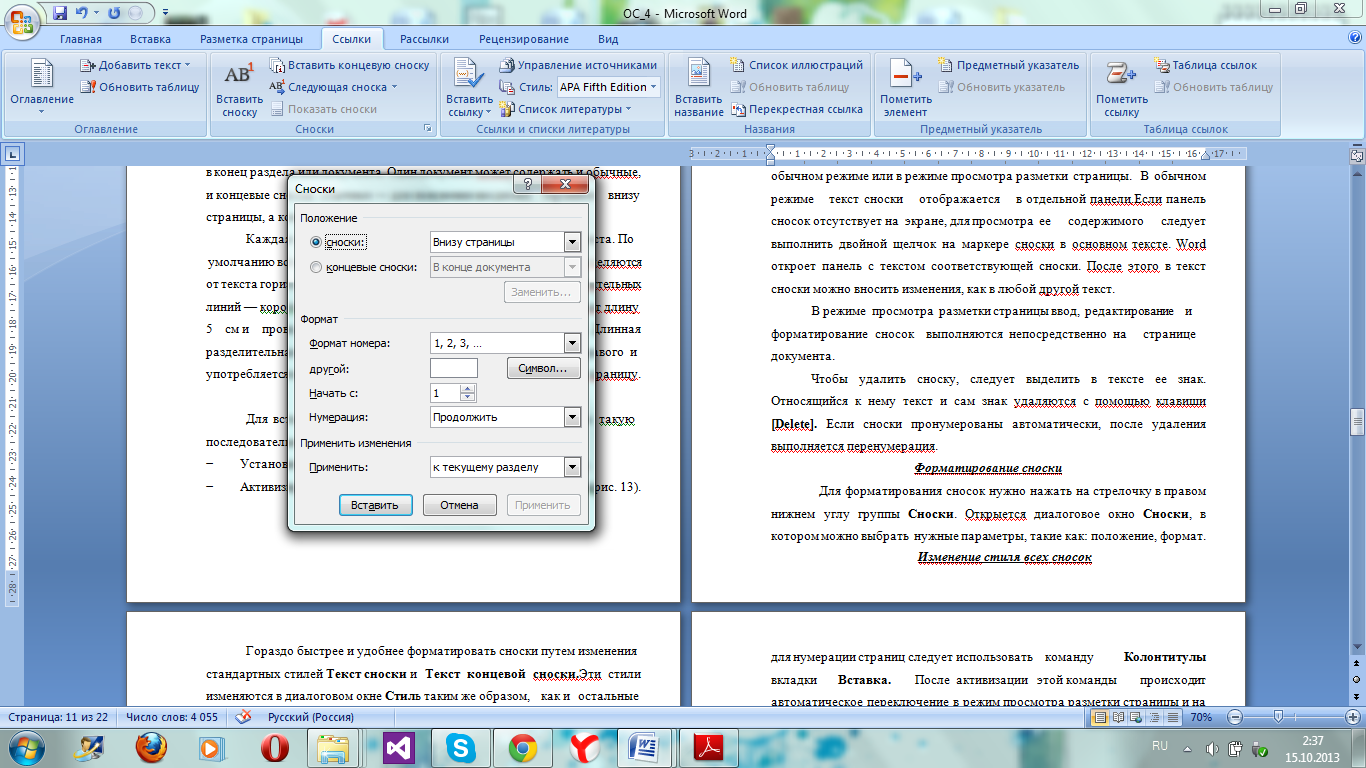
Figure 14 - The Footnotes Dialog Box
Posted March 4, 2013In my previous article, I talked about a few simple techniques for working in Word that can be useful to everyone, even the smallest novice users. But the size of the article is limited, and a few more examples did not fit there, which, I think, will be very useful - maybe not for everyone, but for those who work with Word at a more professional level.
Importantly, these are not spherical examples in a vacuum; the situations described are taken from real life, and I regularly have to explain to others how to add a table of contents correctly, number pages or figures (these are already examples from this article). Here, literally, the question arose of how to change the orientation for several pages to landscape so that the rest would be ordinary, bookish. Asked - we answer!
Comparing two versions of a document
Let's start with the last announced method of comparing two versions of the same document. Suppose that your colleague, with whom you are collaborating on a document, has not read my previous article (of course, this is difficult to imagine, but we will try!) And does not know how to enable recording of corrections. So you received a letter from him with an edited version of the document and a postscript: "Well, I corrected it a little, look, is everything ok?" And you, cursing his stupidity, already imagine the next two or three hours that you will have to spend proofreading a 40-page document.
But things are not so gloomy. In the bowels of Word, there is a secret document comparison function, with which you can immediately see all the differences between the two versions of documents. This is how it works.
Portrait and landscape pages in one document
Sometimes it is necessary to rotate several pages of a document 90 degrees (in landscape orientation). For example, in our standard technical assignment there is a section "Thumbnails of pages", which contains schematic images of the pages of the site. It is more convenient to place them on album pages... But before and after the section with sketches, there is regular text, in portrait orientation. Now I will explain how to do this.
- At the end of the previous page, before the thumbnails of the page, you need to insert the end of the section (in the "Page Layout" panel, select "Breaks - Section Breaks - Next Page").
- At the end of the thumbnail page, it's the same.
- The document is now divided into 3 sections. Now they all have portrait orientation pages, and we need the second (average) to be landscape. To do this, place the cursor on any page from the second section and change its orientation (in the same “Page Layout” panel, select “Orientation - Landscape”).
Page numbers, logo, document title and all that stuff - headers and footers
In our official studio documents, we always include on each page the document name and our studio name (as well as the logo). This is quite convenient: you can immediately see what it is you are reading.
We put all this information in headers and footers... Headers and footers are an area of the document that contains supporting data that is repeated on each page. Headers and footers often contain the title of the chapter (this is usually found in books), page numbers, the date the document was created, or, for example, the full path to the file (a very handy thing!).
Headers and footers are present in any Word document by default, only if there is no data in it, you don't see it.
There are only two headers and footers: header and footer. You can insert ordinary text into them (as we have - the name of the studio), pictures, tables, hyperlinks, as well as auto-text (page numbers, date of creation or printing of the document, file name, etc.).
To add something to the header, you need to open the panel for editing headers and footers (in the "Insert" tab, the button " Page header" or " footer"). Word 2010 has a set of built-in template headers and footers; you can choose a ready-made one or take some of them as a sample and edit to your liking.

It is important to keep in mind that headers and footers are always the same for the entire section (or, if you did not divide the document into sections, then for the entire text). Therefore, if you need different headers and footers on different pages, then the document must be divided into sections (how to do this, described in the previous example, with page orientation) and disable the "as in the previous" flag, which is enabled by default. It sounds complicated, but it's actually not that scary. Once again, to get different headers and footers on different pages, you need to do this:

Numbering of headings
In technical and especially legal documents, it is absolutely necessary to number all sections and subsections so that you can always refer to the required paragraph in the text, for example: “hosting parameters must meet the requirements specified in paragraphs. 4.3.3. and 4.3.4 of this TK ". If you number manually, then with any change, addition or deletion of sections, the numbering will have to be corrected again manually. Imagine how fun it would be to edit our standard contract, which has 9 sections, each with about 5 subsections, and some of them also have third level subsections. Plus, then manually search for and correct links in the same way.
And it's very easy to avoid this entertainment if you know that Word can number headings automatically. To do this, you need to slightly change the standard styles and build a multilevel numbering of headings (for sections and subsections nested in them). Here's how to do it.
Note to the hostess: according to GOST, a full stop is not put at the end of the section and subsection number (i.e., 2.5. General requirements- correct, 2.5.1. General requirements are wrong).
Now all that remains is to give each heading the correct style. And then, with any change in the order of the sections, the numbering will change automatically.
It only takes a few minutes to create a style, but the next time you format the text in your document, the style you create will save you a lot of time and hassle.
For the last month, I have been closely engaged in the development of templates for creating program documents provided for by GOSTs: terms of reference for the program, user manual, application description and others. It would seem that there is nothing complicated in this activity. Insert the necessary sections, page breaks, fields for future text. However, I had some difficulties with the design of the documents, and specifically with the styles of the headings and tiered lists.
According to state standards, headings in a document must begin with a certain paragraph indentation, be drawn up in a uniform font, and not have a period after the last digit in the numbering. In addition, there are other design requirements to consider.
An experienced Word editor might chuckle and say, what's so hard about that? Introduced text for the title, gave it the font you want and formatting, or applied a heading style to the desired level and clicked the "Numbering" button on the format bar. Everything is true, but as a result, a lot of different disordered styles are formed in the document, in which you can get lost and which do not contribute to improvement in any way. appearance document. But there are also multilevel lists, which seem to many to be completely confusing and incomprehensible to use.
In this post, I'll show you my way of taming headings and layered lists by styling them appropriately. I highly recommend using styles when creating any document. It only takes a few minutes to create a style, but the next time you format the text in your document, the style you create will save you a lot of time and hassle.
So, my task was to use numbered headings of four different levels in the document to denote sections of the document. These sections should also have their own numbered subsections. Here is a sample of the correct multilevel numbered headings:
The first step is to edit the standard heading styles built into the global Normal.dot template or your own custom template for specific documents. In order to see the styles used in a template or document, select from the "Format" menu item the "Styles and Formatting" sub-item (command). The task area of the same name will appear to the right of the workspace of the program, as in the screenshot below:
The basic three-level heading styles and the Normal style, which is the style of the document's plain text, are displayed by default. To display more styles in this area, you can select Custom from the Show drop-down list at the bottom of the task pane. This dialog box will open:
If the category "Available Styles" is set, then the "Displayed Styles" area will display only those styles that were used when creating this document. There are usually three levels of headings with checkmarks. If you need to use a fourth level of heading, check the box next to Heading 4. It is possible that there will be no such style in the Display Styles area. In this case, select the All Styles category and check the boxes only for headings 1 through 4 and the style "Normal", as well as those styles that were created by you personally. Close the "Format Settings" window by clicking the OK button.
Our second step is to fine-tune the heading styles. The headings are initially assigned fonts with different formatting. To create a program document, according to GOSTs, it is necessary to use a single font for the entire document. I am using 14pt Times New Roman font for the Normal style. For the headings, I will also use this font, changing only its size and spacing.
To change the heading style, hover over Heading 1 in the task pane. The text will be displayed in a frame and a triangle button will appear to the right of it. Click on this triangle, and a context menu for this style will open in front of you. Select the Modify command and the Modify Style dialog box appears.
In the Style based on field, select No style from the drop-down list. Leave the Style for following paragraph unchanged. Then click the "Format" button at the bottom of the window and select the commands you want to change the settings. Use the Font command to change the font, and the Paragraph command to change the indentation and spacing. Make the changes you require. For example, for "Heading 1" I set the following parameters: font - Times New Roman bold 18 pt, paragraph - alignment to the left, indentation of the first line by 1.5 cm, spacing before 0 pt, after 3 pt, double line spacing, tab stop - set 3.5 cm from the left edge without a padding.
If you want to apply the changes made to the template, on the basis of which you will later create your documents, then check the "Add to template" box, otherwise all these changes will be applied only to the currently active document.
Likewise, I changed the style of the remaining headings, respectively decreasing the font size for each of them: "Heading 2" - bold 16 pt, "Heading 3" - bold 15 pt, "Heading 4" - bold 14 pt.
Thus, I set up the header styles I needed in the template. Now it was necessary to create a style for multilevel lists.
From the Format menu, choose Bullets and Numbering. A dialog box of the same name will open. Go to the List Styles window tab and click the Add button. This will open the New Style window with a familiar interface and buttons:
In the Name field, enter a name for your style (let's say Header_Numbering). Then click the "Format" button at the bottom of the window and select the commands you want to change the settings. There will be only three commands available: "Font", "Numbering" and "Keyboard shortcut".
Pay attention to the field "Apply formatting to" (Apply formatting to). By default, it will be set to "Heading 1". When you specify numbering formatting, you apply it exclusively to that heading. Accordingly, having selected the next value in this field - "Heading 2" - you must specify for it the formatting that was previously set for "Heading 2".
Select the "Numbering" command and you will see the "List" dialog box. Click on any sample list and the Customize button at the bottom of the window will become active. Click it. A new window will open, shown in the screenshot below.
In this window, we have to customize the numbering styles for each of the headings. Select the required level, for example 1. The window will display the parameters applied to this level. Here you can customize the numbering font, paragraph indent... If this window opens briefly, click the More button and more options will be available to customize.
Select the "Font" command. You will see the already familiar dialog box, in which set the same parameters that you set for "Heading 1". Be sure to uncheck all the boxes in the "Effects" group - they will be faint, set the text color, no underline and check all other settings in the other tabs of the window.
In the "Number Position" group, set the position to the left by 1.5 cm. In the "Text Position" group, set the tab stop after 3.5 cm, offset 0 cm. Select from the drop-down list in the " Link level to style to None. Leave the value in the Follow number with field as it is - a tab.
Repeat these steps for all of your heading levels in the template. When finished, click OK and don't forget to check the Add to Template box. A new element (style) will appear in the Styles and Formatting task pane with your name Header_Numbering.
The last thing we need to do is test the styles in practice. To do this, enter a few lines of some text into the document. Enter at least seven lines to check different heading levels. Place your mouse cursor over the first line of text and apply the Heading 1 style to it. Then apply the Heading_Numbering style you created to the same text. Repeat these steps in the given sequence (Heading -> Heading_Number) for the remaining lines, each time applying different levels to them. You should get something like this hierarchical list:
As you can see, at the bottom of the window, I have the "Heading 2" level displayed, but with a broken numbering - 1.1. This happens. And it's very easy to fix it. It is enough to right-click on this number to display the context menu. Select the "Continue previous list" command from this menu and the title will be given the correct number, in this case 2.2.
I hope you understand how styles are created and how they are modified. I also sincerely hope this post will help you create the right heading styles and style your documents beautifully and most importantly.
1. To apply a style literally means the following: place the cursor on the line whose style you want to change. In the Styles and Formatting task pane, click the style you want. The style will be applied to the line. [
This article provides instructions for using several different numbering systems in documents containing both chapter titles and appendix titles.
Program Microsoft Word does not support multiple heading numbering schemes in the same document or master document. When working with documents containing both chapter and appendix titles, the headings should use one level of heading style.
Example 1. Headings of chapters and appendices
When creating a document that contains both chapter and appendix titles, you can use different levels of heading style to format the section numbers in different ways. For example, to define the following numbering scheme for chapter and page titlesChapter one. This is the title of the first chapter
Chapter two. This is the title of the second chapter.
Appendix A. This is the title of the first appendix
Appendix B: This is the title of the second appendix
Follow the steps below.
- From the Format menu, select List and go to the Layered tab.
Note. In Microsoft Office Word 2007 select Multilevel list in the tab home.
- Choose one of the styles, for example Chapter 1 (last option). Click the Configure button.
Defining a New Multilevel List.
- In the Level list, select 7.
- In field Number format type Application, then press the SPACEBAR to insert a space after the word “Space”.
- In the list numbering choose A, B, C, ....
Note. In field Number format the value Appendix A should be displayed with the letter “A” highlighted.
- In field Number format after Appendix A, enter a space character.
- Click the More button.
- In the list Link level to style select Heading 7, then press the OK button.
Note. Heading styles are predefined with specific formatting attributes for paragraphs and characters. To customize the appearance you want, you can change these styles using the Style command on the Format menu.
Example 2. Inserting page numbers for chapters and appendices
Follow these steps to insert the page numbers of the 1-1, A-1 style that works with these heading styles.- Make sure the document contains a specific section break. Usually the type of partition break is needed from next page... A section break is used to separate the main document area from the application area. If there is no section break at this point, position your cursor over a blank area above the application, then follow these steps.
- On the Insert menu, choose Break.
- In the Break dialog box, select From next page in the area of New section and click OK.
- Format page numbers to include chapter numbering. To do this, follow the steps below.
- Move the cursor to the title page of the first chapter.
Note. In Word 2007 select Page numbers in the tab Insert.
Note. In Word 2007 select Format of page numbers.
- Check the box Include chapter number.
- In the list starts with style select Heading 1 and press the OK button.
- In the Page Numbers dialog box, click OK.
- To format page numbers to include application numbering, follow these steps.
- Move your cursor to the title page of the first application.
- From the Insert menu, choose Page Numbers.
Note. In Word 2007 select Page numbers in the tab Insert.
- In the Page Numbers dialog box, select the desired page number placement. Click the Format button.
Note. In Word 2007 select Format of page numbers.
- Check the box Include chapter number.
- In the list starts with style select Heading 7.
- In the area of Pagination choose begin with, then click 1 to start all chapters or chapters at 1.
- Click OK twice to return to the document.
Example 3. Creating a custom table of contents
To create a table of contents that includes both chapters and appendices, and uses a specific pagination style, follow these steps.- Place the cursor where you want to create the table of contents.
- From the Insert menu, select Link, and then Table of Contents and Indexes.
Note. In Word 2007 select Table of contents in the tab Recommendations then click Table of contents.
- Open the tab Table of contents.
- Click the Options button
- In the fields Level enter 1 in the text box to the right of Heading 7.
- Click OK.
- In the dialog box Table of Contents and Indexes press the button OK.