If the tablet does not turn on what to do. The tablet does not turn on: possible problems and methods of solving them.
Regardless of the cost and characteristics of the technology, any gadget can have problems. If you are reading this article now, then with your tablet computer trouble happened, for example. Before you run to a service center, give your gadget for repair and pay for diagnostics, you can try to find out why yourself.
The reasons for the breakdown can lie both in the Android OS software and in the hardware. Of course, after a serious fall, it will most likely be difficult to fix the problem on your own. But if the tablet stopped turning on after installing the application or updating the firmware, then you can easily cope on your own. But first things first: let's deal with the diagnosis by symptoms.
Tablet cannot be turned on
There are many reasons why the tablet may not turn on. In order to restore the operability of the device, the most commonplace breakdowns should be excluded:
- Check the battery first. It's not funny, but many gadget owners simply forget to put the device on charge in time. Android models may not show signs of life for another 10 minutes after being connected to the power supply. Doesn't it turn on anyway? Make sure the charger is working properly.
- Make sure the power button is working. To do this, we recommend that you listen, because when pressed, a click should be heard. The problem is treated with soldering, but it is better to entrust this kind of work to a specialist. In the event that the period of warranty service has not ended, even more so it does not advise to engage in amateur activities.
- Make sure the tablet is not damaged. For example, if he spent some time in the hands of a child, then you should look for cracks or dents on the case. In this case, the repair should also be entrusted to professionals, because it will be difficult to independently identify the exact cause of the problem.
Diagnostics and repair at home
If it does not turn on, and you do not have the opportunity to contact service center, you should try to reanimate the gadget yourself. At the same time, of course, you must be aware that in case of failure, it may no longer be repairable.
First, you need to exclude the following situation - the device is working, but there is no image. This is quite easy to do. First, you charge the tablet, then turn it off. After 20 minutes, turn it on, wait two minutes and check the back cover: it should get a little warm. If this is the case, then you will have to disassemble the gadget and check the cables. Also, the problem may be hidden in a burned-out video card - then the repair will not do without soldering.
Breakdowns associated with the power supply system are also common. In most Android models, the battery is soldered to the motherboard with wires. Sometimes the batteries are connected with a ribbon cable or connector. Therefore, you must first check the contacts. If everything is connected correctly, then we continue to troubleshoot.
Often, the device may not turn on due to a malfunction. In this case, it would be nice to measure the voltage provided by the battery and from the board. To measure the voltage of the board, you need to remove the battery and connect the charger. As a result, you should receive the following data:
- when charging at 5 V, the battery has 3.7 V, and 3.9-4.2 V is supplied from the board;
- when charging at 9 V, the battery has 7.4 V, and 7.9–8.2 V is supplied from the board;
- when charging at 12 V, the battery most often has 7.4 V, and from the board 7.9-12.2 V.
If your measurements match the above data, then there is no problem with the power circuit. In this case, it is worth looking for the reason why the gadget does not turn on in the board malfunctions or the bootloader failure. In any case, "self-medication" is contraindicated, and it is worth seeking help.
Tablet PC turns on "halfway"
Consider now such a case - your gadget turns on, but an endless screensaver with the inscription "Android" or with the image of a broken robot freezes on the screen. Here the reason is a software failure. It usually occurs after installing updates, new applications, forced termination of system processes.

What is the best way to proceed in this situation? It is worth trying a factory reset. You will lose all your data, but you will get a working device. To carry out hard reset you need to get into RecoVery mode. Depending on the gadget model, pressing one of the following key combinations will help you:
- volume up, volume down and power button;
- power button, home key and volume up;
- power button and volume down;
- power button and volume up;
- decrease and increase the volume.
Next, you need to find the "wipe data / factory reset" section, after selecting which, feel free to press "yes - delete all user data". Then choose "Reboot System". Moving between items in RecoVery mode is carried out using the volume rocker, and the selection is confirmed with the power key.
In cases where hard reset is powerless, you can try to reflash the device. But for this you need to be rooted. In most cases, this means you void your warranty. In addition, you act exclusively at your own peril and risk, so no one gives any guarantees of a positive result. Before doing this, think about contacting a service center.
Of course, with any attempt, there is a risk of finally breaking the device. Therefore, without some knowledge of electronics, you can only reset to factory settings and make sure that the charger is working properly.
Especially often there are typical "diseases" in inexpensive Chinese models. If you know about such problems, then share your experience and methods of "treatment" with our users. Have you decided to start parsing the gadget after all? Search online for instructions for your model.
The tablet is a small-sized mobile computer that hit the market thanks to Apple in 2010. A distinctive feature of a tablet from a stationary computer or laptop is the absence of a keyboard and mouse. To control the operation of the tablet, just touch the screen with your finger (in slang, tap) at the desired point, and to turn the pages, just slide your finger across the screen in the desired direction.
Due to their small size, weight and ease of control, tablets instantly conquered the whole world and today, in any corner of the planet, in the most unexpected place, you can meet a person with a tablet in his hands. The mobility of the tablet opened up not only new communication possibilities, but also provoked additional malfunctions of the tablets associated with their mechanical breakdowns. The tablet can be accidentally dropped, sometimes people sit on it or step on it.
All malfunctions of tablets can be divided into two types - software and hardware. Software failures in the tablet operation occur in the event of a software malfunction and are eliminated by flashing or reinstalling the non-working application. Hardware failures (mechanical and electrical) are associated with the failure of tablet elements, such as microcircuits, transistors, resistors, capacitors, battery, buttons, touch screen or a matrix.
In this article, using the example of repair acer tablet A500 considered a method of repairing a tablet with mechanical damage to the power button located on its body. Due to the breakage of the button, the tablet could not be turned on and off.
If the tablet does not turn on, what should I do?
If suddenly the tablet, which has been working stably up to this point, does not turn on when it is turned on again by pressing the Power button, many fall into despair. After all, I really wanted to chat with friends or surf the Internet. The first thing to do is to calm down and analyze the situation to determine the possible cause of the tablet failure.
Reasons why the tablet may not turn on
Your tablet may not turn on for one of the following reasons:
- The battery is flat.
- Broken power adapter.
- Incorrect software operation.
- Failure of the Power button, battery and other components.
In the list, faults are listed in order of their frequency of occurrence. Let's consider how you can determine the cause of the tablet malfunction and how to repair it.
The tablet battery is dead
If the tablet worked for a long time, and it was not turned off with the power button, then it is quite possible that it will not be possible to turn it on next time. Although the tablet automatically goes into sleep mode after a set time, it still continues to consume a small amount of electricity. If the battery is completely discharged during an interruption in the tablet operation, the tablet will automatically turn off and it will be impossible to turn it on using the power button.

To revive the tablet, you need to connect the power adapter to it and press the power button and hold it down for more than three seconds. The tablet should turn on and boot software.
The power button may not respond if the tablet has been outside for a long time in freezing temperatures. This is due to the fact that at negative temperatures, any battery loses its ability to fully give off electricity.
It is unacceptable to turn on the tablet immediately after strong cooling. After bringing the tablet from a frosty street into a warm room, it is necessary to wait at least half an hour until the tablet warms up and the condensate that has fallen on its surface evaporates. Moisture on electronic components can damage the tablet electronics.
Also, the tablet may not turn on without connecting the power adapter to it if the battery is out of order. The battery may fail prematurely due to poor quality, being in a deep discharge state for a long time, or as a result of its resource exhaustion. High-quality batteries last from 3 to 5 years, while the battery life of the tablet gradually decreases over time due to the aging of the battery.
Lithium-ion batteries are installed in the tablets, which do not tolerate long-term deep discharge. This state of the battery greatly reduces its service life and can even completely destroy the battery. Therefore, if a notification appears on the tablet screen about the need to connect a charger, this should be done as soon as possible. You must also fully charge the battery before leaving home or before using your tablet for an extended period.
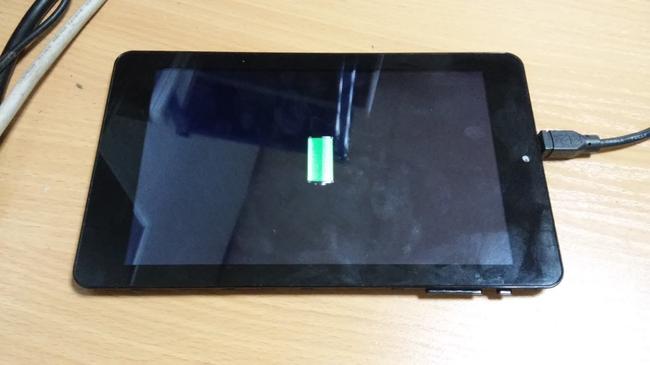
On the screens of any electronic devicesrunning on battery power, a dynamic icon is always displayed to show the battery charge status. The icon represents the battery, partially or completely shaded in white, as shown in the photo to the right. When the battery is all shaded, the battery is fully charged.
Tablet power adapter malfunctions and repairs
The tablet power adapter is an electronic unit that converts the 220 V AC voltage to the 12-18 V DC voltage. The voltage value depends on the tablet model.
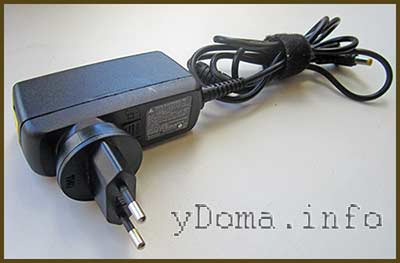
The adapter is also designed for a certain load current and therefore it is unacceptable thoughtlessly instead of the standard one, to use a power adapter from other devices, even if the connection connector is suitable, as you can damage the tablet.
A wire is frayed in the tablet power adapter
Despite the high reliability of power adapters for tablets and laptops, even Chinese ones, it happens that they fail. In most cases, this is due to a violation of the operating rules. Some users, when working on the tablet with the adapter connected to the mains, due to the insufficient length of the wire, pull it like a string. Sometimes pets will chew the adapter wire.

As a result, at the point where the wire comes out of the connector, it frays, or the contacts in the tablet socket are deformed, and the voltage supply to the tablet is intermittent and eventually stops altogether.

If, when working on the tablet with the power adapter connected, the lightning symbol on the battery icon periodically disappears, this indicates that the wire is partially frayed or the contacts in the adapter power connector socket are deformed.
In order to determine where the contact disappears, you need to insert the adapter connector into the tablet and, pressing it against the tablet, make sure that a lightning appears on the battery icon. Then crumple the wire. If the lightning disappears, then the wire is to blame. If the lightning does not disappear, then the reason is bad contact detachable connection. It is necessary to inspect the plug. If there are no external signs of its mechanical destruction, then there has been a deformation of the contacts in the counterpart, which is installed in the tablet. Replacing the connector in the tablet is possible only in a service workshop.
Tablet power adapter is not supplying voltage
If the battery was charged stably while the tablet was in operation, and the battery suddenly stopped charging, although the battery has not yet been fully charged, then the adapter was inserted into a de-energized or faulty outlet, or is out of order.

Any power adapter always has a sticker indicating all of its specificationsincluding output voltage and permissible load current. For example, the adapter plate indicates that the adapter provides an output voltage (OUTPUT) of 19 V and allows a maximum load current of 2.15 A.
Whether the power adapter is to blame for the fact that the tablet does not turn on with the power button, you can find out by measuring the voltage at the output connector of the adapter with a voltmeter.

To do this, it is enough to touch the central and external terminals of the connector with the ends of the test leads of the multimeter, which is included in the DC voltage measurement mode. The plus is usually found at the center pin of the connector. If the voltage is equal to or greater than that indicated on the sticker, then the adapter is working properly and the cause of the malfunction lies in the tablet.
How to repair a tablet power adapter yourself
If the diagnostics showed that the tablet does not turn on due to a faulty power adapter, then there are two ways to solve the problem - buy a new adapter for $ 15 or repair the failed one yourself.
In order to accurately determine the faulty wire or the electronic unit of the power adapter, it must be opened. Usually the adapter body consists of two halves glued together. To separate the halves, you need to insert a flat screwdriver blade into the gap next to the outlet of the adapter cord and gradually move the halves around the perimeter. Sometimes it is not very easy to do this, but, as a rule, it is always possible without damaging the outer surface of the case.
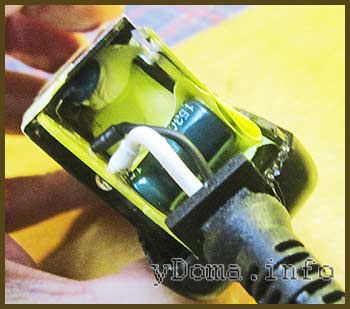
After opening the adapter, access to the soldering point of the cord wires will open. To localize the failure, you need to ring each of the wires of the cord with an ohmmeter in turn, touching one probe to the soldering point of the wire, and the second to the corresponding terminal of the connector. In this case, it is necessary to bend and stretch the cord. If the resistance of the wires is close to zero and does not change when exposed to the cord, then it is serviceable, and the operation of the electronic part of the adapter must be checked.
Attention, a part of the adapter's electronic board is not galvanically isolated from the household network and touching the bare parts of parts and printed conductors is life-threatening.
If the cord is in good condition, then you need to check the operation of the electronic part. To do this, connect the adapter to the mains and measure the voltage at the soldering contacts of the cord wires with a voltmeter. It is best to use an extension cord of the type with a switch for the outlet. The Pilot switch must be set to the off position and the adapter must be inserted into one of its sockets. Next, set the multimeter to the DC voltage measurement mode and touch the soldering points of the output cord wires. Enable "Pilot". The voltage must be equal to or greater than that indicated on the label.
If there is no voltage, then it is necessary to inspect appearance electronic parts, printed conductors and electrolytic capacitors (blue cylinder in the photo) for swelling or traces of electrolyte leaks. If there are any, then they must be replaced.
Repairing the adapter's electronic board requires knowledge and experience with measuring instruments. If it was not possible to identify the failed element by external examination, but you can finish the repair at this and buy a new tablet power adapter.

If the cord ends up in a break at the point where it exits the adapter, then it can be shortened, removed from the ends of the insulation and soldered, observing the polarity, into the printed circuit board. If the break is at the point of entry into the connector, then a complete replacement of the cord will be required, since when replacing only the connector it is impossible to securely fix the wires in it. When buying a new cord, you should choose it with the same connector size that was previously installed.

When soldering the cord into the board, you must observe the polarity. On the adapter board, shown in the photo, the polarity is marked " + "And" - »Is not indicated. But even so it is clear that the negative wire (external contact of the connector) is always soldered into the hole marked GND (common wire), and the positive wire (central contact of the connector) is soldered into VO. There is no standard for the color of the adapter wires, and therefore, before soldering the wires into the board, you need to ring them with a multimeter.

It remains to put the cord in the recess of the adapter body and close its halves. To glue the body, you need to grease the joint around the entire circumference with Super Moment Universal Secondary Glue, press the halves tightly together and leave in this position for several minutes. But before gluing, it is advisable to connect the power adapter to the tablet and check its operation. If the tablet immediately turned on and the battery began to charge, then you can glue the adapter body and on this do-it-yourself repair of the tablet power adapter can be considered complete.
Incorrect operation of the tablet software
There are times when the tablet does not turn on when you press the Power button after rash user actions with the software, such as incorrect installation of new applications, unsuccessful firmware, changing or moving system files. Infection of the tablet with a virus is possible. In this case, the tablet turns on with the Power button, but the software does not load or does not work correctly. As a result, a picture of a broken robot may appear on the screen, or the screen remains black.
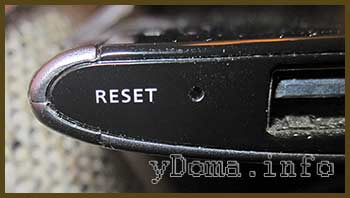
If the screen is black, to restore the tablet's operation, you can try to restart it using the RESET button recessed into the case. On some tablets there is no inscription, but a red dot is applied next to a small hole. The RESET button is recessed specially to prevent interruption of running programs if you accidentally press it while working with the tablet. Therefore, pressing the RESET tablet reset button is possible only with a toothpick, the end of an unbent paper clip, or a similar thin rod.
Before pressing the button, disconnect the tablet from the docking station, and remove the sim and flash cards from it. Then press the RESET button and hold it for at least 3 seconds. The system should reboot and it is quite possible that the tablet will work.
Before rebooting the tablet using the RESET button, please note that in some models of tablets, the system may return to the factory settings. In this case, all settings you have made and personal information will be lost. If all of the above actions did not lead to a positive result, then you should contact the service, since the restoration of the tablet's operation is possible only by connecting it to another computer on which special software and experience with them are installed.
Fault definition
and repair of the Power tablet power button
It happens that the tablet does not turn on when the Power button does not work. A faulty button is easily diagnosed by the behavior of the tablet when you press it.
Troubleshooting the Power button
Pressing a working Power button should be accompanied by the following tablet behavior:
- A quiet mechanical click emanating from the button.
- When the tablet is in sleep mode, cause a picture to appear on the screen.
- A pop-up menu appears to turn off the tablet if it is working.
If the tablet behaves differently when you press the button, then the button is faulty, and you will need to disassemble the tablet to repair it. It will be possible to work on the tablet, but it will not be possible to turn it off, and it will be possible to turn it on only by inserting the plug of the power adapter connected to the network or by pressing the RESET button. While the battery is charged, the tablet will be either in a working state or in a sleep state. It will not be possible to turn off the tablet, but it will turn itself off when the battery is completely discharged.
If, after diagnostics, it is determined that the tablet does not turn on due to the inoperative Power button, then you will have to disassemble it to repair the tablet.
How to disassemble an Acer A500 tablet with your own hands
Let's look at the example of disassembling the Acer A500 tablet how to properly disassemble the tablet. Before proceeding with the disassembly of the tablet, you need to prepare the workplace and stock up on tools.
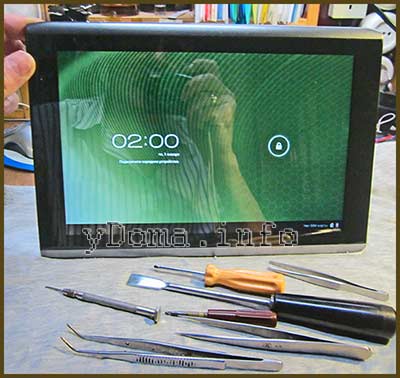
The table on which the tablet will be disassembled for repair must be covered with a soft cloth. From the tool, you will need a screwdriver with a cross-head thin sting, tweezers of different sizes, a metal spatula, a plastic pick or a bank card.
Usually, the two halves of the tablet body are held together with latches. But some models also have screws. Sometimes they are clearly visible on the back cover, and sometimes they are hidden under the rubber stops. Therefore, before disconnecting the covers, you need to carefully examine the tablet and, if any screws are found, unscrew them.

Along the entire perimeter inside the main half of the tablet, in which the screen and all the electronics are installed, there are plastic lugs with recesses, as shown in the photo above.

And along the perimeter of the back cover, there are projections that, when the covers are closed, go into the recesses of the front of the tablet case. When squeezing the halves of the case, the protrusions enter the recesses and thus provide a reliable grip and tight closing of the halves of the tablet case. Therefore, to disassemble the tablet, you need to remove the protrusions from the recesses.
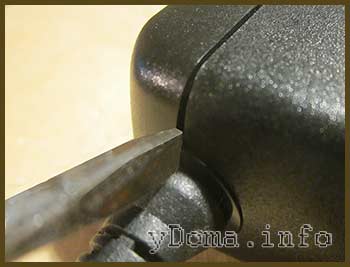
The smallest number of latches are in the area of \u200b\u200bthe volume control buttons and power on the tablet. Therefore, from this place it is necessary to begin the separation of the halves of the case.
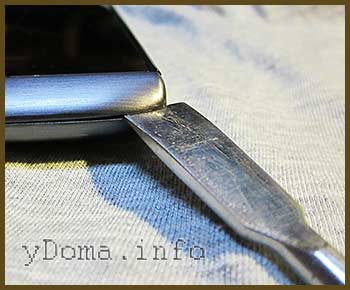
Now, imagining how the tablet latches are arranged, you can start disassembling its case. Place the tablet on a soft cloth with the screen facing down. Then, to a depth of a couple of millimeters, insert the blade of a metal spatula into the gap between the halves of the tablet, and lowering its handle down and slightly turning it to open the nearest latch. As soon as a gap has formed between the halves, it is necessary to insert a flat screwdriver or other object into it so that the halves do not close again. Now, moving the scapula along the perimeter along the gap, you need to open all the other latches.
On the Internet, you can find recommendations to use a plastic card or a pick (a small plastic thin triangle that musicians use when playing stringed instruments) instead of a metal spatula, but my attempt to disassemble the tablet with them was unsuccessful. The plastic card was deformed when trying to squeeze into the gap between the tablet covers. But it is very convenient to separate the remote control cases using a plastic card.
The back cover, released from the latches, must be removed carefully so as not to break the wires coming from possibly installed electronic parts, such as speakers, microphones or a video camera.
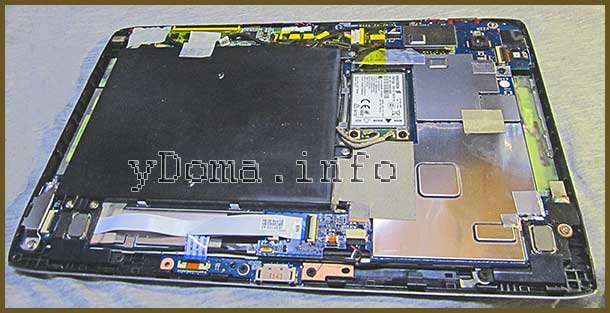
The back cover has been removed from the tablet, and now you can examine its internal structure to decide on the sequence of further disassembly.
If the tablet was disassembled for replacement battery, now you need to unscrew the screws securing the cover that covers the battery. Next, unsolder the wires from the battery to the board (if soldered) or remove the connector and replace the battery with a new one. Observe polarity when soldering wires.
The tablet was disassembled in order to restore the operation of the Power button, which, as a result of diagnostics, was found to be inoperative. After removing the back cover and examining the button, it became clear why it did not work - the solder in the places where the button base was soldered to the printed circuit board collapsed. As a result, the button moved to the side, and it became impossible to press the Power key. But it was too early to rejoice, since access to the button repair could only be obtained after removing the motherboard printed circuit board with the processor.
How to properly disconnect the connectors and flat cables of the tablet
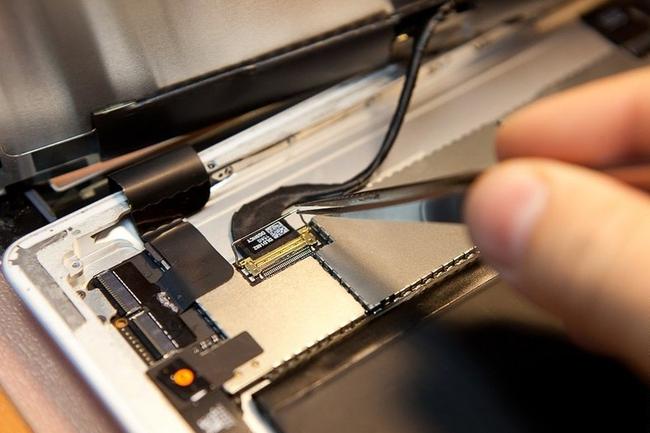
The difficulty in removing the motherboard was that many cable loops were connected to it using detachable connections, including several flat ones without connectors, which are very thin and easily damaged. For the correct disconnection of the connectors, it is necessary to imagine how their halves are held together.
Attention, it is unacceptable to disconnect the connectors by pulling them out of the loop wires coming out of them, since the wires are thin and can easily break. It is especially dangerous if outwardly the wire looks intact, but inside the plastic sheath the core breaks. Finding and fixing such a malfunction yourself will not be easy.
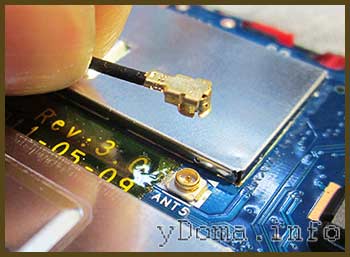
The simplest connectors in the tablet are coaxial, which are designed to transmit high-frequency signals. The removable half of the connector is fixed by a recess in the mating part thanks to the spring-loaded rim of the split cup. To undo the connector, you need to pry the cup by the rim with a flat screwdriver.

The connectors shown in the photograph do not have latches and are held in place by friction. To undo them, it is enough to grasp the removable part of the connector with the jaws of the tweezers and remove it from the stationary part by shaking it to the sides. If there are two identical connectors on flexible wires next to each other, then to avoid confusion during assembly, it is advisable to mark them before dismembering the connector.
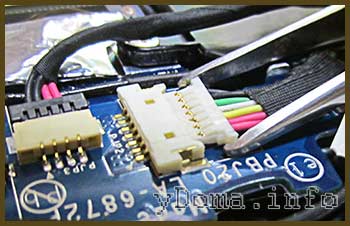
This type of connector has two tabs in the upper plane of the removable part. The tabs engage two square holes made in the soldered part of the connector. The connector is undocked in the same way as the previous one.

I use a small 10 cm long tweezers to pull out the plastic inserts of the connectors. To prevent the tweezer jaws from slipping, they are tucked in as in the photo. With such tweezers it is also convenient to pull out the terminals of resistors, diodes and similar radioelements from the printed circuit board when soldering.
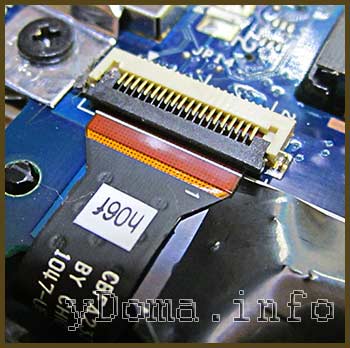
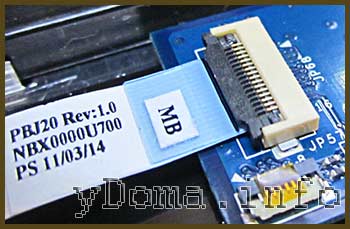
This type of detachable connection is a flat cable, the bare end of which is pressed against the contacts in a plastic block. A black strip is visible on the connector, which is the release lever.
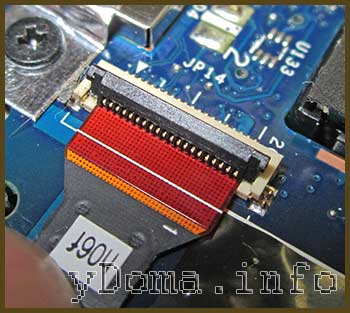
To release the cable, just turn this bar 90 ° clockwise, as shown in the photo, and grasping the ribs of the cable with your fingers, remove it from the connector.

To fix the ribbon cable in the connector, it is necessary to put the ribbon cable in place into the connector using minimal effort, grasping its sides with your fingers.

All connectors from the motherboard are disconnected and it remains only to peel off the pieces of tape that hold the wires and unscrew a few screws. The scotch tape must be saved, as when assembling the tablet, it will need to be glued to its original place.

This is how the tablet power button moved away, it is obvious that the Chinese manufacturer saved on solder. The button was installed in its original place and soldered with a ten-watt soldering iron to the PCB. Additionally, the button was tested with a multimeter. When pressed on its pusher, the resistance became equal to zero, and when released - infinity.
There is a rather massive tablet position sensor behind the power button. To exclude repeated displacement of the power button, the distance from the back wall of the button to the side of the sensor was measured with a caliper. It was three millimeters. A plate in the size of a button was made from a glass-fiber laminate plate three millimeters thick.

The plate, after covering its sides with a thin layer of Moment glue, was tightly inserted between the button and the position sensor, as in the photo. Thanks to such a modification of the motherboard, it became impossible to move the power button from its place even with a strong pressure on it.
Tablets have already become common gadgets. They are essentially compact computers that are capable of solving various tasks. This article will talk about how to turn on the tablet if it won't turn on, the power button is broken, etc.
Solution of problems
It would seem that turning on the Lenovo tablet is not difficult, because you just need to hold down the power button and after a few seconds the usual manufacturer's logo should appear on the screen. But if the device is damaged or the programs were previously installed incorrectly, then the gadget may not turn on. The following will describe how to solve problems with the tablet. Perhaps one of them will help restore the normal operation of the device.
Broken power button
The power button on tablets usually has several functions: turning off the device, and also unlocking it. If it is out of order, then you can try to turn on the gadget in several ways.
- The simplest solution is to connect the charger. Lenovo Tablet should automatically turn on. If the power button is broken, then it is worth turning off the screen lock, since the gadget cannot be unlocked and you will have to constantly connect the charger to it.
- If the power button has sunk into the case, then you need to remove the back panel and try to put the key in its place. It is worth noting that this should be done only if you are sure that you can cope with this task.
- If it was not possible to fix the button on your own, then you need to take the tablet to a service center. Qualified specialists will solve the problem in a short time. The cost of replacing or repairing a button should not be too high, since the repair is essentially straightforward.

Tablet won't turn on
Your Lenovo gadget may not turn on for a variety of reasons. You can try to connect the charger, if charging goes, then perhaps the battery was simply completely discharged. Two more possible solutions are booting the tablet in safe mode and resetting the settings (detailed in the paragraph below).
If all attempts to restore the operation of the device are in vain, then you need to use the services of the service center masters.
Infinite tablet loading
In most cases, this is caused by a software failure. When the gadget is turned on, loading usually stops at the Android logo. You can try to fix the situation by resetting the settings.
Hard Reset to different devices may differ, so the instructions below may not work for any tablet. A factory reset deletes all data and files.
How to reset settings:
- Turn off the tablet, remove the memory card and SIM card.
- Hold down the volume down or up button and the power key for 5-10 seconds.
- A special menu should appear where you need to select "Settings" - "Format System" - "Reset Android". You need to switch between items using the volume buttons.
- Lenovo tablet will reboot and if you're lucky, it will work fine.
You can write your questions in the comments. Also, if you know other methods for solving problems with tablets, then be sure to share this information, as it will be useful to other users.
What if the tablet won't turn on
It so happens that in the process of passing games or working on the tablet, it stops working and does not turn on. The main reasons can be conditionally divided into two categories: problems with the hardware of the device are malfunctions of the battery, connecting cables, boards or some problems with the software - incompatibility of programs, operating system flew off or incorrectly installed after the update process.
Let's take a closer look at individual cases of tablet malfunctions.
There are absolutely no signs of life
1. The simplest and most commonplace reason is a completely discharged tablet battery. To check this version, plug it in and wait at least 10-15 minutes. Only then will the tablet be able to accumulate the minimum amount of energy to turn on. Hold the power button on the device body, wait for the screen to light up. If the screen turns on, check the health of the charger - take another one and do the above. The tablet turned on, but the charging process is not progressing, you need to find out why the tablet is not charging .
2. If a child played with the tablet, it may have damaged it by hitting the floor or corner of furniture. Most likely, part of the display has suffered, in which case it can be replaced. The tablet itself is in working order. Screen damage is usually visible to the naked eye.
3. If the device had no mechanical damage, a rare case - the video adapter is out of order.
If you find such signs and there is a valid warranty for the device, run to the salon and wait for repairs, it is simply unreasonable to make repairs yourself.
The patient is neither alive nor dead
When the tablet turns on, but not completely, but freezes during the boot process (there is only a splash screen on the screen), we are dealing with a software failure.
The reasons may be as follows:
1. Some programs or games are not installed correctly.
2. You forcibly terminated the work of system processes, possibly through third-party software or a task manager.
Procedure:
You can try to save the tablet by resetting the system to factory settings. It is best to find some data on this on the Internet, because each device model has its own nuances. Or use the hard reset program. Using these instructions, you can reduce the procedure to the following:
1. Turn off the device.
2. Remove the sim card and memory card.
3. Hold down the volume up key (on some models - down) and the button to turn on the tablet. Hold for about 10-12 seconds
4. If the tablet vibrates and a menu appears on the screen, you are on the right track. Select Settings, then Format Systems.
5. Resetting the system - Reset Android.
6. The tablet will reboot with factory settings.
7. Try this scheme several times, it should work.
If unsuccessful, read the information on “ How to unlock your tablet”. In addition, an excellent option for resuscitating the device is flashing tablet ... When unsuccessful firmware device, here are some good practical tips.
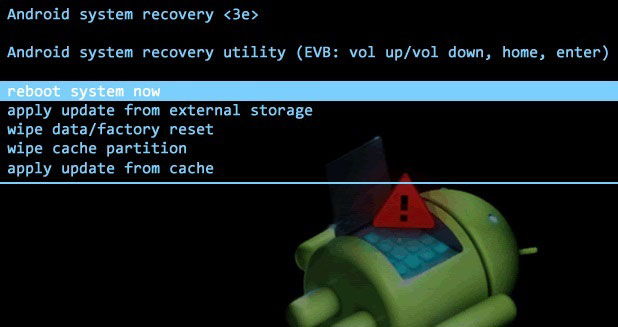
Exclamation mark on a lying android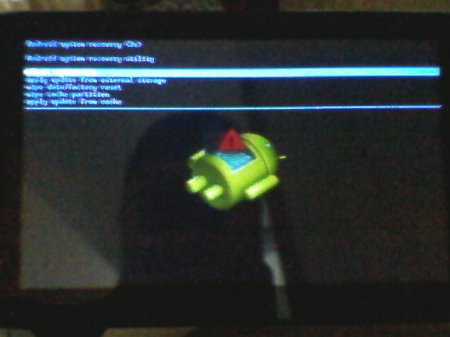
If an image of a lying green android appears on the screen of the device, and there is an image of a red exclamation mark on it, you are in stock Recovery mode. There is nothing wrong with it. Need to install modified ClockWorkMod Recovery... You got into it, because when you entered a combination to reset the settings, you made a mistake, because each tablet model has its own combination. Press the power button and hold it for a while until the device turns off, you can just wait 3-5 minutes until the device shuts down on its own. In the most extreme case, you can do the flashing again.
What is Fastboot
The user can get into the mode Fastboot mode, in this case, the android also lies on the screen, but there is no exclamation mark. You need to use the volume buttons to get to the menu item Restart bootloader , we make a choice with the power button, sometimes it helps to revive the tablet.
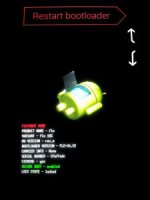
Remember that each device model has its own "chips". Some tablets easily reset the settings after pressing the home button with the android lying down, others react only to the simultaneous pressing of the plus and minus buttons in volume control for a long time.
Play or watch a movie on your tablet, but ... it won't turn on. You are at a loss and the only question that interests you is why is this happening?
Do not send your tablet to a service center right away
Instead of panicking, let's find out why the tablet won't turn on, and how to figure it out on our own.
The tablet does not turn on - what could be the reasons?
First of all, problems with equipment of this kind can be conditionally divided into two types - mechanical - problems with the integrity of the device or with its parts, or with the system or software, that is, its internal contents.
We check the integrity of the device
It is logical that first you need to check the external integrity of the tablet, for which we will be guided by the following recommendations:
- Check if the battery is charged and remember the last time you put the device on charge. If it was a long time ago, and then you did not use the tablet for a long time, then it could be very discharged. Therefore, try plugging it in, wait a few hours - at first, in some cases, it does not even show that it is charging.

- If you see that charging does not occur even after a few hours, it may be in the very charger - then you should try to connect another to the tablet or connect this accessory to another tablet. So you can understand who is to blame - your gadget or your charging device.

- If you are sure that everything is in order with the charge, inspect the entire device for damage, but do not disassemble it - you can only make it worse.
- In the case when the tablet does not respond to the charge, did not fall and is not damaged, but completely refuses to respond to any action, most likely the matter is in a malfunction of one of the parts. In such a situation, all that remains is to carry it to specialists in order to find out what is the reason for its failure.
![]()
Note that in some cases, repairs may cost you large amountrather than buying a new tablet. Why? This happens if, for example, a video adapter breaks down. But this is the worst scenario - always hope for the best.
We are looking for problems with the system
Why won't the tablet turn on? If you see that it does not load completely, but gives signs of vital activity - for example, the screen lights up, but goes out after a few seconds, the boot logo appears, but then the matter does not go further, or the icon of a broken Android is knocked out for you, then all is not lost ...
First of all, try to reboot the system using the connector with the Reset key - this usually requires a rather thin object that needs to be pressed down on a small button inside this slot.
If this does not help, try resetting all parameters and settings to the factory version, which is done as follows:
- Turn off the tablet, remove the memory card and sim card from it, if any.
- Now you need to hold down the key combination to enable the hard reset mode - usually the volume and power keys are pressed simultaneously. In some devices, this combination may differ, try several options if the proposed option did not help you.
- When you see a menu like the BIOS on a computer, you need to execute the following commands in it:
- Settings - Format system - Wipe data / factory reset.
- To navigate between menu items, use only the volume keys, to select a section - the tablet power button.
A similar mechanism for restoring the tablet returns it to its original factory settings, while you will lose all files from memory, but you will get a working tablet.
Apart from this troubleshooting method, the logical method for starting up the tablet is to change its firmware.
Why is that?
Often, problems with turning on and then starting the system mean that the software does not fit the device or does not work correctly, so it needs to be reflash.
This is done quite simply by using the following actions:
- Download the appropriate firmware for your tablet to your computer.
- Write it to a previously formatted memory card in a folder called SCRIPT.
- Insert the memory card into the tablet, try starting it, after which the process of installing the new system will begin.
![]()
If the reset hard reset menu did not help you, the tablet does not reflash or does not respond to any actions with it, then it is really worth taking it into the hands of a specialist, because you never found out why it does not work. Do not risk its performance by opening the case, and do not go to its details - this can only make it worse.