Sint login personal account dir 300
Home Wi-Fi Routers D-Link DIR-300 - this is probably the most common router in the territory Russian Federation... The fact is that this is one of the very first subscriber devices of this class to appear on the market. And although many hardware versions have been easily changed since then, the DIR-300 still does not lose its popularity.
Setting up DIR-300 is nothing complicated, you just need to know your type of connection to the provider and, if necessary, the data for authorization. As an example, we will consider the firmware version 2.5.11 for the hardware revision of the DIR-300 D1. If you have a different version (C1, B1, B3, B5, B7) - do not be alarmed. Even though they have a different firmware version (such as 1.4, etc.) and the configuration web interface looks a little different, the sequence of actions will still be the same. Just follow the analogy.
The IP address of the router through which you can enter its settings - it must be entered into the address bar of your Internet browser:
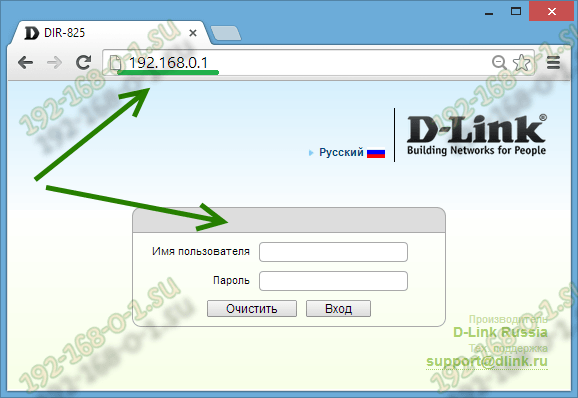
After that you will see an authorization form. The default login is admin. If you just unpacked the DIR-300 router out of the box, then the login password will be the same - admin. If authorization fails, then use the instructions.
To configure the connection of the D-Link router to the Internet, we need to go to the section Network-\u003e WAN:

If there is already any connection in the table, left-click on it to enter its parameters and click Delete.
Then, you need to create a new connection. To do this, press the button Add to... After that, you will be taken to the section for configuring the connection of the Dlink router to the Internet.
1. Dynamic IP (Dynamic IP) on DIR-300
In the "Connection type" field, select the connection type Dynamic IP:
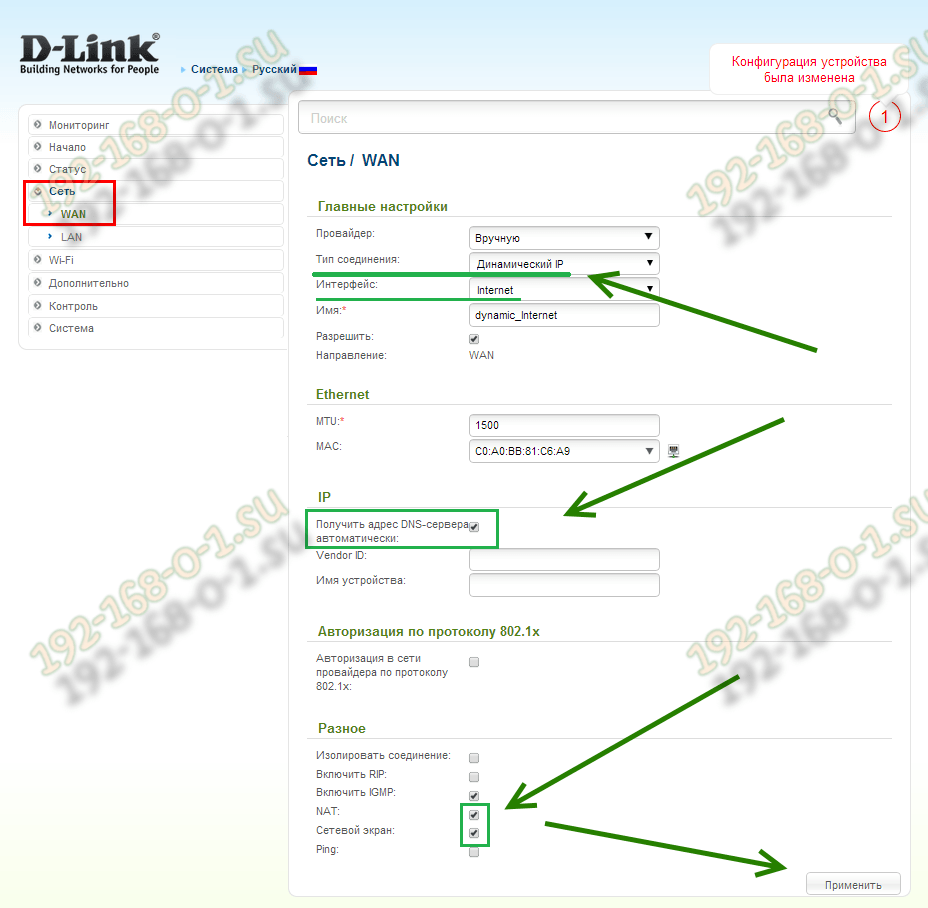
In the list "Interface" set the value the Internet, check that the "Allow WAN direction" checkbox is checked, and below, in the "Miscellaneous" section - checkboxes NATand Firewall.
2. PPPoE on D-link DIR-300
This protocol is used by most providers in Russia, Ukraine and Belarus - Rostelecom, Dom.ru, TTK, ByFly and UkrTelecom.
To configure the Internet via PPPoE on the D-Link router, you need to set the value in the "Connection type" list PPPoE:
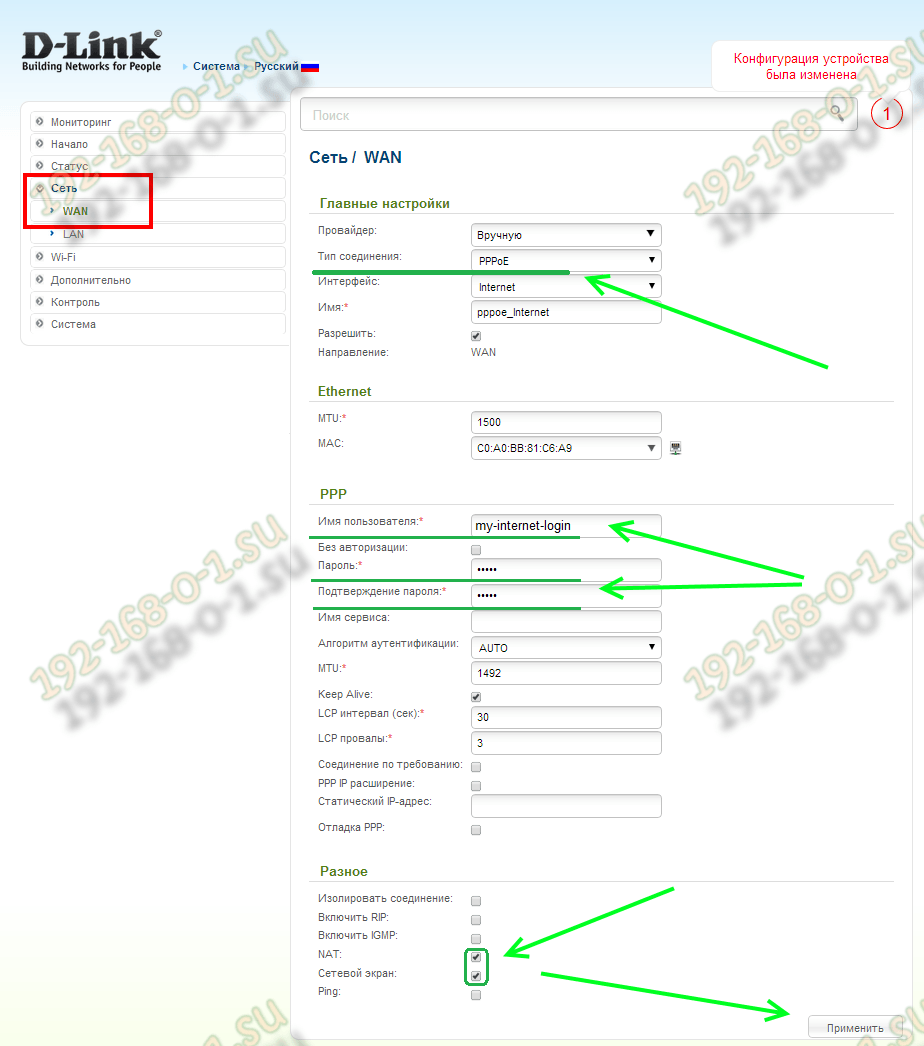
Make sure that the "Interface" field is set to Internetand the "Allow WAN Direction" checkbox was checked. Below, in the "PPP" section, you need to register the login and password for access to the network, which were given to you at the conclusion of the contract with the provider.
Checking the boxes NATand C network screen.
Click the "Apply" button.
3. VPN L2TP on the example of connecting to Beeline.
This is the most difficult type of connection, as it actually consists of two - Dynamic IP and VPN tunnel.
In the list "Connection Type" set the value L2TP + Dynamic IP:
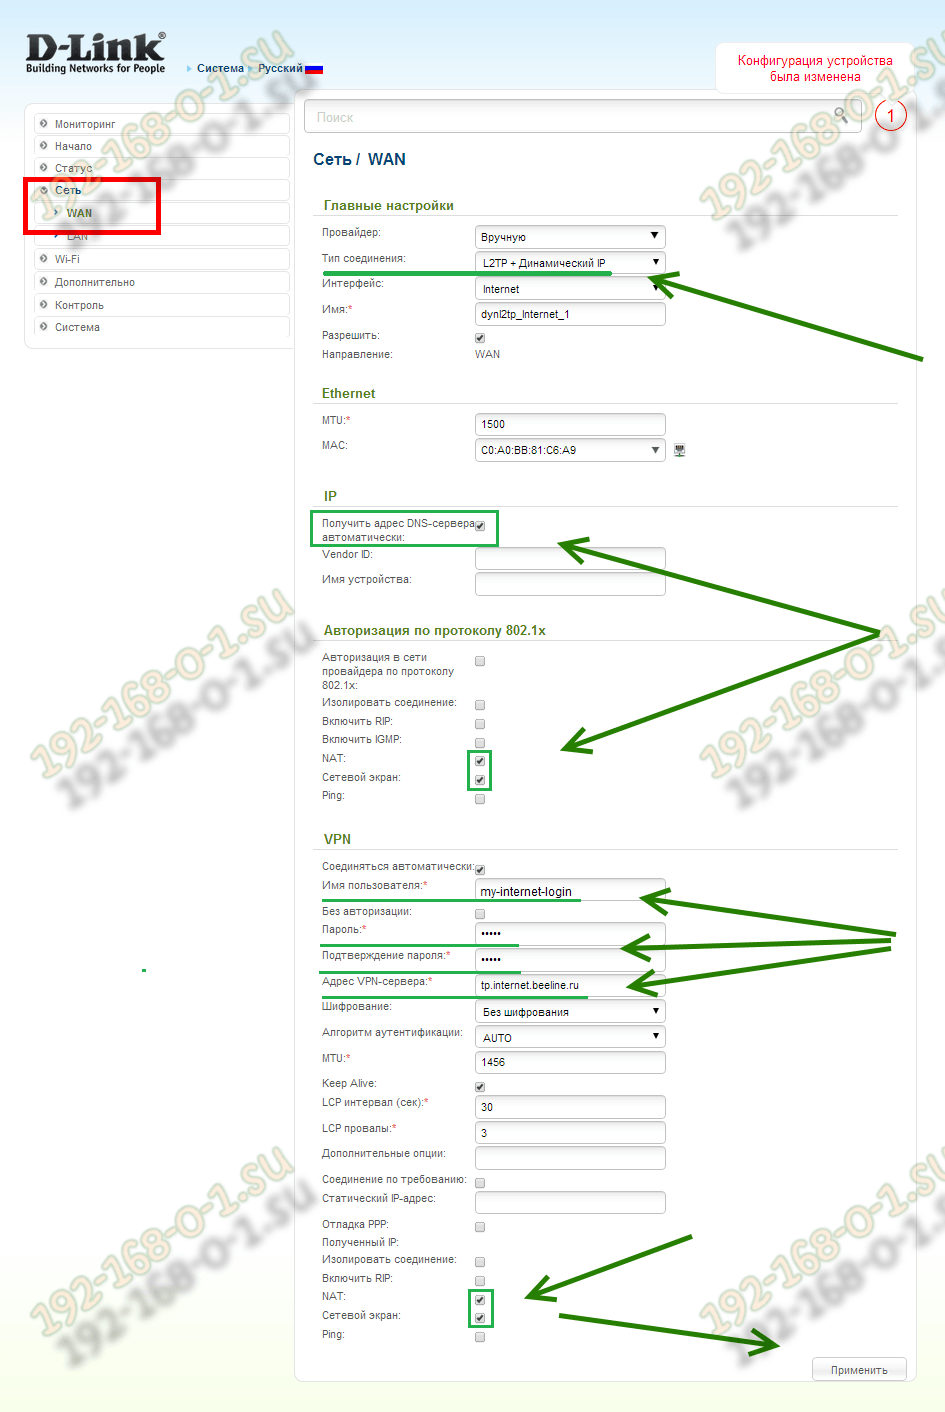
Make sure the "Allow WAN Direction" checkbox is ticked. We go down to the section IPand put a tick "Obtain DNS server address automatically".
Below, check the items NATand Firewall.
Now all that remains is set up a VPN connection:
We put a checkmark "Allow connection".
In the "Username", "Password" and "Password Confirmation" fields, you must enter the authorization data that you received when concluding an agreement with BeeLine.
Be sure to specify the provider's VPN server address. Beeline has this - tp.internet.beeline.ru.
We don't touch anything else, just check that there are check marks NAT and Firewall... Click the "Apply" button and check the Internet access.
Setting up the DIR-300 NRU router fails, help with advice. I bought this router model. The store calmed me down, said that it is the easiest to install and that almost all Russian Internet providers work with it and everyone has instructions on how to install it on the official websites. Of course, there were no instructions for this model on the website of our provider, and I also realized that the DIR-300 router is of some different revisions b1-b5 (it turned out that I had NRU b5). And for each Internet provider, the router is configured differently, or so it seemed to me. As for the manual book attached to the router, there is a description of how to connect the DIR-300NRU b5 to operating system XP. I want to connect it first to the system unit with the Windows 7 operating system, and then connect my daughter's laptop to the created virtual network, but it also has Windows 7. I tried to figure it out myself and you know, from all these IPoE and PPPoE, PPTP head got sick. So I have a question for you, whether I can still connect two of our computers to the router or immediately call a specialist like you. And yet, explain in Russian, what is the difference between WAN and VPN? Vladimir. Samara.
For a long time my friends have been asking me to buy and configure a router for them. We go to the store, buy and set up step by step, and you watch everything that happens, everything will be clear even to a beginner. You can connect any router, it all depends on your perseverance and of course patience. Setting up the DIR-300 NRU Router not complicated, this router is very popular because of the inexpensive price of 1000-1100 rubles and good reliability and works with the operating systems Windows XP, Windows Vista, Windows 7. On the official websites of Russian providers, there are instructions for installing it, but as I noticed obsolete revisions b1, b2, b3, web interface settings in black and brown.
- In 2011, D-Link updated the web interface, now the router settings windows (including the new model DIR-300NRU b5 pale green color, and the background is white, of course, the settings have changed slightly. For providers, everything remained in its place. This is confusing for many users who recently bought a router. At the moment, according to my observations, most often people buy the D-Link DIR-300 NRU b5 model that has Wi-Fi support at speeds up to 150 Mbit, uses an updated settings interface, a built-in firewall and compatibility with 802.11b and 802.11g wireless standards. I advise you to know exactly what you are buying and check everything in the store.
Attention! Setting up a D-Link DIR-300 NRU router (revisions HW: b1, b2, b3) is slightly different from setting up a DIR-300NRU b5 model router, but the essence is basically the same, now you will see everything for yourself.
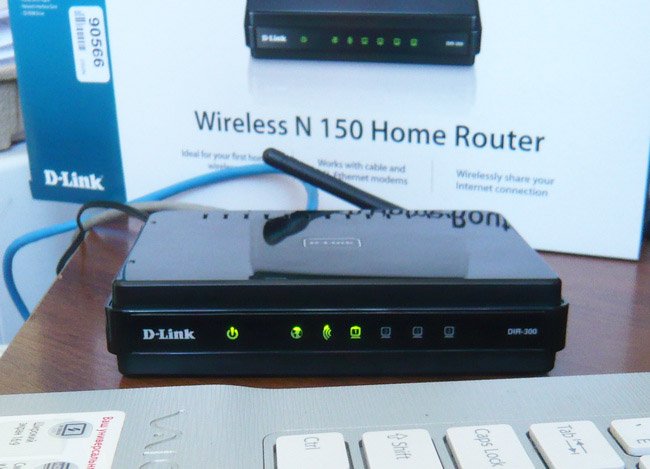
Now about the settings. Before we actually get to the Internet (global computer network) from our home, we first get to our Internet provider or VPN provider (for example, Beeline). There are few real providers in Russia, there are many sub-providers, in the simple language of intermediaries. But how these providers organize their network depends on how to configure the router.
What is the difference between all providers (providing Internet services) and how does this affect the settings of the router?
Nowadays, one half of the providers use the modern network protocol DHCP or IPoE for operation, where the distribution of IP and DNS addresses occurs automatically (I must say, it is very convenient for the Internet provider), and for Internet access they use an outdated tunnel protocol or a new second layer tunneling protocol L2TP (bridging PPTP and L2F).
The other half of the providers use the outdated PPPoE protocol, mainly associated with xDSL technology (for example, Rostelecom), that is, they use DSL modems, in the router settings, again, select the PPPoE Connection Type (information at the end of the article) and already configure it a little differently than In the first case. Of course, sometimes there are other features, so before buying a router, my advice to you. Call your provider and find out all the information you need to set up the router, ask about which range of router models to choose from, so as not to suffer later with the settings, firmware and, as you said, by specialists like me. Now, let's take a closer look at the setup, in my opinion of a very good router from D-Link, DIR-300NRU b5. Generally set up many times this router in the seven and in, but unfortunately I did not look at the accompanying manual, but it turns out in fact, as our reader said, nothing is written about Windows 7, but there is information about XP. Don't worry, our router works great on both operating systems.

Let's start with the fact that you need to find out what network protocols your Internet provider uses - PPPoE or L2TP, you can find out by looking at the contract with him or you need to call your provider's support service and just ask, this is the best way by the way. Let's start with the most common and simplest configurable network protocol DHCP today. You also need to find out how your provider issues IP addresses, in the case of the DHCP protocol this happens automatically, you can verify this by looking at the Local Connection Properties of your network adapter.
Windows XP
Start - Control Panel - Network Connections - Local Area Connection - Properties - Internet Protocol (TCP / IP) -Properties - Obtain an IP address automatically and Obtain DNS server address automatically.

Windows 7
Start - type View network connections -Local network connection - Properties - Internet Protocol version 4 (TCP / IPv4) and Properties- Obtain an IP address automatically and Obtain DNS server address automatically.
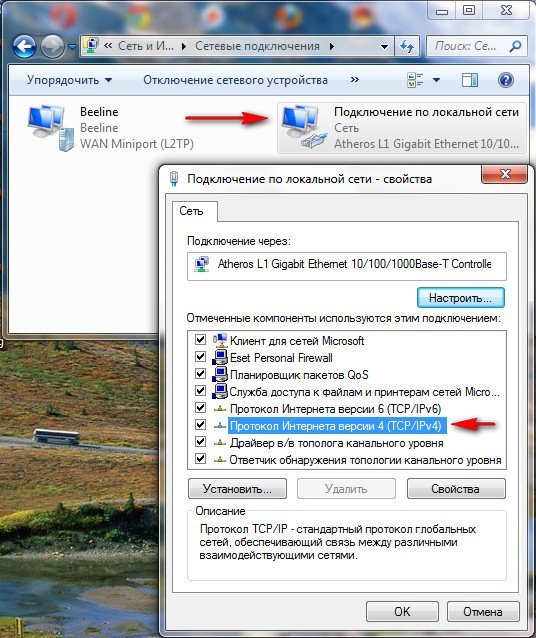
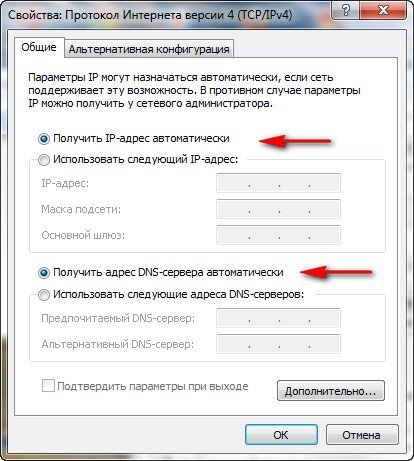
If you have the Use the following IP address checked in the Internet Protocol Properties and the addresses are registered, the same addresses must be specified in your agreement with the provider, then your Internet provider is using PPTP or PPPoE. Let's consider configuring a router with these protocols at the end. But before connecting a router with these protocols, you also need to set the Obtain IP-automatically and Obtain DNS-server address automatically in the Internet connection properties.
Let's go to the router settings. If something goes wrong with you, you can always reset the router settings to factory settings by clicking on the Reset button.
We will connect the local Internet cable conducted by your provider to the WAN port on the router, as we see it says internet, and we will connect the router and your stationary computer to each other network cable (blue in our case) via LAN port # 1.
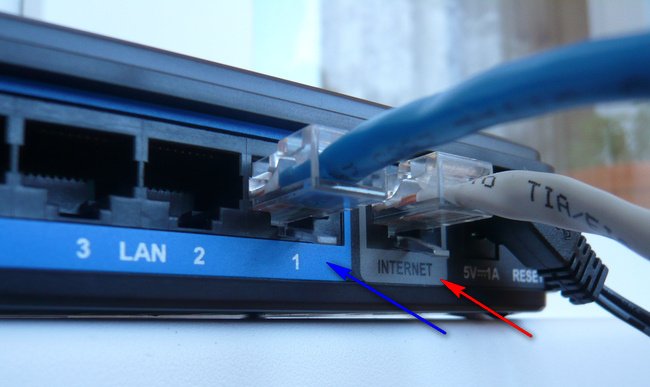
Users who are supplied with the Internet using ADSL technology need to connect the DSL modem and the router with a network cable, then connect the router with a network cable to the system unit.
The DIR-300 router has only 4-LAN ports, to which we can connect up to 4 personal computersthat do not have Wi-Fi.

Turn on the router, open any browser: Chrome, Opera, Mozilla, Internet Explorer and enter 192.168.0.1 in the address bar and press Enter.


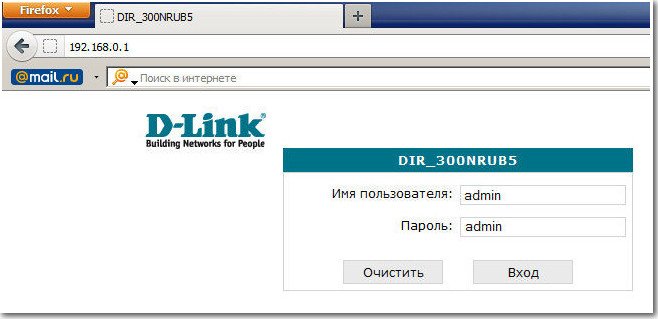

And here we are in the initial window of the DIR-300 router. First of all, experienced users download the latest firmware version from the official website ( software) for the router and install it, at the moment it is installed on our router latest version firmware, so you don't need to download or flash anything. And my advice to you, even when the firmware is released, try first to configure the router as it is, without flashing it, it is easy for a beginner to make mistakes, and then the router can be restored only in the service center.
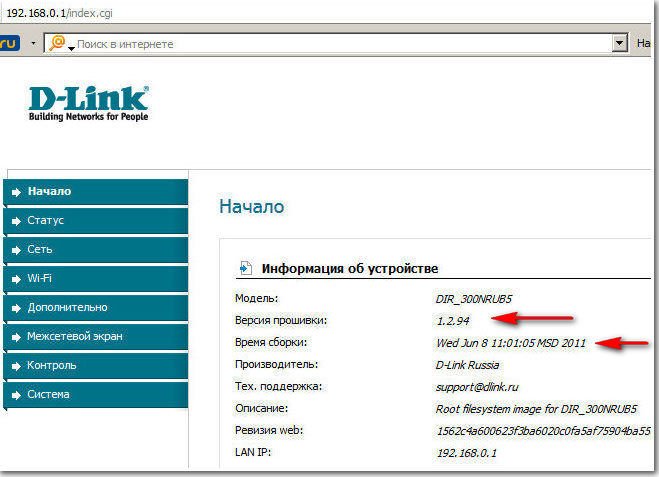
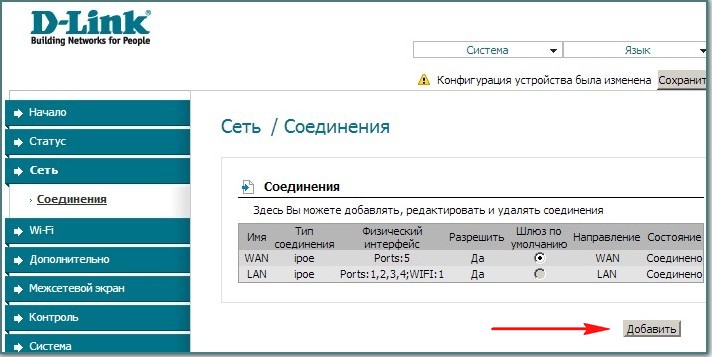
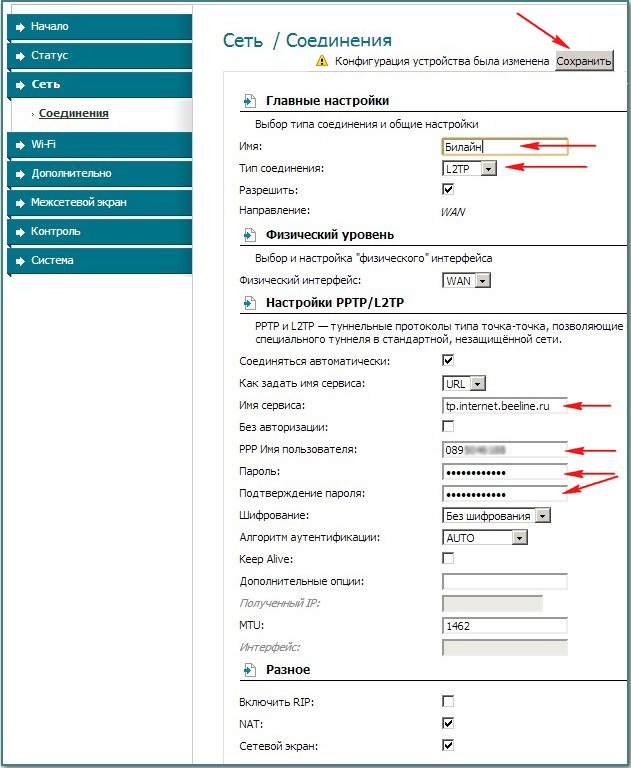
Name - Beeline
Connection type - L2TP
Connect automatically - Check the box
Service name - tp.internet.beeline.ru
PPP Username - our login in Beeline starts with 089 ...
Password - Your internet password
Encryption - Usually No encryption
Device configuration has been changed - Save, so that after restarting the computer, the changes you made to the router settings are saved.
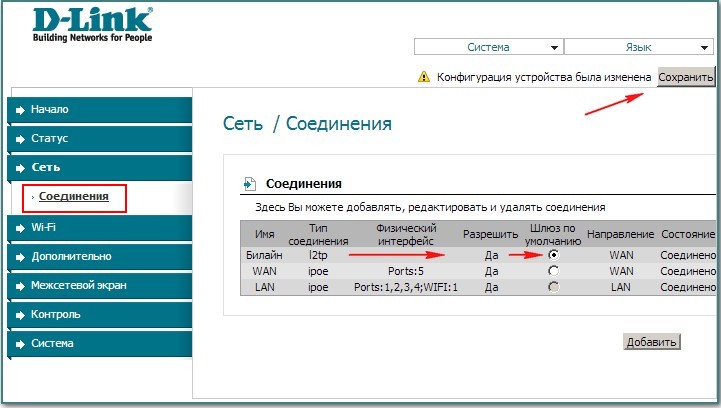
Next, again click Connections, select the Beeline we just created, the Connection type l2tp and assign it Default gateway(we mark this point). Click Save.
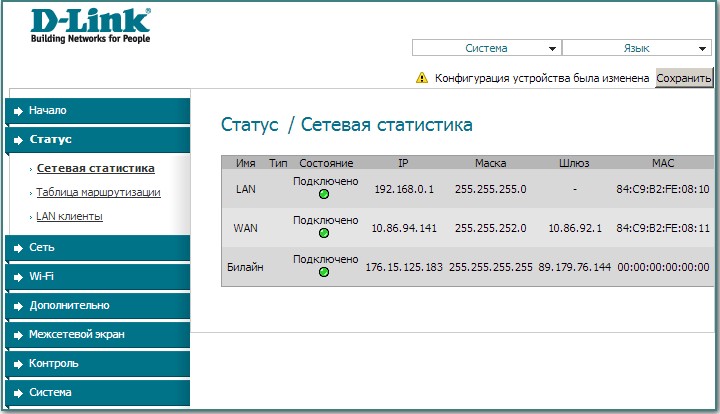
Click on the button Status - Network Statistics... In the WAN field, we see information that our router has successfully received the necessary data from the provider and we have the Internet.
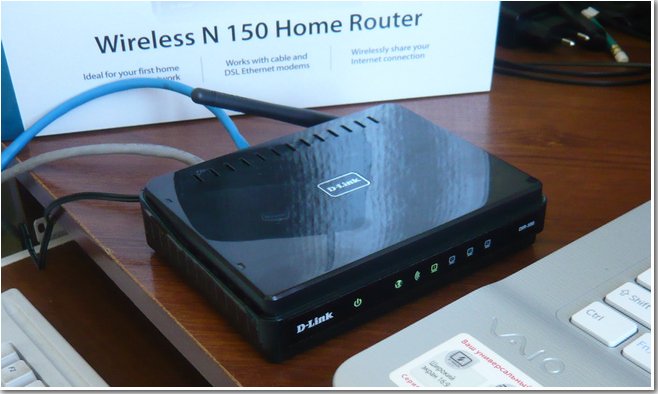
Now we connect a laptop to our router via Wi-Fi.
Press the Wi-Fi button in the router settings. General settings . We leave everything as default.


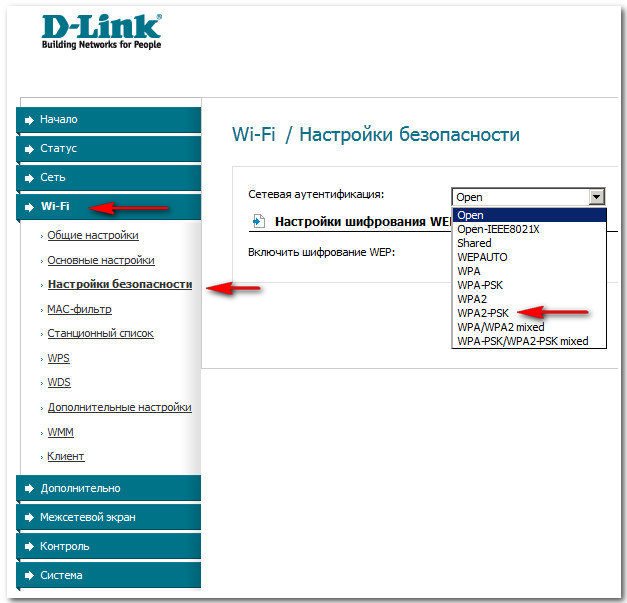
Encryption key PSK: We come up with an encryption key, preferably 10-digit, consisting of letters and numbers in random order, so it is more reliable
WPA encryption - AES or TKIP + AES, then your network will be available to almost all existing Wi-Fi devices.
WPA key renewal period we leave it by default.
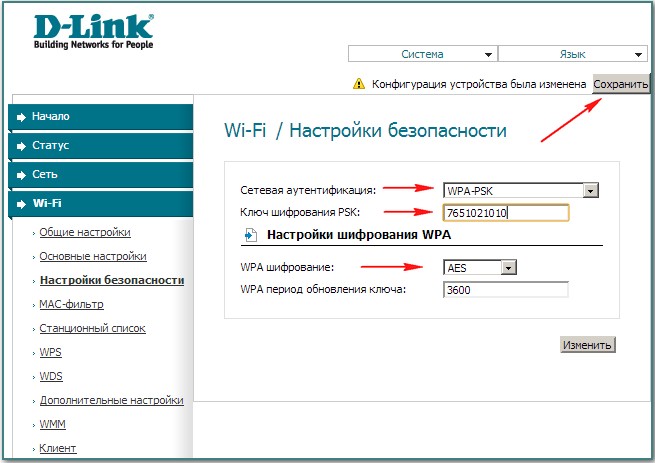
Sometimes it happens that the settings of the router fly off when its power is turned off, so be sure to open the "System" menu in the upper right corner of the page and click on " Save and Reload". Now the changed settings of your router will be saved in its non-volatile memory.
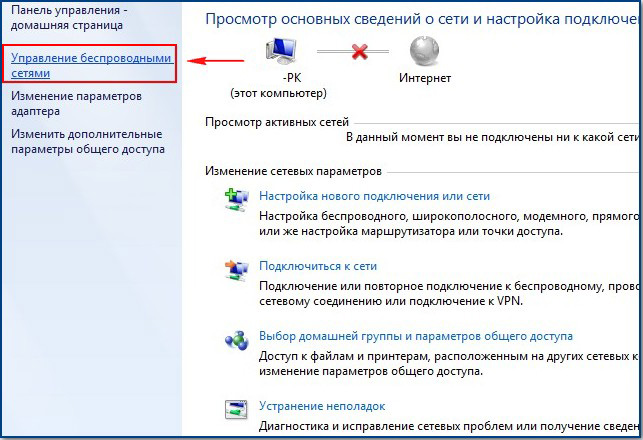
Control Panel\\Network and Internet \\ Network and Sharing Center\Wireless network management,
Double click on the network DIR-300 NRU 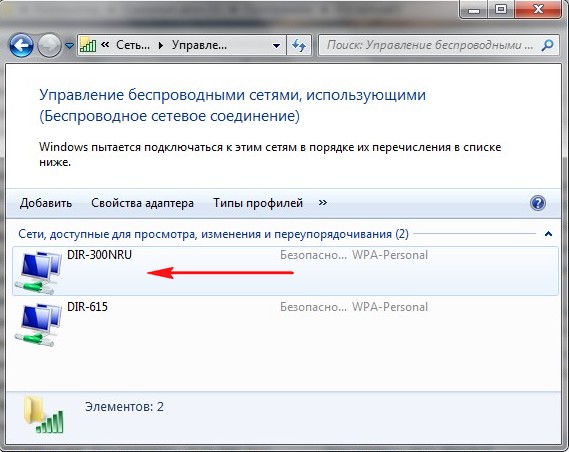
DIR-300 NRU wireless network properties. Connection tab, you should have a checkmark on the item Connect automatically if the network is within range.
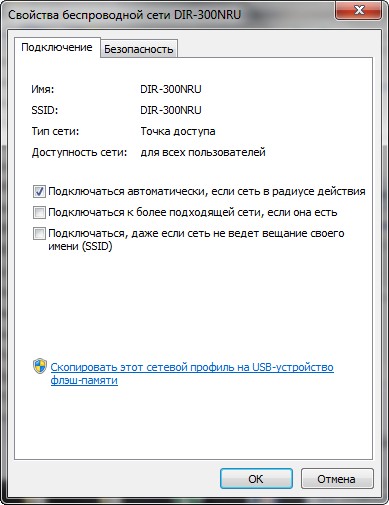
In the DIR-300 NRU wireless network properties window, the Security tab, check the security settings - Security type, Encryption type, Network Security Key, everything must match the settings of the router.

Here are friends and all the settings of our router in the DHCP network protocol.
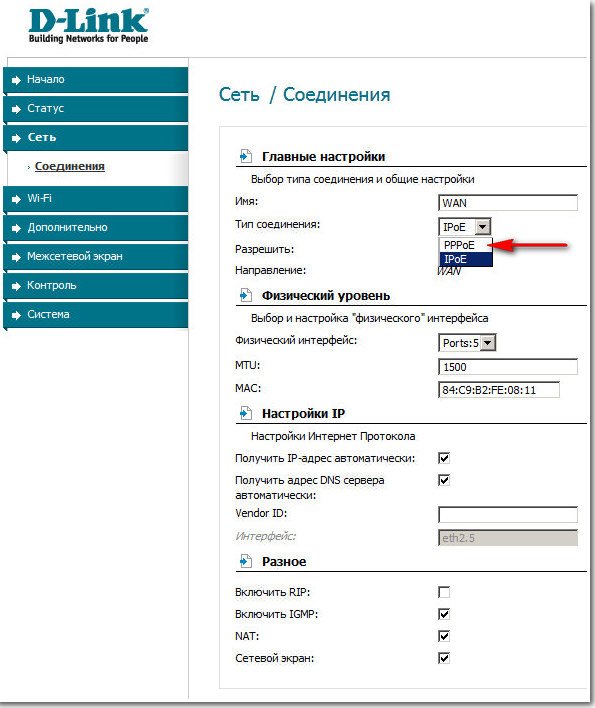
As for setting up our router in PPPoE mode, you will need to go to the router settings Network -\u003e Connections and select the PPPoE connection type, then register the username and password, as well as confirm the password. detailed instructions available on the D-Link website itself - http://dlink.ru/ru/products/5/728.html
Connect the supplied cable to any LAN port on the back of the router and to the network adapter of your computer. Plug the provider's cable into wAN port (Internet) on the back of the router.
In Windows XP: Click on "Start", then "Control Panel", then "Network Connections". Right-click on the local area connection icon and select "Properties". Highlight the "Internet Protocol (TCP / IP)" line and click the "Properties" button. Customize network connection to automatically obtain the IP address and DNS server address.
In Windows 7: Click "Start", then "Control Panel", then "Network and Internet", "Network and Sharing Center", "Change adapter settings". Right-click on the local area connection icon and select "Properties". Highlight "Internet Protocol Version 4 (TCP / IPv4)" and click the "Properties" button. Configure your network connection to automatically obtain the IP address and DNS server address.
Configuring the DIR-300 / NRU (B5) router
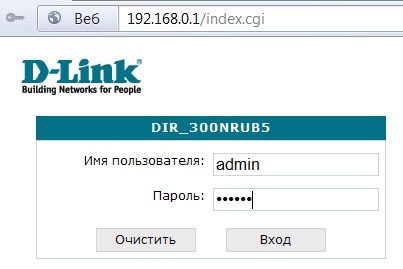
In order to access the web-based interface of the router, open a browser (Opera, Firefox, Internet Explorer, Google Chrome), enter the IP-address of the router (by default: 192.168.0.1). A window should appear:
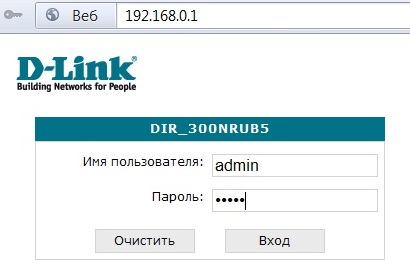
By default: In the field "Username" enter in small Latin letters: admin, in the field "Password" enter: admin
Click "Login".
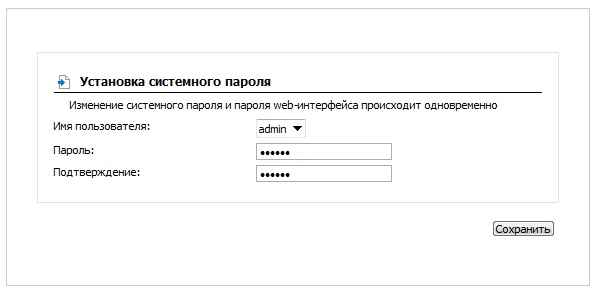
In the next window, Dir-300 will ask you to change the default password to further enter the router settings. (Fig. 3)

Click OK and in the next window (Fig. 4) enter the new Password and its Confirmation, click the Save button.
After logging in, a page with information about the device will be displayed (Fig. 6).

IN new version firmware to save the configuration after any changes to the settings, you must each time click on the Save button in the upper right corner.
Configuring a connection with a provider
To set up a connection with a provider in the "Network" menu, click on the WAN connection line.
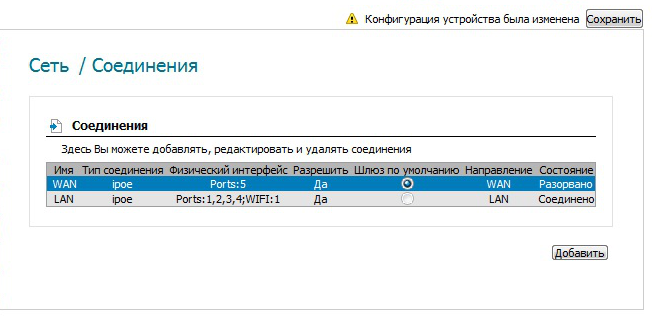
If your router has already been configured with PPPoE or PPTP connection, you need to remove the PPPoE connection (or PPTP connection) from the list of connections. To do this, enter the PPPoE connection settings and click the "Delete" button.
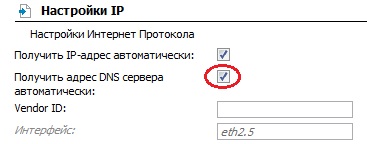
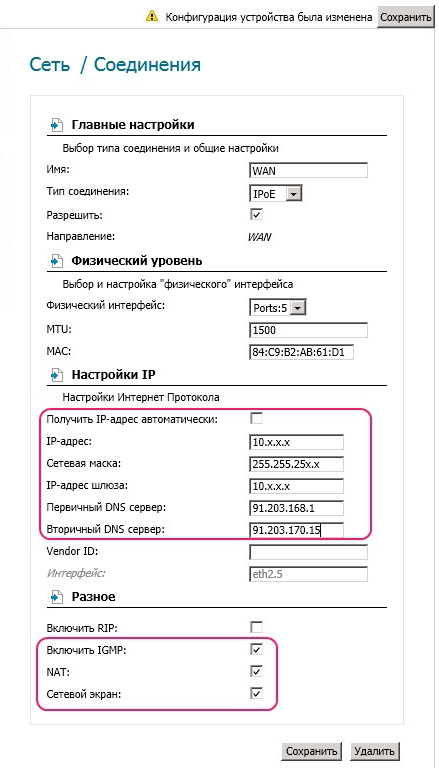
In the WAN connection settings menu, uncheck the "Obtain DNS server address automatically" checkbox.
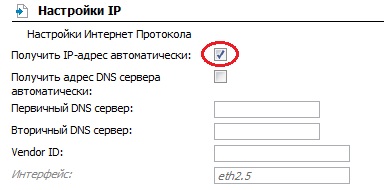
In the "Ip-address", "Netmask", "Ip-address of the gateway", "Primary DNS server" fields, enter the settings provided by the provider.
Make sure the checkboxes “Enable IGMP”, “NAT”, “Firewall” are checked.
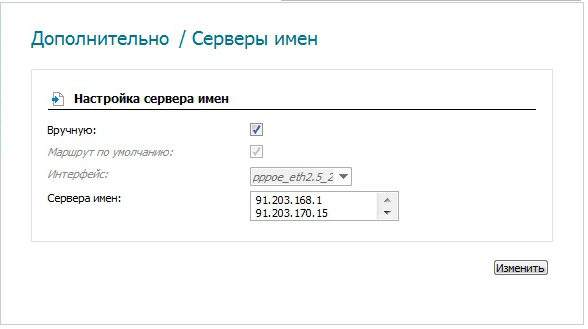
To set up a name server, in the "Advanced" menu, select the "Name servers" item, check the "Manual" box and in the "Name servers" field write 91.203.168.1 91.203.170.15 (Fig. 11).
Click "Change".
Wi-Fi setup
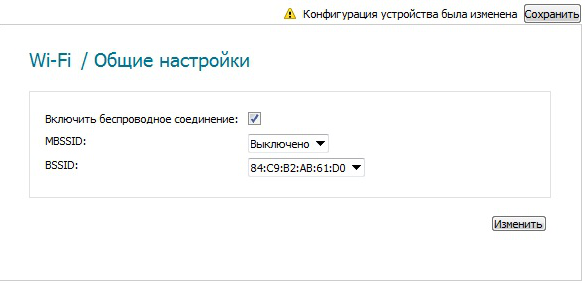
For settings Wi-Fi connections in the "Wi-Fi" menu, select "General settings" check if the "Enable wireless connection"(Fig. 12).
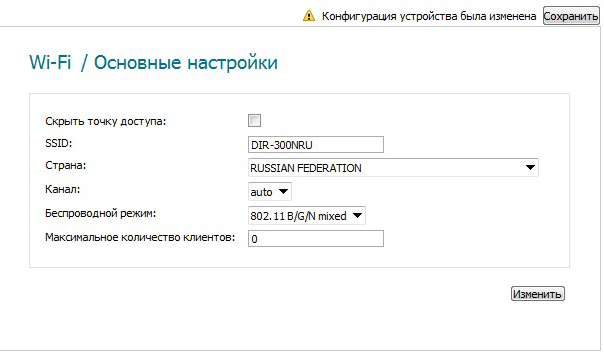
In the "Basic settings" item in the "SSID" field, set the Wi-Fi networks, click the "Change" button (Fig. 13).
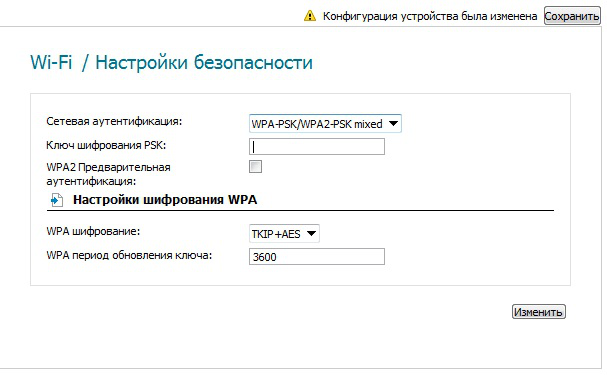
In the Security Settings item, in the Network Authentication field, select WPA-PSK / WPA2PSK mixed.
In the "Encryption key" field, enter the password for your wireless network (from 8 to 63 characters, Latin letters and numbers can be used).
In the "WPA encryption" field, select "TKIP + AES". Click the "Change" button and then the "Save" button at the top to save the router configuration. (Fig. 14)
On computers connected to the router via Lan ports or via Wi-Fi, automatic obtaining of the IP address, Subnet mask, Default gateway, DNS server should be set, static routes removed.
To remove static routes open a command prompt window as administrator. To do this, click the "Start" button in the taskbar, select "All Programs", then "Standard", then right-click on the "Command Prompt" file and in the menu that opens
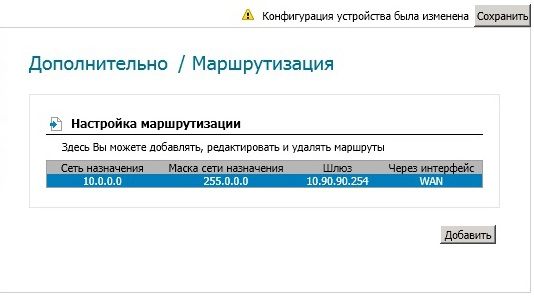
If your router has previously been configured with PPPoE or PPTP connection, you need to remove all static routes. In the Additional -\u003e Routing section, double-click on the line of each route. Click the delete button. Then click the save button. (Fig. 15.16)
