1 landscape sheet other book. How to make one landscape sheet another book sheet in a Word
The way the sheets are arranged in the Word program is called page orientation... It can be book or landscape.
By default, in every document, portrait orientation is normal vertical sheets. But you can turn them over, make them landscape.
How to make album sheets
1 . Open the "Page Layout" tab at the top of the program.
2. Click on the "Orientation" button and select "Landscape".
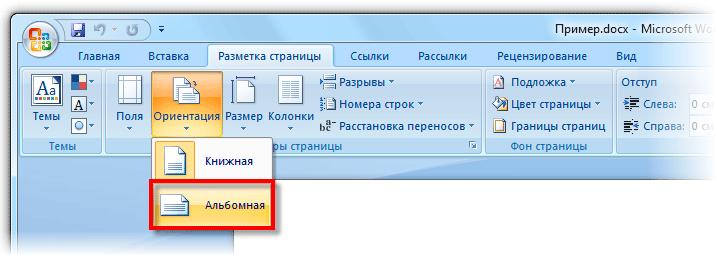
Now all sheets of the document will be horizontal.
This is suitable for all modern versions Microsoft programs Word. Namely 2007, 2010, 2013 and 2016.
In Word 2003 it is done differently: File - Page Setup - Tab "Margins" - Landscape (in the "Orientation" part).
How to make only one landscape sheet
Sometimes you need to make sure that all pages of the document are normal portrait orientation, but one or more of them are landscape. Here we have to act differently.
1 . We put the blinking cursor on the sheet that needs to be turned over. To do this, simply click on the page once or twice with the left mouse button.

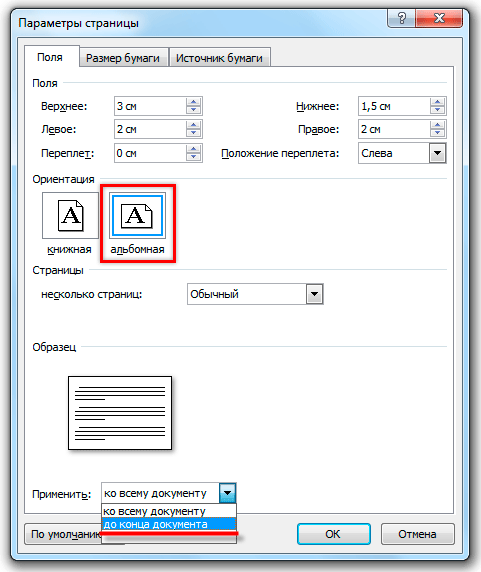
2. Open the "Page Layout" tab and click on the small arrow next to the "Page Setup" label.
In Word 2003, to do this, go to File and select Page Setup. And in Word 2016: Layout - Margins - Custom Margins (bottom).

3. In the window, in the "Fields" tab, click on "Landscape" and at the bottom of the list select "to the end of the document".
After that, the desired page will turn over. And also all other pages that follow it will be landscape. To return them to a book-like appearance, you need to follow the same scheme:
- Place the cursor on the next sheet
- Go to the "Page Layout" tab and go to "Page Settings"
- In the window, indicate "Book" and "to the end of the document"
The page layout mode allows you to see the document as it will appear on paper printed pages. Here, the pages of the document are displayed in the form of white rectangles, on which, along with the text, absolutely all objects are visible, as shown in Fig. 5.14. If the document contains numerous pictures or graphics, it is more convenient to work with it in the page layout mode.
Rice. 5.14. Page layout mode
The layout mode window practically does not differ from the normal mode window. But by turning on the display of the ruler, in addition to the horizontal ruler, you will also see a vertical ruler, which allows you to evaluate the position of objects on the page by the second coordinate. The techniques for moving through the document are also the same in both modes, but in the drop-down list Scale in the layout mode, three additional items appear - Fit to text width, Full page and Two pages, the names of which do not require additional explanations.
When working in markup mode, take your time to arrange objects and format text. First, you need to adjust the size of the page and its margins.
1. Select a command File> Page Setup.
2. In the dialog box that opens, click on the tab Paper size, which is shown in Fig. 5.15.
3. In the list Paper size select the paper size on which the document is to be printed.
4. To set a custom size, select Another and put the width and height of the page into the counters Width and Height.
Rice. 5.15. Page settings
5. After adjusting the page size, you should specify the size of the indents and select the option to output the text to the printer. To do this, open the tab Fields, which is shown in Fig. 5.16.
6. In counters Upper, Lower, Left and Right enter the width of the page margins.
7.Using the switch Orientation in the page setup dialog box, select the portrait or landscape layout of the page in relation to the text.
Rice. 5.16. Setting up fields
8. If you are going to print a document on both sides of sheets, and the left and right margins are not equal to each other, then in the drop-down list Multiple pages choose Mirrored fields... This will ensure the correct placement of the fields. When choosing 2 pages per sheet two pages will be placed on one sheet of paper. Field Sample displays the current page layout and allows you to visually check the entered parameters.
Note The header and footer of the page contains the header and footer, which contain, for example, page numbers or the names of the current sections of the document. If you use headers and footers, don't make the top and bottom margins too narrow.
9. Expand the tab Paper source... In chapter Distinguish headers and footers use the appropriate counters to adjust the distance from the edge of the page to the header and footer.
10. By clicking the button OK close the page setup dialog box.
11. Fields can also be customized using rulers. To increase the width of the left margin, place the mouse pointer on the border of the gray and white areas of the horizontal ruler (see Fig. 5.14), press the mouse button and drag the border of the field. The other three fields of the page are configured in the same way.
12.In multipage document usually, page numbers are required. There is no point in doing it manually. Word can number pages automatically. Select a team Insert> Page numbers... The dialog box shown in Fig. 5.17.
Rice. 5.17. Adding pagination
13.Using the drop-down list Position specify if page numbers should appear at the top or bottom of the page. In the list Alignment select the desired alignment mode for numbers in the header.
14. To remove the number from the first page of the document, clear the checkbox. Number on the first page.
15. If additional formatting of numbers is required, click the button. Format and adjust the parameters of the dialog box Number format.
16. By clicking the buttons OK close all dialog boxes. Word will automatically number the pages of the document. When editing text, you will be able to drop and paste sections, as well as move entire blocks of pages. Word will automatically correct the numbering and ensure the correct sequence of numbers.
17. To change the font of the page numbers and add other information to the headers and footers, select View> Headers and Footers... The text of the document will be faded, and headers and footers will be highlighted with dotted rectangles, as shown in Fig. 5.18. In addition, the toolbar will appear Headers and footers.
18.Use the scroll bar to find any rectangle labeled Page header.
19. Enter text in it it page header ... Now such an inscription will be displayed in the top field of each page. You will say that no one needs such page titles. Yes, of course, this is just the simplest example. Let's see what possibilities the toolbar offers. Headers and footers.
Rice. 5.18. Editing headers and footers
20. Click in the rectangle footer.
21. In the panel Headers and footers click on the button Insert auto text.
22. Select from the drop-down menu item Full name file... Now you will not forget the name of the file in which the source of the printed text is stored. The name of this file will appear in footer each page. If you rename a document file or move it to a different folder, the next time you open the document, the new file name appears in the footer. Toolbar Headers and footers allows-tayuke insert date and time into headers and footers last update document, date of printing of the document, author's name and other information.
23. To close the view of headers and footers, click on the button Close toolbars Headers and footers... Sometimes, when you view a document in page layout mode, you may be unhappy with the way Word has paginated the text. In this case, manually insert additional page breaks into the text.
24. Place the cursor where you want the new page to start and select the command Insert> Break... The dialog box shown in Fig. 5.19. In it, the upper switch allows you to select the type of break from three positions. The bottom radio button allows you to insert a label for the beginning of the next section and select how the section should be positioned: from the beginning of the next page, with an even, with an odd or no page break.
Rice. 5.19. Inserting a break
25. Select the position of the New page switch.
26. Then click on the button OK... Text to the right and below the cursor will be moved to the beginning of the next page, and the end of the current page will remain blank.
Electronic document mode, which is activated by the command View> Web Document, is kind of a combination of normal mode and page layout mode. An electronic document allows you to see all objects, including pictures and graphics, move them around the document and change their size. But in electronic document mode, there is no pagination and all text is displayed as an endless vertical ribbon. There is no vertical ruler here either. Since it is assumed that the electronic document will be published on a web site, the developers of Word took into account that web pages can be of any length, and to view them in a browser window is used vertical stripe scrolling.
If you are using a Word processor to prepare web pages, always use electronic document mode instead of page layout mode. In this case, after conversion to HTML format, the assigned formatting will not be lost. For example, it is impossible to place text in multiple columns on a web page (unless you use tables), so the electronic document view mode ignores this formatting, strictly following the HTML standards.
Note Office XP writes HTML without errors, and the resulting web page faithfully reproduces the appearance of the original electronic document.
To generate a web page, just select the command File> Save As Web Page and in the dialog box Saving the document enter the name of the HTML file. The resulting web page can be further modified both in Word and in any web editor.
Note Please note that after converting to a web page or after opening an HTML file in the menu View a new team appears HTML source, the selection of which opens a window with the source HTML-code that forms the edited document.
How do I arrange the page numbers, starting with the third (so that the first two do not have numbering)?
The solution is to apply a different style to the first two pages.
- Number all pages as usual;
- Open the Stylist (F11), find the page style First page, right-click Change- tab Control.
- In the Next Style field, change the style value from The usual on First page... This must be done because pages with the style First page in our case, not one, but two.
- Place your cursor at the end of the second page and do Insert - Page Break by explicitly specifying the style of the next page Normal.
- Move to the first page and apply a page style to it First page.
If everything is done correctly, then the first two pages will have the style First page, and numbering will start from the third.
Where can I change the page format / settings (margins, headers and footers, etc.)?
| Take part in the project! |
|---|
| General issues |
| Formatting responses |
| Usage issues |
| Popular sections: |
| Writer: Frequently Asked Questions |
| Calc: Frequently Asked Questions |
| Spelling and grammar |
| Usefulness and secrets |
| Home page |
Format - Page or with the help of the Stylist
How do I arrange page numbers?
The page number is part of the footer. Therefore, if there is no header or footer in the document yet, then insert a footer (or header): Insert - Footer, and then, by positioning the cursor in the footer, Insert - Field - Page number.
If you already have a header, then just go to the header area. For this:
- just click on the corresponding area of the page, or;
- click<Ctrl>+<PageUp> to go to the header, or<Ctrl>+<PageDown> to go to the footer;
- then insert the page number field as mentioned above.
If a numbering shift is required, see
If you need to set a non-existent number, see
Included pagination. But instead of a digit with a page number, the words "Page numbers" are shown
How do I set the offset of the pagination?
If needed in the footer arrange arbitrary page numbers, then you need to insert the field " Page number"and then use the menu Format - Paragraph - Position on the page - Add break - With page style - Page number...
Before executing this command, the cursor must be in the first paragraph of the page (not in the header or footer!).
If you need to refer to the page number in the text of the document, which is separated from the current one by n forward or backward, then insert into text field " Page number"and then, by right-clicking on this field with a number, call the context menu, select Field ...
A window for editing the field will open, set the desired offset n.
| An offset set in this way is not stored in doc. |
If the first page needs to be numbered, say, one hundred and ten, then the numbers in the field disappear completely (the field itself is saved and displayed, as expected, with shading, but there are no numbers in it)
This is due to improper use of the tool.
To force the page number to be set, you edit the " page number"- section" bias". This function is provided for inserting references to numbers pages in the text of the document, but not for the numbering itself!
To manually set the page number, use the menu Format - Paragraph - Position on the page - Add break - With page style - Page number...- indicate the required number.
Before executing this command, the cursor must be in the first paragraph of the page.
How to set the display of page numbers in the header and footer of the form "x / y", where y differs from the physical number of pages in the document
Example: You need to make two sheets. On the second gap with the new number "5". It will turn out: page number 1, page number 5. The number of pages will give: 2. In the header and footer, the field "number of pages" gives 2, but you need 5.A bookmark is inserted on the last page (let's call it " last page ")
Where you want to get (show) the number of pages, insert a cross-reference
- Insert - Cross reference,
- in the list Type of choose Bookmarks,
- in the list Choice - last page(our inserted bookmark),
- in the list Insert link - Like page style,
- Push Insert.
How do I get rid of the number on the first page?
Page numbers are inserted into headers and footers. And headers and footers are part page style.
Therefore, so that the first page does not have a number, it must be given a style different from the styles of other pages. For example, the style " First page". To do this, open the stylist<F11>, in the row of icons, select the page style and set the desired style.
Is it possible in OpenOffice.org to set a different style for each page of the document?
It is possible. Include a stylist<F11>, if it is off and then make up the required number of required page styles (for example, one landscape, the other portrait, etc.). Page styles are available by clicking the button at the top of the folded sheet stylist. Then just assign the desired style to the desired page.
How do I make one sheet of a document landscape and the rest in portrait?
Create your own style for separate page, and in the style to specify the landscape orientation for the page:
Styles and Formatting Window(F11). Create a new page style (the fourth button in the row from the top), give it a name, for example, “ Album page»And specify the landscape orientation in the parameters (Page tab, landscape orientation), and then apply this style to the desired pages.
To insert new page with landscape orientation select menu item Insert - Gap - Page break, specifying the style "Album Page".
To return the next page to portrait orientation, you need to re-insert the page break and select the appropriate page style.
The first page is numbered for some reason from the 25th. How to remove?
Endnote numbers in text must have the same style as the text. For example, you need "The article contains ...", but it turns out "[34]". Can this be fixed?
Yes, by editing the Endnote Anchor style, or Service - Footnotes. Replace the Endnote Anchor style with a different one.
How do I create a link to a word in the same document as the link?
How do I re-insert a link to an existing footnote?
- Insert - Cross reference .
- The field type is Footnotes or Endnotes for different types of footnotes. In the "Insert Link" field, select "Link Text".
- To make the link look the same as the standard one, you can select it and press the Ctrl + Shift + P combination.
How can I make footnotes not at the bottom of the page or at the end of the document, but at the end of each chapter?
- Select the text of the document.
- Insert - Chapter - Footnotes / Endnotes tab
- Check the box " Collect at the end of the section"
How do I get footnote numbering to start on every page?
Menu Service - Footnotes - Check
How do I get the endnote text to start on the same page where the body of the document ends?
By inserting a section and assembling footnotes at the end of a section Insert - Chapter - Footnotes / Endnotes
Hierarchical numbering of headings when importing from MSWord format.
When importing from MSWord, the numbering of headers is likely to "fly off". If all the headers were set by styles, but there are no numbers, then you need to go to the menu Service - Numbering structure ... Check that the headings correspond to the correct numbering levels and click the Restore button. All heading numbers are visible correctly.
OpenOffice.org does not create hyperlinks when creating a table of contents in a document
By default, hyperlinks are not created when the table of contents is generated. But you can customize the table of contents as needed. see OOo Usefulness: How to make the table of contents of the document in the form of hyperlinks
How to highlight the lines (items) of the Table of Contents in different colors?
- Insert - Table of Contents and Indexes - Table of Contents and Indexes- tab View
- Uncheck the box Protected against manual changes- OK
- Highlight the items you want and give them the color they like.
All headings of the first level should be red in the table of contents.
Edit the appropriate style Contents 1 with the help of the Stylist
How is the page break sign displayed?
See Writer. User Interface: Frequently Asked Questions # How is the page break character displayed? | Usefulness | Content
This is much more difficult to do.
The creators of the service did not think fundamentally about the question of how to upload photos to Instagram from a computer. The site does not have a form for uploading photos either from links from other sources or from the user's PC.
We don't think it would be difficult to do this for such an advanced and powerful project like Instagram. The explanation is simple: the administration of the service does not want photos to be uploaded from stationary sources.
Is it possible to get around this limitation? In the regular way - no. Neither the official website nor third-party Instagram services provide such an opportunity. As you know, clients for Windows and other desktops operating systems does not exist either.
Or maybe you can at least post a photo on Instagram from your computer?
Yes, of course, you can install an Android emulator - Bluestacks on your computer. It's easier than iOS or Windows Phone.
You can download it from the official website: bluestacks.com
Before uploading a photo to Instagram from a computer, you need to install BlueStacks, log in to Google from it, and then install the Instagram application and publish the photo from it.
Are all these steps required? Yes. In the article "How to download Instagram on a computer" we talked in detail about how to install BlueStacks and Instagram on a computer under Windows.
Perhaps, after the release of Windows 10, the situation will change. Microsoft promises that desktop and mobile version Windows will get a new level of compatibility thanks to a common kernel. Perhaps then it will be possible to install the Instagram app for mobile Windows and PCs after some refinement.
Whether this is true or not, we will find out already in 2015.
Are there any workarounds?
As we know, you can broadcast photos from Instagram to others. social networks... Or maybe you can do the same with Instagram, and instead of the task of how to upload a photo to Instagram via a computer, you need to solve the problem with another network?
We will not tell you anything comforting. There are applications for mobile devices, which allow you to export photos directly to Instagram, but their web versions, alas, do not have this functionality. This also applies to the famous Pixlr-o-Matic online filter, which has no social media export option.
Therefore, the only one hundred percent working way (at least before integrating applications for different Windows versions) Is to use BlueStacks, and through it, the Instagram application on a PC.