How to make half of a document in landscape orientation. Portrait and landscape paper orientation.
Hello everyone. Sometimes there is a need to create a document in Microsoft Wordwhere all the pages would be vertical, and the other page (or several) would be horizontal. For example, it might look like this:
Everything looks so that it seems simple. It seems that it is enough to select the desired page and change its position to landscape. But if you do this, you will see that not one page becomes horizontal, but everything.
Therefore, I will tell you how to change the orientation in a few simple steps of only one page (and you may have several), and leave others in an upright position.
Process
Getting started:
The last action will cause all the following pages to be horizontally expanded. But what can you do to ensure that only the pages you need remain flipped? And for this you need to repeat the same steps, only in step 4 select Portrait orientation.
Advice: You can repeat these steps as many times as you like, combining horizontal and vertical sheets throughout the document.
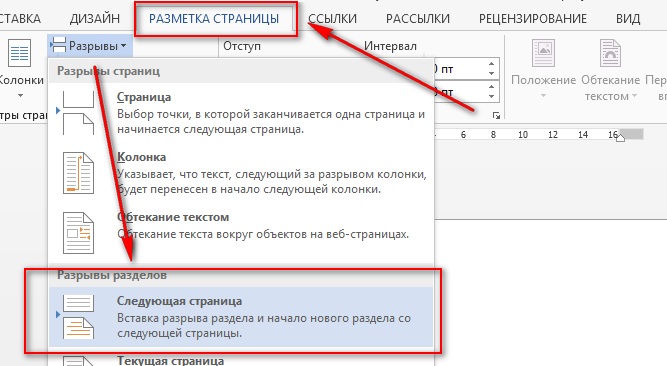
Attention! Step 2 is very important. When you select the next page, you create a section break in the text, which allows you to change the position of the pages only in that section. If you add new pageby choosing Insert - Blank Page or Insert - Page Break, then Word will insert the page but not insert the section break, causing all pages to be flipped in step 4, not just one.
Video
Conclusion
That's all. Now you know how you can turn the page to any side and arrange vertical and horizontal page in the Word. If you have any questions, write in the comments.
Typically Word prints text on the page from top to bottom - the way we are used to reading. However, you can also print across the page. In this case, they say that the orientation of the page has been changed: the text is printed not along, but across the sheet.
If you want to make it clear to others that you are a major word processor specialist, you can show off technical terms: printing from top to bottom is called portrait or portrait orientation, and printing across is called landscape, or landscape, orientation. Portrait format means that the page height is greater than its width. It is convenient to place portraits on pages of this orientation - it's not for nothing that this format is called portrait. Landscape orientation is more suitable for landscape sketches. Such pictures are most often stretched horizontally.
To force Word to print across the sheet (that is, in landscape format), do the following.
- Select a team File\u003e Page Setup.
A dialog box will appear Page settings... Click on the tab label Fields (fig.14.2).
- Select in the group Orientationparameter Landscape.
Document form in the area Sample and a small pictogram in the area Orientation will change to reflect your new perspective on the document.
- Click on the button OK.
Fig. 14.2. Page Setup Dialog Box with Fields Tab
- When creating a document in landscape format, you may need to change the margins of the document. You will learn how to achieve this in the next section.
- It is worth formatting the document only after specifying the page orientation. If you do the opposite, you will almost certainly have to re-edit the document, i.e. redo your work. Not the most pleasant prospect!
- Standard documents should not be printed horizontally. Scientists and other wizards in white coats, who know a lot about their business, have found that when reading an overly long line, the reading speed is noticeably reduced. Landscape mode is best for printing lists, tables, and other documents for which the normal vertical format is not wide enough.
- As with changing the paper size, you can set the orientation type for the entire document, for a section, or for a group of pages — from specified to last in the document. This was discussed in more detail in the previous section.
- In a document that prints in one format, you can change the orientation of any page to another (for example, print a page in landscape format from a document that has portrait orientation pages). This is possible thanks to Word's ability to apply formatting commands to a specific section of a document. Start typing a new section, changing the page orientation for that section only, and then when you need to restore the previous page orientation, start a new section again. For more information on how to divide a document into sections, see Chapter 15.
People are used to preparing all office and work documents using microsoft program Word. Novice users often wonder how to turn a sheet horizontally in a Word. By default, the program produces vertical, or book, pages - long but narrow. Learn how to turn a page in different versions of a Word.
How to make a landscape page in a Word for the entire document
To print a wide table, chart, or insert an image, it is best to use a horizontal page view. For plain text, the standard portrait format is fine. To change the paper orientation, you do not need to install additional editors or programs, you just need to follow the steps and steps from the instructions below. It is important to remember that when using different versions of the program, it is worth referring to different sequences and algorithms. Understand the steps how to make a landscape orientation in a Word.
Word 2003
The oldest, but no less popular so far, version of the text editor does not differ in functionality from the newest. Additional options, new fonts and beautiful design are added every year, and the base remains unchanged. The position of the document is one of the main criteria of the editor. How to make album sheet in Word 2003? Making these changes is easy and simple, it is worth remembering the algorithm once:
- Open the File tab. To find it, look at the upper left corner.
- Find and click "Page settings" among the menu that opens.
- On the line "Page orientation", you should select the icon representing the desired orientation.
- Using the same menu, you can return the classic position of the page.
For Word 2007
The algorithm is simple:
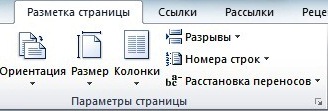
- Since you can make a landscape sheet in a Word only using the menu, you need to expand the "Page Layout" column in the top menu bar.
- On the bottom line will be the word "Orientation", it should be the leftmost. You have to click on it.
- Two items will open: "Book" and "Album". After selecting, it will turn out to change the arrangement of the pages of the whole document.
In Word 2010
New and latest versions Word programs do not differ much from the seven: the design has changed slightly, the colors have changed, but the functionality meets the highest requirements. Changing the position of the leaf using the tenth year version is as easy as in the older ones. For this you need:
- On the Navigation Panel, select the "Page Layout" item.
- Among all the functions: theme, color, effects, margins, size, background, border color, line numbers, breaks and others - you need to find "Orientation". It will be closer to the left edge, but you shouldn't look at the corner of the menu.
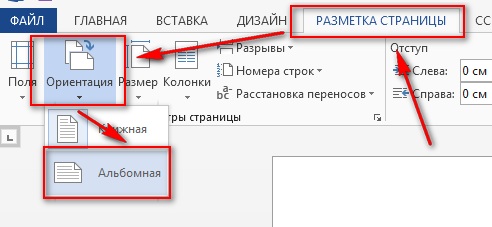
- After clicking on this button, you should choose from the two options that appear: "Portrait" or "Landscape". The first is vertical and the second is horizontal. After such simple actions, the document will acquire the desired appearance, and it will become much easier to place the necessary information.
How to make one page in a Word landscape

If you figured out how to turn a vertical sheet into a landscape sheet, there is only one last secret left to know, how to delimit each page and give it its own layout. For a new sheet, you can set the orientation different from the adjacent ones. Here are the steps to take:
- We need to make it active. To do this, you just need to place the cursor on this sheet, highlighting any line or word.
- Open the already familiar "Page Layout" tab.
- On the expanded window, among all the options, you need to click on the small "expanding" arrow - "Page settings". It will be in the lower right corner.
- The characteristics window has appeared. Mark the location you want.
- For the bottom column "Apply" you need to choose "until the end of the document".
- Click "OK".
- After that, all pages, starting with the selected one, will change orientation.
- To make only one sheet horizontal, you must continue to follow this instruction.
- Make the next sheet of the document active. And do all steps from two to six, only changing from landscape to book, and not vice versa, as you did from the very beginning.
- As a result, only one page stands out from the general row.
Video: how to rotate a sheet in a Word
Sometimes, working in the simplest and, at first glance, studied programs it is impossible to find and apply any function. For example, the same Microsoft Word. Do you know how to quickly make a landscape sheet in word? If not, then I suggest reading my little manual on this issue.
There are several types of sheets in Word. The main one is a book spread, in which you often worked. But there is also a landscape page spread. In the landscape spread, the page becomes twice as wide and we have the opportunity to insert various schemes and graphic elements. We have decided on the purpose, now let's answer the main question, how to make an album sheet in word.
1) How to make a landscape sheet in word 2003
Go to the top menu of the program, click on the file tab, then page settings, page layout and select the page orientation - Landscape. Click Ok and observe that our page has turned over and adopted a landscape spread. As it turned out, making an album sheet in word is not that difficult.
2) How to make a landscape sheet in word 2007 - 2010
In later programs, this action is even easier to do. Just go to the top menu of the program, see the page layout tab and click the page settings. Next, select the orientation - landscape.
We answered the question of how to make a landscape sheet in word, and now we can correctly draw up any application, including to the company. But what should be done if necessary to landscape view took just one page and several.
First, we need to create the required number of pages. After that, we hover the mouse cursor over the desired blank page and go to the already familiar page layout tab and click on the page parameters, everything is the same as in the previous case.

Next, in the settings, set the orientation - landscape. And pay attention to the bottom drop-down menu - Apply. There we choose to apply to the end of the document. Now all our pages have become landscape format. Next, hover the cursor over the landscape page, page parameters and select the book page, apply to the end of the document.
In general, there is nothing complicated in the question of how to make an album sheet in a Word. If something does not work out, please in the comments.
In a text editor Word, you can and vice versa. But, the button that is responsible for changing the orientation changes the orientation at once for the entire document. Therefore, if it becomes necessary to change the orientation for only one page, then you have to resort to different tricks. In this article, we will look at two ways at once, how to make one page landscape in Word, and the other book.
The instruction is written using Word 2010 as an example, but it will be relevant for Word 2007, 2013 and 2016. And with the proper skill, the information from the article can also be applied to Word 2003.
How to make one page landscape with section breaks
Perhaps the easiest way to make one landscape page and another book page is to use section breaks. To do this, you need to separate the page you want to landscape with two section breaks. One section break should be before this page (at the end of the previous one) and one section break after this page (at the end of the page, which should be landscape).
So, suppose you have text Document... And you need to make one of its pages landscape, while the rest of the document pages should remain portrait. To do this, place the cursor at the end of the previous page, go to the "Page Layout" tab, click on the "Breaks" button and select the "Next Page" option. After that, place the cursor at the end of the page you want to make landscape and click "Breaks - Next Page" again. If you have Word 2003, then use the "Insert - Break" menu to insert a break.
This will separate the page you want from the rest of the document with two breaks. To make sure that the section breaks are in the correct places, go to the "Home" tab and turn on the "Show all characters" function.
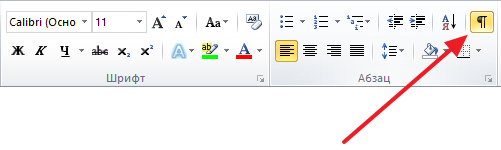
After that, you should be able to see where the section breaks are set. They should be right above album page and at the end. If the breaks are misplaced, you can edit the pages so that the breaks fit properly. In the screenshot below, you can see what the break at the end of the page should look like.

After the section breaks are set in the desired positions, you need to place the cursor on the page, which should be landscape, go to the "Page Layout" tab, click on the "Orientation" button and select the "Landscape" option.

If everything was done correctly, then you will have one landscape page, and the rest of the book. If something doesn't work, then most likely the problem is in the placement of the breaks.
How to make one page landscape using page settings
There is also another way to make one page landscape and the other book. It's a little more confusing than the one above, but you can also use it.
In order to use this method, you need to place the cursor on the page that comes before the one that should be landscape. After that, you need to go to the Page Layout tab and use a small button to open the Page Setup window. If you have Word 2003, then in order to open the "Page Setup" window, use the menu "File - Page Setup".

After that, you need to select the orientation "Landscape" and apply this "To end of document" setting.

After saving the settings using the "Ok" button, all pages that are below the selected one will switch to landscape orientation. Now you need to position the cursor on the page you want to make landscape and reopen the Page Setup window. This time, you need to choose the portrait orientation and apply it to the end of the document.

After saving the settings with the "Ok" button, you will get one page, and the landscape orientation, and the rest in portrait.