How to insert headers and footers on specific pages. Insert a section break
CREATION OF FOOTBALLS. DIVISION INTO PAGES AND SECTIONS.
Word – Lesson number 4
1. Purpose of work
1.1. Learn to paginate text.
1.2. Learn to create headers and footers for different sections.
1.3. Learn how to break a document into sections.
2. Brief description of the theoretical part.
2.1. Headers and footers ... This is text that repeats on every page. Page numbers can serve as headers and footers, as well as the so-called. "water marks ". You can set different headers and footers for different sections. Headers and footers are created through the menu View - Headers and Footers, and Insert - Page Numbers.
2.2. Loudspeakers ... Text can be split into several columns, and on one page the text can be split into a different number of columns. To create a column format, use the menu Format - Columns.
2.3. Column, page, section breaks . They are used when you need to forcefully split the text. This is done through the menu Insert - Break.
3.1. Creation of headers, footers and "watermarks".
Watermarks are freehand drawings that serve as a background for text.
· Select the menu command View - Headers and Footers. The Header and Footer toolbar appears on the screen. This command is needed so that the "watermarks" go through all the pages of the document.
· Turn on the Drawing toolbar.
Draw some geometric shape or a small drawing.
· Select the picture and click the Place Behind Text button on the Drawing toolbar.
Follow these steps to create headers and footers:
· Select the menu command View - Headers and Footers. The Header and Footer toolbar appears on the screen.
· In the Header line, enter some small text. You can use the insert date and time buttons on the Header and Footer toolbar.
· Format the entered text.
· Go to the footer and repeat your steps.
· On the Header and Footer toolbar, click Close.
Try to set pagination using the button on the toolbar Headers and footers.
In order to different pages headers and footers were different, follow these steps:
· On the page previous to the one where the header and footer change will be, enter a section break using the menu Insert - Break - New Section - From Next Page.
· Include non-printable characters and see how section breaks are indicated.
· Open the header by double clicking.
· On the Header and Footer toolbar, click the Same as Previous button.
· Delete the text and enter a new one.
· You can change the page numbering settings in the same way.
· Change the footer.
· Close the headers and footers.
3.2. Removing headers and footers.
To remove a header or footer, double-click it, delete the text, and close the header.
3.3. Splitting text into columns.
To create text in multiple columns, follow these steps:
· From the File menu, select New to create a new document.
· Use the Enter key to create an empty string.
· Select Insert - Break - New Section - On Current Page from the menu.
· Select Format - Columns from the menu.
· Specify the number of columns, whether the columns will be the same or different width, the distance between the columns, set the separator.
· Click OK.
After that, the text will be printed in several columns. In the previous section, you can create a heading above the columns. If you need to move to another column, select from the menu Insert - Break - New Column... The cursor will move to another column.
· Try reformatting one of your texts into columns. To do this, you need to repeat the above steps, having previously selected the text.
3.4. Insert page breaks.
IN Word text automatically switches to new page... In some cases, it is necessary to force page breaks. To do this, follow these steps:
· Position the cursor at the beginning of the line where you want to start a new page.
Select from the menu Insert - Break - New Page.
· Include non-printable characters and see how page breaks are indicated.
3.5. Insert section breaks.
Consider dividing the text into sections for switching on one of the sheets of the document to landscape orientation pages. To do this, follow these steps:
· On the menu File select team Create a to create a new document.
· On the menu File select team Page Setup - Paper Size - Orientation - Portrait.
· Enter text or copy it from another document.
· Make sure the cursor is on the new page.
· On the menu File select team Page Setup - Paper Size - Orientation - Landscape, Apply To Current Section.
· Enter text or copy it from another document.
· On the last line, enter a section break from the next page.
· Review the entire document to make sure the page orientation has changed.
3.6. Remove page breaks, sections and columns.
· Include non-printable characters to show breaks.
· Select the line containing the section character.
Press the key Delete.
3.7. Pagination.
Learn on your own how you can add page numbers using headers and footers and menus Insert - Page Numbers.
4. Test questions.
4.1. How to create an A3 sheet in a document printed on A4 paper?
4.2. How do I set page numbering from 1 to 10 without printing numbers on pages 3 and 7?
4.3. How can you set a columnar format for text without breaking it into columns?
4.4. How is text in headers and footers formatted?
Most of the formatting commands in Microsoft Word are applied to the entire content of the document or to an area that has been previously selected by the user. These commands include setting margins, page orientation, page size, headers and footers, etc. Everything would be fine, but in some cases it is required to format different parts of the document in different ways, and for this you need to split the document into sections.
Note: Despite the fact that creating sections in Microsoft Word is very simple, it will certainly not be superfluous to familiarize yourself with the theory regarding this function. This is where we start.
A section is like a document within a document, or rather, an independent part of it. It is thanks to this division that you can change the sizes of fields, headers and footers, orientation and a number of other parameters for separate page or a certain number of them. Formatting of pages in one section of a document will occur independently of the other sections of the same document.
Note:The sections discussed in this article are not part of a scientific work, but a formatting element. The difference between the second and the first is that when viewing a printed document (as well as an electronic copy), no one will guess about the division into sections. Such a document looks and feels like a complete file.
A simple example of one section is the title page. Special formatting styles are always applied to this part of the document and should not be applied to the rest of the document. That is why, without highlighting cover page a separate section is simply not enough. Also, you can select a section of a table or any other fragments of the document.
As mentioned at the beginning of this article, creating a section in a document is not difficult. To do this, you need to add a page break, and then perform a few more simple manipulations.
Insert a page break
There are two ways to add a page break to a document - using the tools on the Quick Access Toolbar (tab "Insert") and using hotkeys.
1. Place the cursor in the document where you want one section to end and another to begin, that is, between future sections.
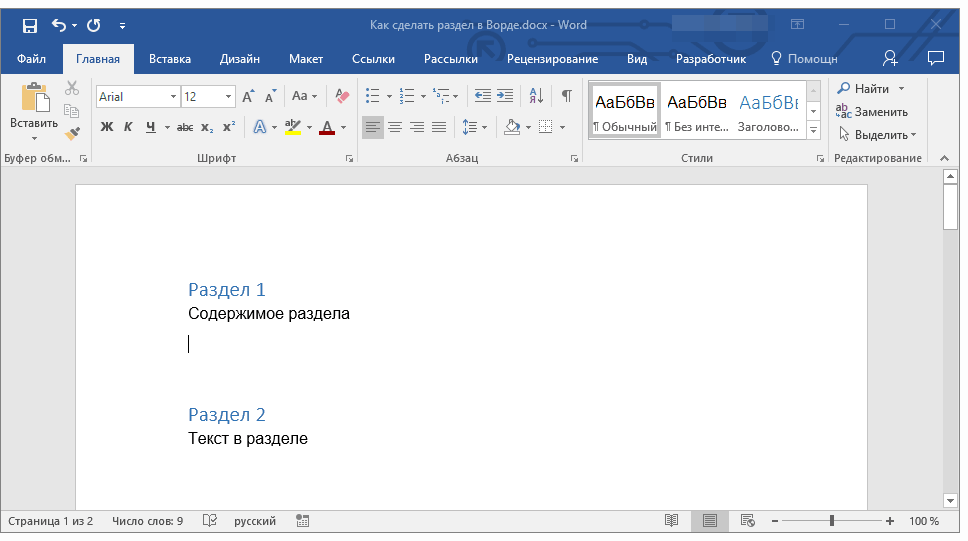
2. Go to the tab "Insert" and in the group "Pages" press the button "Page break".
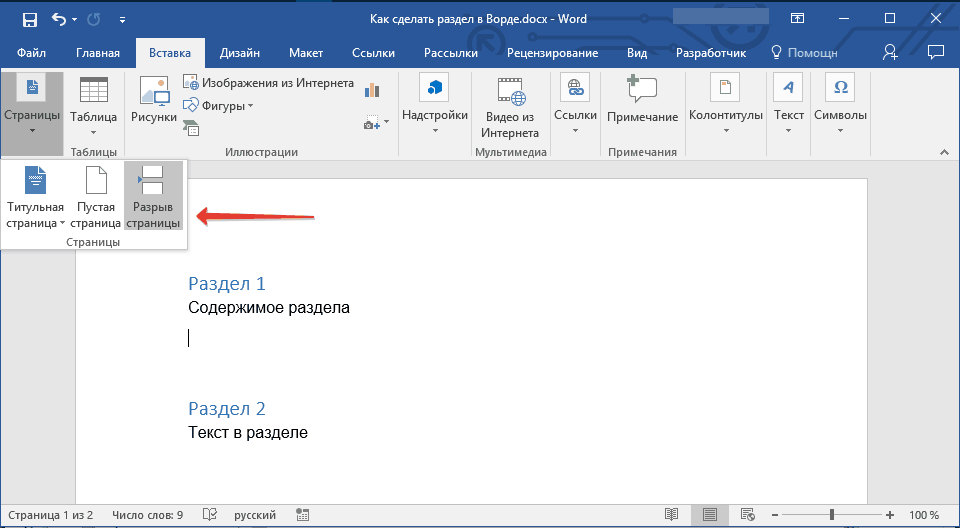
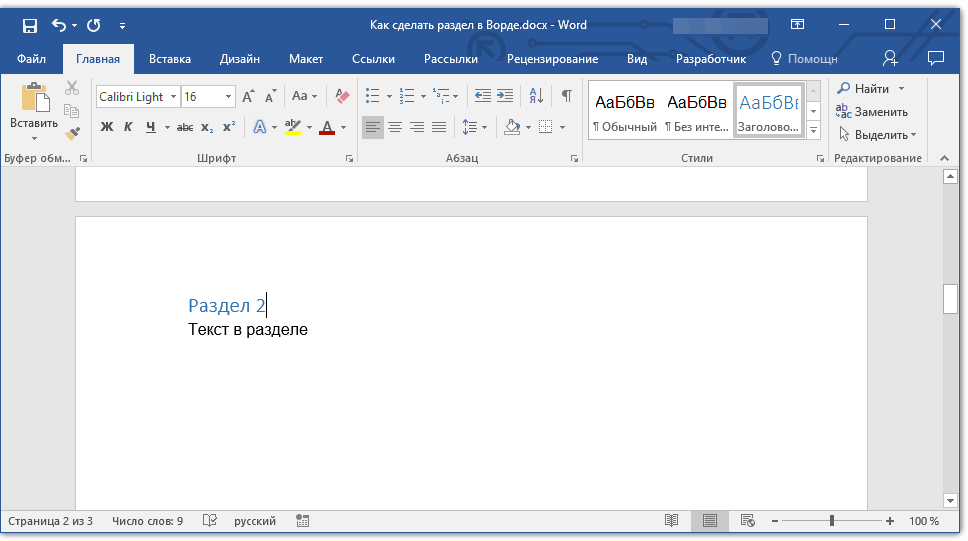
3. The document will be split into two sections using a forced page break.
To insert a break using the keys, just press "CTRL + ENTER" on keyboard.
Formatting and customizing a partition
Having divided the document into sections, which, as you understand, may well be more than two, you can safely proceed to formatting the text. Most of the formatter is in a tab "The main" word programs... Our instructions will help you to format the section of the document correctly.
If the section of the document you are working with contains tables, we recommend that you familiarize yourself with detailed instructions on their formatting.
In addition to using a specific formatting style for a section, you may want to do separate pagination for sections. Our article will help you with this.

Along with page numbering, which is known to be located in the top or footers pages, when working with sections, you may also need to change these very headers and footers. You can read about how to change and configure them in our article.
The obvious benefits of breaking a document into sections
In addition to being able to independently format text and other content in a portion of a document, sectioning has another distinct advantage. If the document you are working with consists of many parts, it is best to output each of them in an independent section.
Section breaks are used to separate and format documents. For example, you can divide a document into chapters or chapters with different formatting such as columns, headers and footers, and page borders.
Adding a section break
Notes: If you need to add a new page to your document, see the following articles:
Types of section breaks
Using breaks between sections opens up limitless possibilities for your document layout. Experiment and try different uses of section breaks to find the one that works best for you.
To start a new section on the next page, select Next page.
In the tab Layout press the button Breaks and select Next page.
Continuous a section break starts a new section from the current page. This type of break is mainly used when working with columns: it allows you to change the number of columns without starting a new page.
In the tab Layout press the button Breaks and select No break.
Team Even page lets you start a new section on the next even page.
In the tab Layout press the button Breaks and select Even page.
Team Odd page lets you start a new section on the next odd page.
In the tab Layout press the button Breaks and select Odd page.
Insert a section break
Insert a column break in a section
You can add columns to the section. For example, you can insert a section break on the current page and split a portion of the page into two columns.
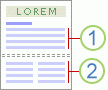
1. Section with one column
2. Section with two columns
Click Page layout > Loudspeakers and set the required number of columns.
Tips for using section break columns
A section break is like a fence that limits column formatting. If you delete a section break, the text above it becomes part of the section that was below the break and is formatted accordingly.
Take a look at the above example. If you remove the section break between the first and second sections, the entire document will be formatted as two columns because that's the formatting below the section break.
Sections can be used to change other formatting options on different pages of a document, including the following.
Insert a section break
You can use section breaks to change the structure or formatting of pages in your document. For example, you can divide a portion of a page into two columns, divide a document into chapters so that the page numbering for each of them starts with 1, or set different headers and footers for different sections of the document.
1. Section with one column
2. Section with two columns
Note: In the collection of templates microsoft pages Office Word 2007 provides many standard page layout options. For example, you can add a page with one column and a section that has two columns by selecting the appropriate markup in the template gallery From next page.
Types of section breaks
Section breaks allow you to change the markup or format of a portion of your document. You can configure the following parameters:
-
Pagination
Line numbering
Footnotes and endnotes
Notes:
The section break determines the formatting of the text in the previous section. Removing a section break also removes the text formatting in the section before it. This text becomes part of the next section and is formatted accordingly. For example, if you divide your document into chapters using section breaks, and then remove the section break at the beginning of chapter 2, Chapters 1 and 2 are combined into a single section with the formatting specified for Chapter 2.
The section break that determines the formatting of the last part of the document is not displayed. To change the formatting of the document, click the last paragraph of the document.
Paper size and orientation
Printer paper source
Page borders
Aligning text vertically on the page
Headers and footers
Examples of section breaks
The following are the types of section breaks that you can insert into your document (in the illustrations, a section break is indicated by a double dashed line).
To start a new section from the next page, select the command From next page... This type of section break is useful when you need to start a new chapter.
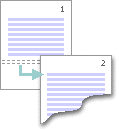
To start a new section on the same page, select the command On the current page... This type of section break is used to change the formatting on the page, such as changing the number of columns.
Undoing changes to document markup
A section break determines where text begins with different formatting. Removing a section break also removes the text formatting in the section before it. This text becomes part of the next section and is formatted accordingly.
Make sure you are using Draft view and that section breaks are shown with a double dashed line.
Click the break that you want to remove.
Press the DELETE key.
Sometimes, when working with documents in Word, it becomes necessary to format a page (or several pages) with a section break. Thanks to the gap, it is possible not only to divide chapters text document, but also start the numbering of each chapter from one, or apply different headers and footers for different sections.
Microsoft Office Word 2007 release contains a large selection of page layout templates.
The page sections change the markup as well as the format of the specified portion of the document. As a rule, the following parameters are required for operation: vertical alignment of text, margins, footnotes, columns, page and line numbering, page borders, paper source for the printer, headers and footers, paper size.
Do not forget that it is the test break that determines its formatting. Therefore, removing the break will cause the sections to merge, and the format will thus become common.
To go to the section break, you need to click on the "Page Layout" tab, which is located on the Word taskbar. In the page settings, select "Breaks". After completing the above steps, a menu appears containing break templates in Microsoft Office Word 2007, which are divided into section breaks and page breaks. The types of breaks in templates are of the following types: current page, next page, even page and odd page.
If you select the section type "Next page", the cursor will immediately move to the new clear sheet... This makes it convenient to start a new chapter in a document that you are working on.
To separate paragraphs of a text document, it is recommended to select the type of section called "Current page".
Even Page and Odd Page breaks automatically move the cursor to the corresponding new even or odd sheet.
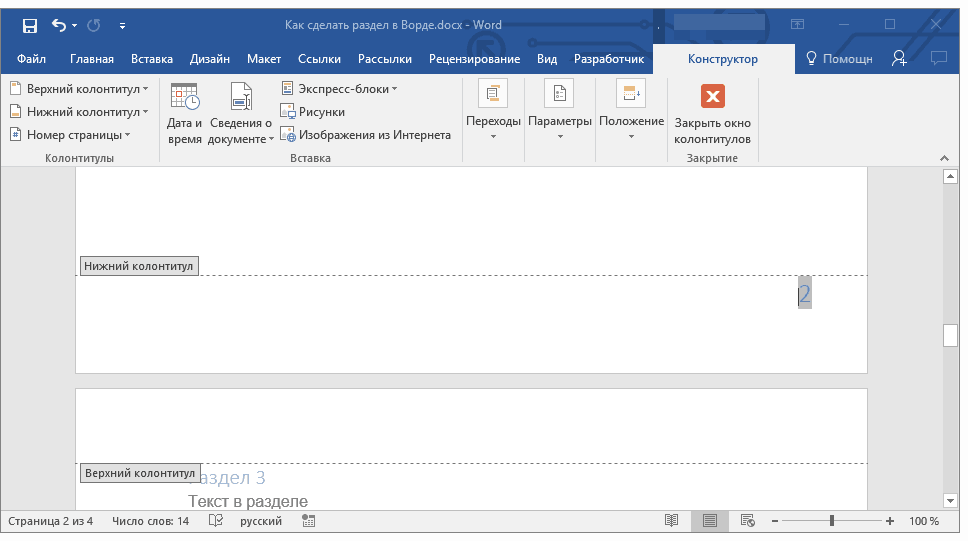
After selecting the required break type, you can set new parameters, for example, change headers and footers. Choosing a break template. We make a transition to the tab called "Insert". We decide on the required type of footer, it can be header or footer. Next, you need to fill in the header field. This field can contain both a picture (logo) and text, a table with certain data. We do a check, that is, we make sure that the header and footer is displayed only in the section of the document to which the section break is applied.
To view the break point, go to the "View" tab. Select "Draft" in the "Document view modes" field. If the gap is shown with a dotted line, then everything is done correctly.
Done!
That's all.
Partition breaks were created successfully.