Page numbers are affixed. How to number pages in Microsoft Word. Adding page numbers for different sections of the document.
How to number pages in Word? This question is asked by many computer beginners. With a lack of experience, they often try to insert the sheet number in the usual way, using the tab key or edge alignment. The appearance of such a document leaves much to be desired.... In addition, when the text is changed, the numbers shift, everything has to be redone again.
Sometimes it happens that there is a note on a page at the end of a chapter full of text that does not fit the whole. The solution is to put the part that fits and pass the rest to the next page, but putting it in upper part pages as if it were plain text, respecting the folio and heading if others take it. This part of the note states that moves must have at least five lines of text.
Also called ladillots, they are notes that are placed in the margins of historical or didactic works. They are written in small type and are placed at the height of the paragraph that matches, unless the paragraph begins to the end of the page; It is then placed so that the last line of the weevil matches the last line of text, even if the head of this one starts before the paragraph.
An existing special function in the editor will help to avoid such errors. When using this window, you can select and customize the numbering in various ways.
Figure 1. Opening a document.
Despite the availability of new programs, Word 2003 is still a fairly popular editor and is used on many computers. Page numbering in Word 2003 is a little easier than in subsequent versions, although the differences are not significant.
On even pages, the weevil is placed in the left margin, and on odd pages, it is placed on the right margin. When a verse begins or forms the text of the note itself, the call is placed at the beginning of the first line at the same height as the others, with normal indentation, and the verse is centered without reference to the notation.
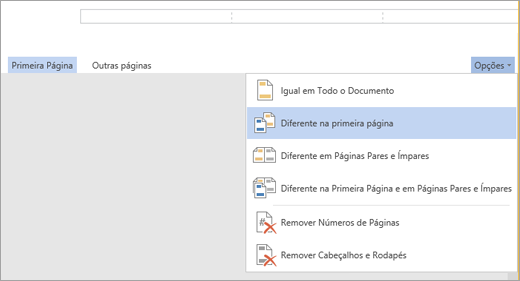
To start numbering at a later page in a document, divide the document into sections, undo the division, and enter page numbers. Then choose a numbering style and run number in each section. You might find it useful to display not only the content of your header or footer area, but also formatting marks in those areas. ![]()
Use the Page Format dialog box to choose a different starting number for your document.
It's just that the functionality of the updated versions has been significantly expanded, the number of tabs and submenu items has been increased.
To configure, open a working document in the program or create a new one (Fig. 1). When working, remember that there is a cursor and a mouse pointer in the document window. The cursor displays the location where characters are entered and moves only over the print field.
Use the steps in this article to customize where and how you want to display page numbers. Use this procedure to number all pages or remove a cover page. Show the current page number with the total number of pages in the document.
Add page numbers in different sections of the document
Use this procedure to enter odd page numbers in the right page footer, and even page numbers in the left page footer. 
Large documents sometimes require different page number formats in separate sections. Your title page does not need a page number, you can use Roman numerals on summary pages, and the main document can use Arabic numerals. Use these procedures to customize different page number formats for your document or validation.
The mouse pointer can move across the entire screen depending on the operator's actions. The position of the cursor can be changed using the keyboard or the mouse pointer.
If it is necessary to number the document in the top line of the window (menu bar), you need to find the "Insert" tab, move the mouse pointer over it, press the key. Depending on the settings, it can be the right or left key.
Enter page numbers
Select "Insert" - "Field - Page Number" to enter the page number at the current cursor position. However, these fields will change position when text is added or removed. Therefore, it is advisable to insert a page number field into a header or footer that is in the same position and is repeated across all pages.
Use different styles of page numbers
Choose Insert - Header & Footer - Header or Insert - Footer and Footer - to add a header or footer to all pages with the current page style. You write text Documentwhich must start with a page number.
- Click the first paragraph of the document.
- In the Breaks area, turn on Paste.
- Include a page style so you can set a new page number.
- Double-click immediately before the page number field.
- You can view the Edit Fields dialog box.
- Select the number format and click "Accept".
In new versions operating systems can be triggered by any mouse button.
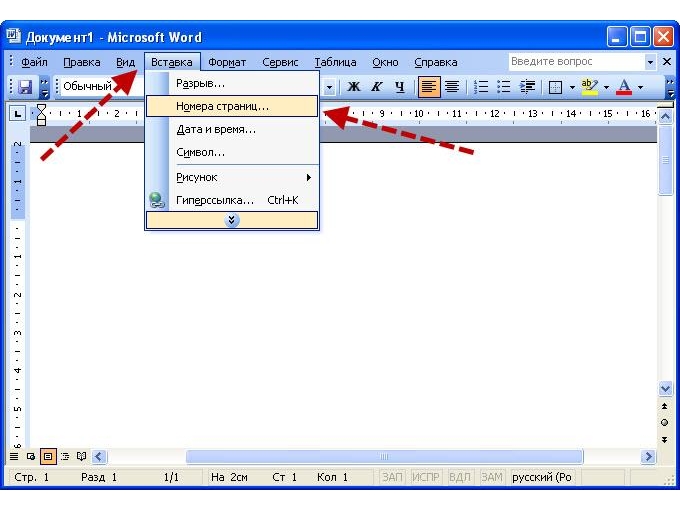
Figure 2. Selecting the "page numbers" item in the tab.
As a result of pressing, a window should open (Fig. 2) with a choice of possible actions. In the window that opens, move the mouse pointer to the required action (in this case "Page numbers"), press the left key.
The first page page style contains a footer with a page number field formatted for Roman numerals. The next page style contains a page number field formatted with a different look. An automatic page break occurs at the end of the page when the page style contains another style. Manual page entry can be applied with or without changing the page style. The best option depends on the document: use manually entered page breaks between page styles, or use automatic change.
A window will open (Fig. 3) with possible options for displaying sheet numbering in the document. In the first line, select the vertical location.
Possible options:
- bottom;
- up.
The second line defines the alignment method.
Alignment refers to the horizontal position:

To apply a different page style on the first page
If you only want a different style cover page from other pages, you can use the automatic method.
- Click on the first page of the document.
- Choose "View" - "Styles and Formatting".
- In the Styles and Formatting window, click the Page Styles icon.
- Double-click the First Page style.
To apply a change to the style of a manually inserted page
Now you can, for example, insert a footer for the Default page style, or insert footers in both page styles, but with page number fields formatted differently. Click the start of the first paragraph on the page where you want to apply a different page style.
- Select "Insert" - "Hand Wrapped".
- You can see the Insert Break dialog box.
Figure 3. Selecting the location of page numbers.
- right left;
- in the center;
- inside a text box;
- on the fields.
If there is a check mark in the box with the inscription "Number on the first page", the editor will number accordingly. In order not to number the first page, the check mark should be removed.
To set additional parameters, point to the "Format" button, press the mouse button. In the window that opens, you can set the type of display, start numbering from the second or any required page, and others.
However, these fields will change when text is added or removed. As such, it is best to insert a page number field into a header or footer that is in the same position and repeats across all pages. You now need a little more control over the page number. You are editing a text document that must start with a page number.
Formatting the page number style
- In the Breaks section, enable Paste.
- Include a page style so a new page number can be set.
- Double-click immediately before the page number field.
Settings in Word 2007
Despite the vastly increased capabilities of later versions of the editor, the question of how to number pages has a simple answer. The interface (way of communication) with the program is carefully thought out and organized.
A distinctive feature of the new versions is the ribbon located under the menu bar.
The first page style has a footer with a page number field formatted in Roman numerals. The following page style displays a footer with a page number field formatted in a different style. An automatic page break appears at the bottom of the page when the page style has a different "next style". For example, the page style "First Page" displays "Default" as the next style. Manual page printing can be applied with or without page style changes. On the Organizer tab, you can see the "Next Style". ... The best option depends on the document: use manual page layout between page styles, or use automatic change.

Figure 4. Selecting the "Insert" item.
The ribbon contains groups of settings, united by functional characteristics. Moving the tape from side to side can be done with the mouse wheel. In the open editor (Fig. 4), select the "Insert" item in the menu bar, as in Word 2003.
If you only need one cover page with a different style, you can use the automatic method. The title page displays the "First Page" style and the following pages automatically display the "Default" style. You can now insert a footer only for the Default page style, or insert footers in both page styles, but with page number fields formatted differently.
Click at the beginning of the first paragraph of the page where a different page style will be applied. The "Edit Break" dialog box appears. ... The selected page style will be used from the current paragraph to the next stylish page break. You can improve appearance your text with a stylish header, place a footer with the same pattern, or specify the numbers you prefer.
In the ribbon under the menu bar, you need to find the "Page number" item. Hovering the mouse pointer and pressing the key will open an additional menu (Fig. 5). Mouse keys can be configured in the editor settings or defined in a practical way.
The menu that opens contains the basic numbering settings in the document. When you select a specific item, an additional menu will open containing all possible actions.
By clicking this option, you add a new title according to what you want to display. Each template serves to highlight specific information such as text title, publication year, or subtitles. Please note that not all templates display all information, so choose the one that best matches your text.
Click on the heading you want to select. Then edit the information according to your text. At this point, you can add images, additional information, cliparts and date, and customize other details. To insert what you want, select a category from the Insert field on the Design tab that opens automatically for editing the title.
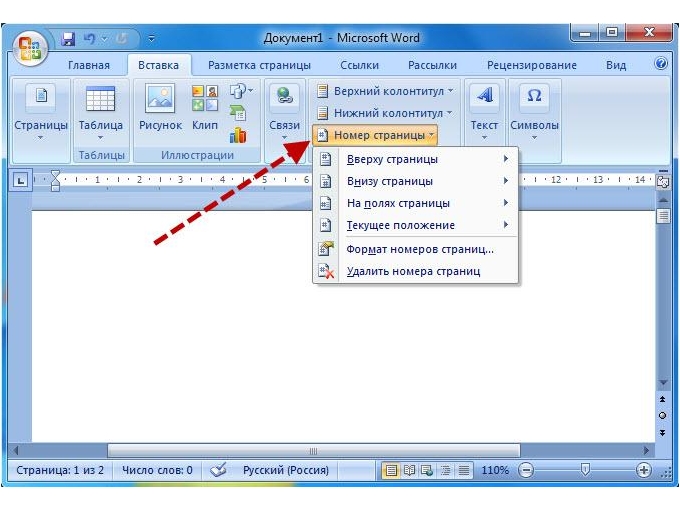
Figure 5. Selection in the "Page numbers" insertion point
The item "Format of page numbers" will help you set the appearance of numbers, the origin, and other parameters.
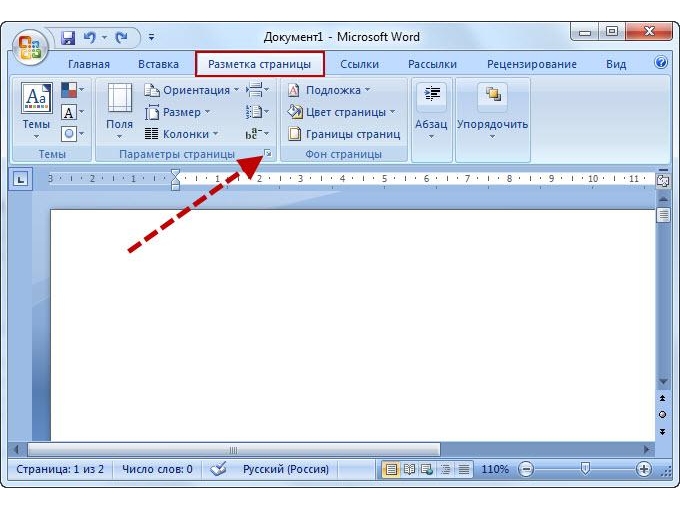
Sometimes a situation arises when the countdown needs to be displayed from the second page, and start from the first. To figure out how not to number title page, you need to go to the "Page Layout" tab (Fig. 6).
When finished editing, click Close Header and Footer to save your changes. You can make subsequent changes by double clicking on the area you want to edit. When the header is ready, it's time to insert the footer. Each header template has a match, and you can use that or try a different combination. To add, click the "Footer" on the "Insert" tab.
Select a template and edit the information according to what you want to display. There are footer templates that differ for odd and even pages. Choose one of these templates if you must specify pages as if they were a book. Footers can contain the date, pagination, and other necessary additional information.
The sheet numbers should initially be set from the beginning of the document. On this tab, select the "Page settings" item with a small button in the form of a square with an arrow. Clicking the button will open a window for configuring display parameters.
To save your changes, simply click the Close Header and Footer button, repeating the procedure you did earlier. You can also edit the information by double clicking on it. If you don't want a footer but want the page numbers to be printed, you can do it without great work in a way that really works. With the Insert tab open, click Page Number and select one of the options provided.
Numbering is automatically generated for all pages, but you can edit them manually. This way you can avoid frustration trying to get the desired result. Your document has the look you want, with a title, footer and pagination, but you want to add notes to the end of the text or page without messing up the setting you set. Click the Links tab to get started.
Figure 6. Selecting "Page Layout".
In this window, in the "Distinguish headers and footers" section, check the box next to the words "first page" and OK. After making the settings, the number on the cover page will not be displayed, the rest of the display of numbers will remain unchanged.
Sometimes a problem arises of how to number pages selectively in the Word. On the same tab, select "Breaks", then in the "Section breaks" item select "Next page" with the mouse pointer. The editor cursor must be at the end of the numbering.
The document will be divided into sections, which can be numbered according to the assignment. You can start counting the next section from any page of the previous one.
After making all the adjustments, sheet numbers will be generated automatically as the text is enlarged. Editing text, changing the font size, and other formatting operations will in no way affect their location.
2,127 ViewsWe do not use page numbering in Word very often. And maybe it would never have come in handy if I hadn't started writing my book. And here the numbering is simply necessary. It is also necessary when writing a diploma or term paper... Yes, and in a simple abstract, it will not hurt either. Let's not postpone the matter indefinitely try to number the pages right now. The first thing that needs to be done is in the Word itself, find the line "Insert" and click on it.
After this action, such a panel will open in front of us, where we just need to find this row, under which there is a signature "Headers and footers". In this row of three lines, we are interested in the very last "Page number". 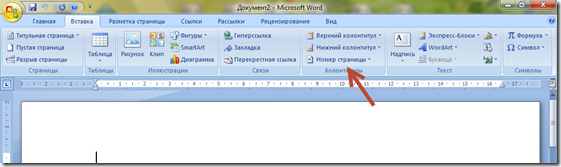 After that, you need to click on this line with the mouse. When this action is completed, a new panel will appear in front of us again.
  Here we see exactly how the numbers will be located. Let's take an example and see the result.
 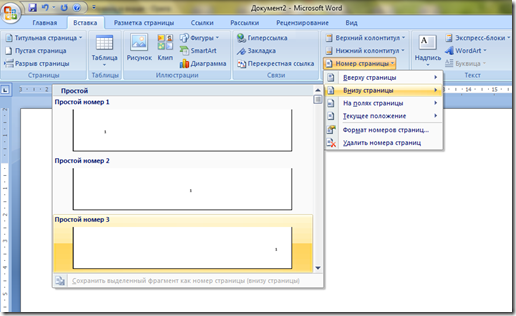 And this is what we got on the Word sheet itself
 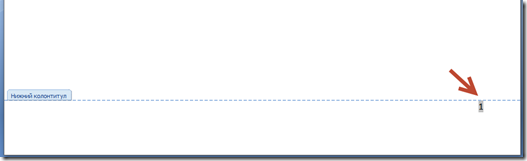 That's it, the sheet is numbered. All other pages of your document from the very first to the very last will be numbered in the same way. But here, too, there is one "but". Where did you see that the document begins with the page under the number 1? That's right, there is practically no such thing anywhere. Because number 1 is the title page. And we do not number it. And what then? It's simple. In order to solve this problem, you need to click on this line "Format of page numbers"
  And this image appears in front of us:
 ![]() What do we need here? Just one - "Page numbering" and "Start at".
What do we need here? Just one - "Page numbering" and "Start at".  Here you just need to put the number from which the book, dissertation or abstract begins.
 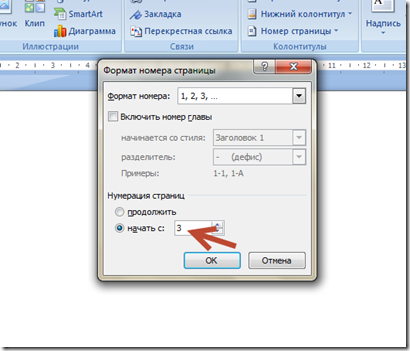 That's it, our numbering is set as it should be. Now let's try to sort out such a question. When we carry out all these actions, we get such a strip.
 ![]() How to remove it? Everything is very simple. To do this, you should click on the box "Close window of headers and footers" Where can I find it? And here. After this action, we will have only one numbering.
How to remove it? Everything is very simple. To do this, you should click on the box "Close window of headers and footers" Where can I find it? And here. After this action, we will have only one numbering.
How to number pages in Word, for example with roman numerals or even letters? Oh, and that's not a problem! It is very easy to number pages in Word this way. We again display this window "Page number format" and in the line "number format" select Roman numerals. 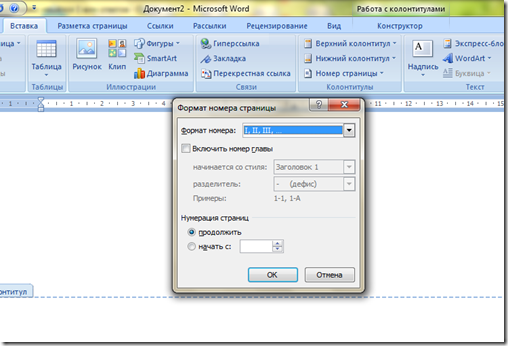 And here's what we got: Well, how can you completely remove all the numbering? And this problem is very easy to solve. To do this, click "Delete numbers" in the header and footer column.
  So, easy and simple, and most importantly, understandable for everyone, we have solved one of the main problems of Word users - how to number the pages. I think now you will definitely not have any difficulties with this!
P. S. By the way, if you want to know how to put stress in the Word, then you can read about it I promise, it will be interesting and very informative.