How to add a page or title page to a Word. Fit text on page
How to add a page to the Word. For some, this is not a problem, but for some it is a whole disaster. Even if you have been familiar with the Word text editor for a long time, this does not mean that you know everything about it. I can't say that about myself either. You must always learn, and do not be ashamed of it. Stupid is not the one who learns, but the one who believes that he knows everything! I am not writing my articles to teach you. I never had such intentions. I'm just sharing my experience in a friendly way. And I really want you to write in the comments about your secrets of working with text editors or various developments in the field of computer programs. This is the only way to know the truth.
Today we will talk about how to quickly and painlessly add a new blank page to a document, and how to create title page or a cover in Word 2010. Since the text editor Word 2010 and Word 2007 are similar, I will describe the sequence of actions in only one of them, ie Word 2010.
In order to add a page to the Word, you need to do the following:
- Place the cursor where you want to insert a new page;
- Select Team Empty page in the tab Insert in Group Pages ;
A new page will appear above the cursor you placed on the previous page.
How to insert a cover page or cover intoWord
Word 2010 has pre-built cover and cover templates. You just have to select, insert it, and replace the finished sample text with your own.
- You can set the cursor anywhere, the title page will still be at the beginning of the document.
- Select Team Front page in the tab Insert in Group Pages .
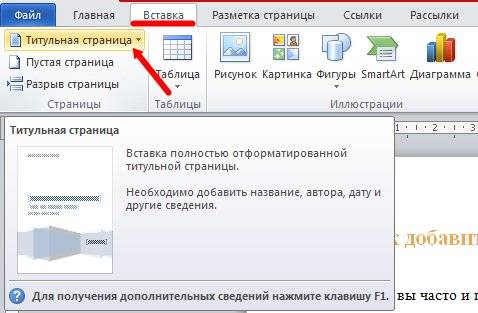
3. Select the cover you like from the drop-down box cover page, and click on it with the left mouse button.
![]()
Lesson Archiving files Archiving is compressing files, that is, reducing their size. A compressed file is called an archive (or archive file). This is what the file looks like after zipping
Lesson Word Document
Word 2007 Basics
Lesson 11. Placing Text on the Page
Lesson topics
1. Page parameters. Orientation, dimensions and other sheet parameters
2. Formatting paragraphs using a dialog box Paragraph
3. Formatting paragraphs using buttons Tool belts from the group Paragraph
1. Page parameters. Orientation, dimensions and other sheet parameters
At the beginning of working with a document, you need to set the page parameters (this can be done at any time when working with the document). Usually the initial page parameters are the most appropriate and nothing needs to be changed. However, sometimes you may want your document sheets not to be vertical (like in a book), but horizontal (like in an album). Or you might want to change the margins - the distance from the edge of the page to the text.
All this can be set on the tab Page layout tool tape. This tab contains tools responsible for different actions for page layout and text layout.
The most used tools are in the group Page settings.
All changes made will apply not only to the current page, but also to all pages of the document.
Figure: 1. Tab Page Layout
To select / change the orientation of the document pages (from portrait to landscape or vice versa), click on the button Orientation and in the drop-down list select the desired type of orientation. The default orientation is portrait when creating a document.
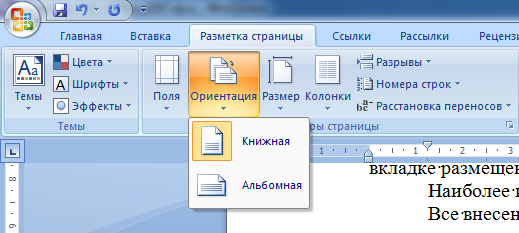
Figure: 2. Selecting page orientation
Similarly, by clicking on the button Fields, you can select the desired margins (empty areas at the edges of the document). You will be offered several options to choose from, and if none of them suits you, click Custom fields and a dialog box will appear in front of you Page settings(Fig. 3), in which you can set the required field sizes.
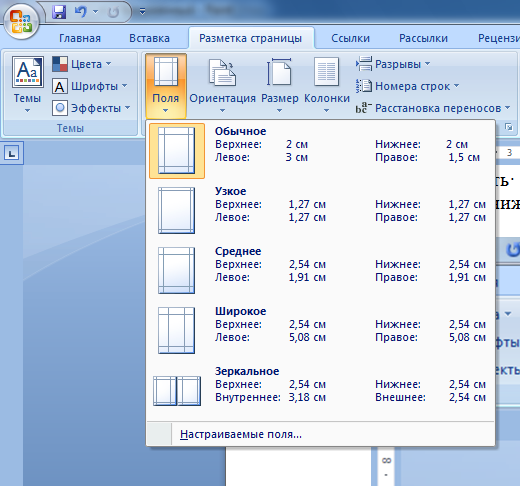
Figure: 3. Sizes of fields
The page size is selected using the button The size(Fig. 4), and the number of columns in which the text should be displayed - using the Columns button. As in the case of fields, if you need to manually adjust the number and width of columns, then clicking the button Loudspeakers select value Other speakers and in the dialog box that appears, make the required settings (Fig. 5).
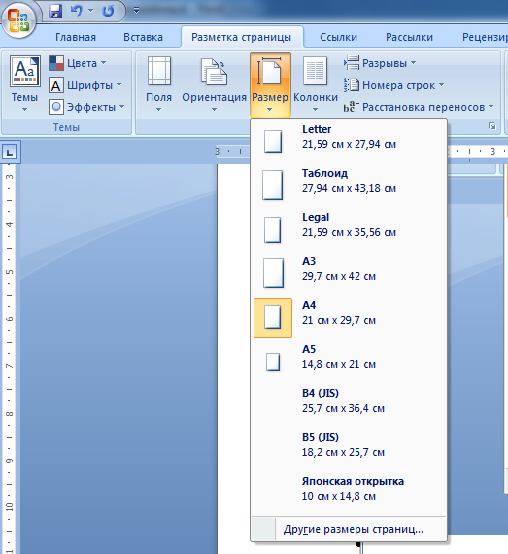
Figure: 4. Page size
![]()
Figure: 5. Selecting the number of columns per page
2. Formatting paragraphs using the Paragraph dialog box
In the tab Page layout in Group Paragraph there are tools that set indents for a paragraph, and on the right you can set the spacing before and after the paragraph. By clicking the button in the lower right corner of the group, you can go to the window Paragraph and choose more fine-grained paragraph settings.
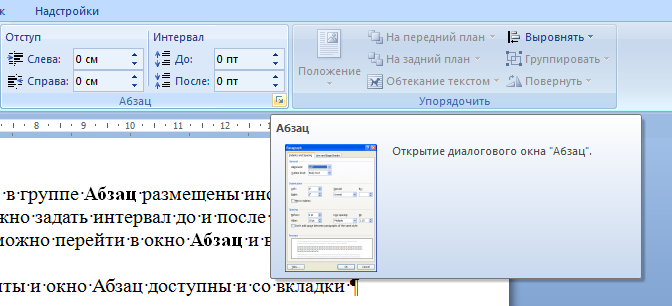
Figure: 6. The Paragraph tool group and calling the Paragraph dialog box from the Page Layout tab
The same tools and window Paragraph available from the tab home... Since this tab opens when you start Word, the tools located on it are used most often.
Let's go to the tab Home.The tool strip will become as shown in Fig. 7. In a group Paragraph collected paragraph formatting tools, that is, how the paragraph text will be placed on the page.
Figure: 7. Word tools located on the Home tab. Opening the Paragraph dialog box
To format a paragraph, follow these steps:
1. Select 1 or more paragraphs with the mouse. Or position the cursor anywhere in the paragraph.
2. Click on the small button to the right of the word Paragraph to open the Paragraph dialog box (see Figure 7). A dialog box will open Paragraph (fig. 8).
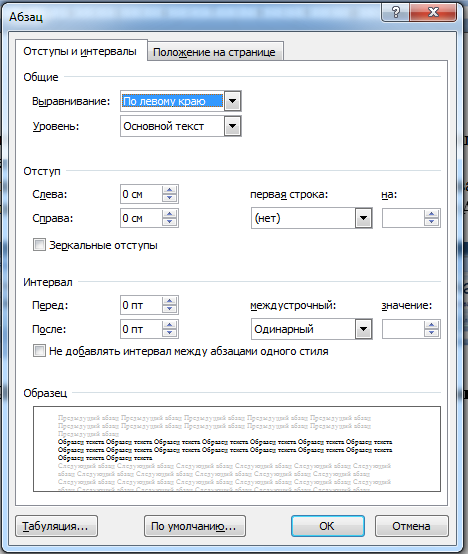
Figure: 8. Paragraph window
This window contains lists with the help of which the required formatting is set.
General group
Alignment - sets how the text will be aligned relative to the page borders. Possible ways: Left, Center, Right, Width.
A preview of the paragraph with the settings set can be seen directly in the window Paragraph, at its bottom. This helps to evaluate the effect of setting certain settings before they are applied.
Alignment tools are also located on the tab home tapes in group Paragraph.
Level - sets the nesting level for lists, or Main text for plain text.
3. Select Alignment from the list: By width.
Leave the level Main text
4 . Indent group... Sets the placement of text relative to page margins and the indentation of the first line (red line).
To set the red line, in the Paragraph window, in the drop-down list First line should choose a value Indent... In this case, a field will automatically become available in which you can specify the size of the indent of the red line. By default, it is set to 1.25 and this corresponds to the standard value.
A preview of the paragraph with the settings set can be seen directly in the Paragraph window, at its bottom.
Select from the list First line value Indent,install in the list by: 1 cm.
5. Line spacing
In the Paragraph window in a group Interval there are lists for setting the spacing between lines and between paragraphs.
To select the interval between lines (single, 1.5 lines, double), just open the list and select the appropriate value in the drop-down list interlinear.
Select 1.5 line spacing.
6. Spacing between paragraphs
To set indents between paragraphs (between the last line of the previous paragraph and the first line of the next), you need to specify in the field Front the corresponding value (for example, 6 pt.).
In field After indicates the value of the indent between the selected paragraph and the next.
These spacing are used to better emphasize sections of text and headings.
Set indents for the paragraph: Before: 6 pt. After: 12 pt.
Note
Note that the window settings Paragraph do not apply to all paragraphs of the document, but only to those that are currently selected.
3. Formatting paragraphs using the buttons on the Tool Ribbon from the Paragraph group
Some paragraph formatting tools are located at Tool belt in Group Paragraph tabs home... These are text align buttons and Line spacing, which provides a quick way to format a paragraph without invoking the Paragraph dialog box. To use them:
1. Select 1 or more paragraphs
2. Click the left mouse button on the alignment button (for example, by width)
3. Then left-click on the button Line spacingand choose 1.5.
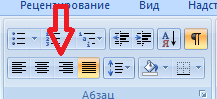
Figure: 9. Tool Group Paragraph Tool Ribbon
Note.
The Paragraph group includes other tools that are not available in the Paragraph dialog box. Such as Fill, Borders and others.
Exercises
1. Create new word document under the name My text 1
2. Enter the text below. To force the jump to the next paragraph, press the Enter key on your keyboard.
History Microsoft Word.
2007 - Microsoft Word 2007 (aka Word 12) was released for Windows XP and Windows Vista.
3. Page layout.
Set margins by template Average.Orientation Bookstore.The size A4.
4. Text alignment
Select all text and set justification. Single line spacing.
5. Formatting of individual paragraphs.
Place headings in the center.
Place the main text on the red line, indent 1 cm.
In paragraphs after the heading "History of Microsoft Word" set spacing Front and After at 6 p.m.
As a result, you should get this kind of text:
Microsoft Word 2007 features
As you probably already know, Word is the most popular and widespread text editor.
A text editor is a program that is designed to work with text documents on a computer: their creation, editing, design, etc. In today's view, a text editor has outgrown just a tool for easy typing and editing of text.
The functionality of modern text editors is very expanded and strives to provide convenient work with text information in all its manifestations.
History of Microsoft Word
The first version of the text editor Word appeared back in 1983 and was designed to work in the MS DOS operating system. The editor was based on the Bravo word processor, developed in the laboratory of the Xerox PARC research center.
The first version of Word can hardly be called a text editor in the modern sense. The program did not have a graphical interface (buttons, menus, etc.), but it could display the markup of documents, which compares favorably with other programs of that time for working with text.
The first text editor with a graphical interface was Word 3.01, which, by the way, worked for Macintosh computers (from Apple) and was released in 1985. The first version for Windows appeared in 1989 along with the most operating system... From this period word numbering it was decided to start with 1 and the further historical path looked like this:
1989 - Microsoft Word 1 for Windows released.
1991 - Microsoft Word 2 for Windows released. In the same year, a set appeared microsoft programs Office and its first version came out
1993 - Microsoft Word 6 for Windows released. From this period, Microsoft decided to take into account the three versions that existed before the Windows era and thus jumped from version 2 to version 6 at once.
1995 - With the release of Windows 95, Microsoft Word 7 for Windows was released, which became known as Word 95
1997 - Microsoft Word 97 (aka Word 8) was released, focused on working with Windows 98.
1999 - Microsoft Word 2000 (aka Word 9) was released, developed for the Windows 2000 platform.
2001 - Microsoft Word XP (aka Word 2002, aka Word 10) was released, focused on working with Windows XP.
2003 - Microsoft Word 2003 (aka Word 11) was released again for Windows XP.
2007 - Microsoft Word 2007 (aka Word 12) was released for Windows XP and Windows Vista.
Cooking text for print in Microsoft Office 2007, one may encounter a situation where a couple of lines do not fit on the page and move on to the next one. Print document with extra page, on which there will be only a few lines not rational from the point of view of saving paper, and simply the convenience of perceiving the text as a whole.
To solve this problem, open the required textwhich follows fitand click on the logo button. Then click the "Print" and "Preview" button.
In the window that opens, click the "Shrink to page" item.
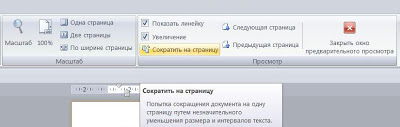
For convenience, if you often encounter such a situation, you can carry over this function to the quick access panel.
And everything is good, understandable and works, but all this was written for someone else. The point is that in Microsoft Office 2010 there is no such function. Rather, she disabled, and to activate, you must accordingly customize ribbon menu... Click "File" and choose options, there click Customize Ribbon.
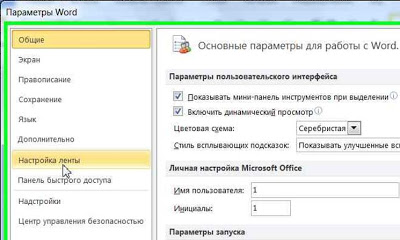
In the window that opens, expand the menu under "Select commands" and select "All commands".
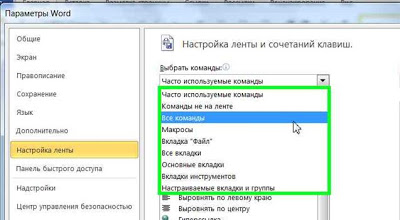
Scroll down to Shrink to Page, select it. In the column on the right, mark the tab on which this menu item should be located and at the bottom click "Create group" and then click the "Add" button and OK.