The table does not fit on the sheet. Video to help. Keeping the link with the original * .xlsx file
Doesn't fit text in a table cell created in Word? More precisely, not all of the text is visible in the cell, since some of it is hidden behind its borders. The reason for this can be both in the table settings and in the paragraph parameters settings. Therefore, to get rid of this problem, you need to change the named settings.
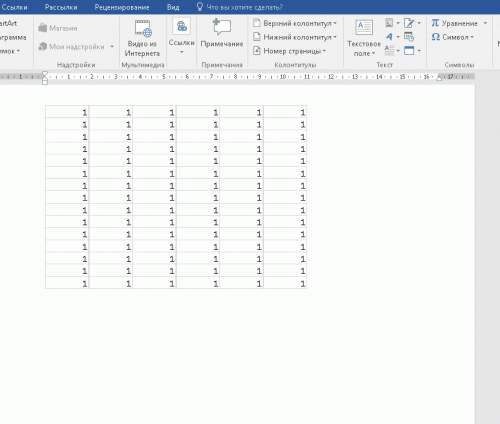
For example, a table listing textbooks should look like this.
You can hover over them and you will find the same two options mentioned above. If you open both files at the same time, you will see the changes in real time. Obviously, there is a rather complex mechanism that does all of this work, but thankfully you don't need to worry about it.
1: Preparing the file structure
Step 3: After selecting the file, you will see two checkboxes on the right. If you want to insert a table so that it is not linked to the original file, do not select the check box. There was no easy explanation of how to do this in help or on the web, so we created our own. If files are "lost", you can relink them, but it is best to have all the files you use in the same folder. It's even better if you're not going to move the folder later.
But in fact it turns out like this:
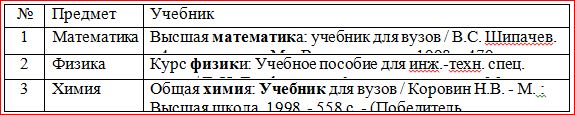
That is, the height of the lines in this table is too small to reflect the full information about the books.
The table might look like this:
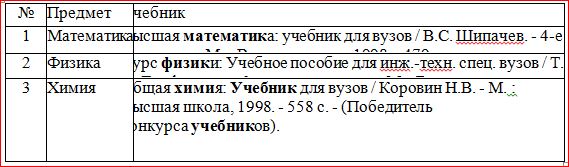
Here, not only the low height of the rows, but also the width of the text, seems to creep into the cell borders (second column) or even hide behind them (third column). In addition, we see that the height of the third line is too high. Of course, this does not happen often, but it still occurs, especially when you have to edit tables already created by someone earlier.
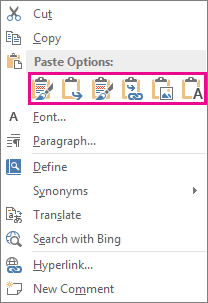
Any binding between files can be established. You can see from the formula bar above that the cells in this table refer to cells in another workbook. Formatting, centering, etc. can be executed immediately after the cells have been inserted. This requires you to interact with the clipboard menu, which disappears and is very difficult to get back to. The easiest way to change the justification of cells on a page is to use the formatting bar on the ribbon. Use the Properties button to make any changes.
8 - setting table layout properties
"Centered without text wrap" are the most common layout properties, but obviously a style preference. Thus, until it is found, you will need to open all tables that are stitched together in the document and then update them as needed. If there is a cross-link between the spreadsheets, then the related data will not be automatically updated.
14: Ensuring all links are correct
This ensures that all data is current and correct.Row height and table cell width in word document can be adjusted automatically depending on the size of the text, we talked about this. But in this case, this is not the case, and all the unsightlyness of the table is due to the incorrect setting of the table and paragraph properties.
Table settings
To change the properties of the entire table, or a separate cell you need to select this table or cell, the settings of which do not suit us, and by clicking in this place with the right mouse button, go to the drop-down menu. In which (drop-down menu), you need to find "table properties" and click on it with the left button. What will cause the window to open "Table properties".
Working with my second son was a real partnership. They took the time to understand our business and its unique challenges. Rob's team and their deep skill bench have been able to handle everything from renewal software and equipment, to the reliability and simplification of the network. They processed the logistics order, configured systems, placed new employees, and managed our stock of software and hardware.
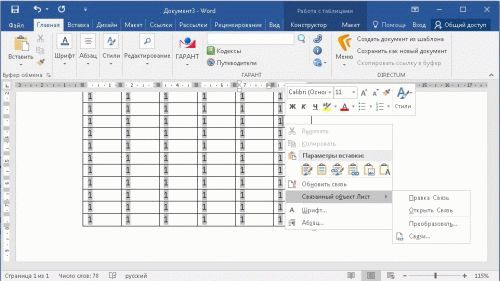
We couldn't imagine how to do this with another support provider! The document displays only the information displayed in this area. To resize this display area to enlarge the displayed data or remove extra cells, place your mouse pointer over the small black resize squares that appear around the perimeter of the embedded sheet object until your mouse pointer turns into a double-headed arrow. After that, the mapping of the worksheet to the table is changed.
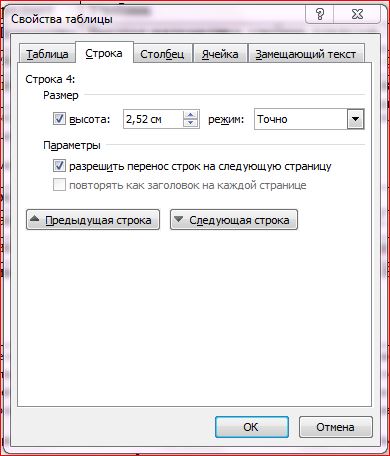 In this menu, you can change the row height, column width
 To increase or decrease the row height in the “row” tab, check the box next to the height parameter and select the “minimum” mode; now the row height will change depending on the text in the cell (the larger the text, the higher the table row height).
Method 2. Inserting an object
To change its contents in the future or change its display size, you must return to edit mode. Usually most of us will not follow these two methods, but will go for the paste copy method. If the data in the spreadsheet changes, the chart is automatically updated. ... Note. You cannot edit the chart that was inserted as an image, but you can adjust it.
Top down buttons. Chart Elements Add, remove, or change chart elements such as title, legend, gridlines, and data labels. Chart Filters Edit which data points and names appear in your chart.
- Layout Options Choose how your object interacts with the text around it.
- Chart Styles Set the style and color scheme for your chart.
If the line height is too large and the text does not even fill it all, then it is possible that the exact size of the line height is set in the table properties and / or its value is too large. Then you should set the "minimum" mode and decrease (or delete) the value of the table row height.
In case the text "creeps" on the borders of the cell, perhaps cell margins are incorrectly set, or rather, the width of the fields is zero. To set the cell margins or change them, you need to go to the "cell" tab, "parameters" and change this indicator here.
Hover over the button to read the description of the option. Once inserted, the object is no longer part of the original file and does not reflect any changes. Use linked objects if file size is a consideration. ... But does the result look the way you want it to?
The tables in the two programs may look very different. In your case, the data and the table will be different because this is just an example. So, we need to copy all or part of this table. Select all or part of the information in the table by highlighting it. It is recommended that you check the total number of selected rows and columns.
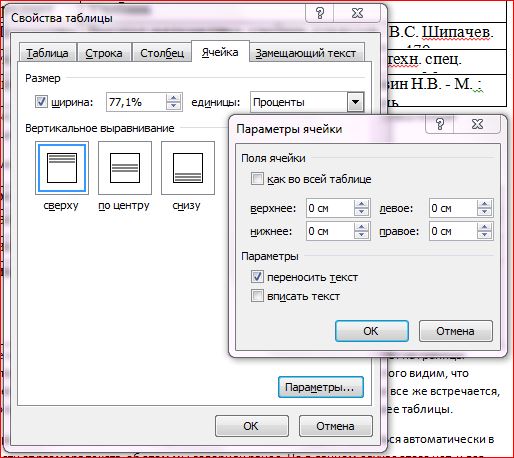 In the "cell" tab, the fields inside the cell are configured
 Paragraph settings
If the text in the table does not just "creep" over the cell borders, but part of it is generally hidden behind it, it is probably necessary to change the parameters of the paragraph of this test. To do this, select the required cell or the entire column and in the main menu enter the "Paragraph" settings window.
Select Copy to copy the data table. This way you have data on the clipboard, but you won't be pasting just the data. When the "Insert Table" option opens, we need to customize the table, which we will do in the next step.
Step 6: select the word table
To do this, we use the information obtained in the step. In the Number of Rows field below, select the number of rows in the table that you are about to insert. For example, after selecting rows and columns, our table might look like this.
Step 7: Select the "Insert Special" option
Method 1. It is important to note that this is not a file. Note: Only the image objects in the spreadsheet will not be included.In the paragraph settings window, you will need to change the indentation (left, right and first line), usually you need to set zero values \u200b\u200beverywhere. In this case, the position of the text in the cell will depend only on the setting of the cell margins (which we have already changed).
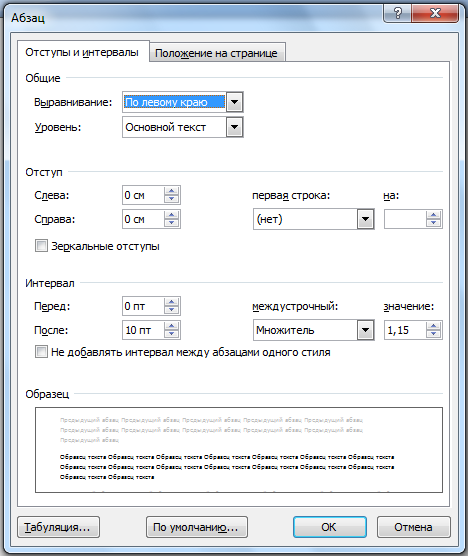 Paragraph parameters can also be changed inside the table.
 Thus, changing table and paragraph properties can make tables look neat and attractive. This can be done using the word processor Word. In addition, some of the valuable information will not hide behind the borders of the table cells. And that's good too!
Method 4: Linking a Specific Range of Data
Resize the object to fit on the page. This is a link to the image of the file in its location. If you want to link specific data, the best way it would be easy to link the data you want. The downside is that the link needs both files and space to work. While these are simple processes, you should be aware of your options and limitations that apply to each. For users who want information to be updated every time they make changes to spreadsheet, link is path.
Video
Sometimes we need to insert excel spreadsheetinto a Word document. In this case, the inserted table should be updated automatically. In other words, after making changes to the Excel table, the inserted table in Word should update automatically without updating the Word document itself. This can be done in several ways - by linking objects and creating a new Excel spreadsheet inside the Word document. Typically, most of us do not use these methods. They use regular copy-paste. You can of course just copy the Excel spreadsheet and paste it into Word, but then it will not automatically update.
Step 2: set up the main document
The only difference is in the options you specify in the Paste Special dialog box. While the results may seem the same at first, they are very different from each other. If you plan on printing your document in the future, check. This article provides instructions that you can use to create such a list. The main document contains basic text that is the same in all outputs. This database is usually a list of names, addresses and phone numbers. The text in an output document can be the same in all outputs, but you can apply formatting to specific documents. For example, in a mailing list, each line might contain information about a specific recipient. All records in the data source appear in the Mail Merge Recipients dialog box, where you can refine the list of recipients to include in the mail merge. In the Mail Merge Recipients dialog box, select the recipients you want to include. Check the boxes next to the recipients you want to include and clear them next to the recipients you want to exclude. This is useful if the list contains entries that you know you do not want to see or include in the merge. After filtering the list, you can use the checkboxes to include and exclude entries, as described in the previous section.
Organize the content of your shortcuts
- The outputs are the result of a merge.
- The first line should contain the field names for each column.
- Each line should provide information about a specific element.
- There should be no empty rows in the table.
- This method is most useful if your list is short.
- This is useful if you want to see items alphabetically or numerically.
Method 1: copy and paste excel sheetin Word
Just copy the contents of your Excel sheet and paste it into your Word document. Choose the paste option as "keep original formatting and link to excel" or "use the target table style and link to Excel".

Changing the format of the combined data
To use a postal barcode, follow these steps.
Step 7: Preview Labels and Fine-tune the Recipient List
Your main document also remains open, and you can return to it if you want to make changes to all elements. Save the label sheet for future use.- Highlight the information you want to change and make the changes.
- Print or save your document just like any regular document.
- If you change the data in the sheet, the chart is updated automatically.
- On the tab, in the Data group, click Refresh Data.
In essence, we insert static excel datain Word. If you refresh the Excel spreadsheet, the changes will not be reflected in Word. If you change the Excel sheet and after that open the word document, it will ask if you want to update the document. If you click yes, Word will update the latest changes.

Chart Elements Add, remove, or change chart elements such as title, label, gridlines, and data labels.
- Chart Styles Define a color scheme and style for your chart.
- Chart filters.
- Edit which points and data names are visible on your graph.
On the Chart Tools Design tab, in the Data group, click Edit Data. NOTE. ... Two options will insert one copy of the entire book, the other two hold the diagram anchored to the original workbook instead of pasting it, and one converts the diagram to an image.
If you are using this method and would like to update the corresponding Word document, simply right click on the Excel data in Word and choose Update Links

If you right-click on Excel data in Word and select "Linked Object / Sheet" -\u003e "Edit Link" it will open excel formwhere you can make changes without opening directly yourself excel file... After you make the necessary changes, save the form, the data in the Word document will also be updated.
If none of these options do what you want, you can also click Paste Specials. 
Once injected, the object is no longer part of the original file and does not reflect the changes made. Select one of the following: To add the file as a linked object, select the Link to file check box and click OK. To add the file as an inserted object, select the Show As check box and click OK.
- On the Insert tab, in the Text group, select Object.
- In the Object dialog box, New From File tab, select Browse.
- Select one of the following options: Link to File and click OK.
- Click OK as the icon.
Method 2: by inserting an object
The second way links an Excel sheet to a Word document through an object insert.
Step 1: In Word, click on the "Insert" tab in the "Text" box, "Object".

Step 2: Select in the "Object" dialog box and go to the tab "Create from file". Select the Link to file check box, specify the Excel file to link using the standard Windows Explorer and click OK.

Excel file is inserted. Double-clicking on Excel data will open the original Excel sheet. You can make any changes to it just as if you were opening a regular Excel file. This method allows you to automatically change the data in the Word document when the same data changes in Excel.
Method 3: using the "Insert Table" command
IN this method we are creating a new Excel sheet in a Word document. In Word, click on the "Insert" -\u003e "Tables" tab. Select "Excel Table".

Excel sheet is inserted. Now you can create formulas, use filters, etc. Those. work like a regular Excel document.
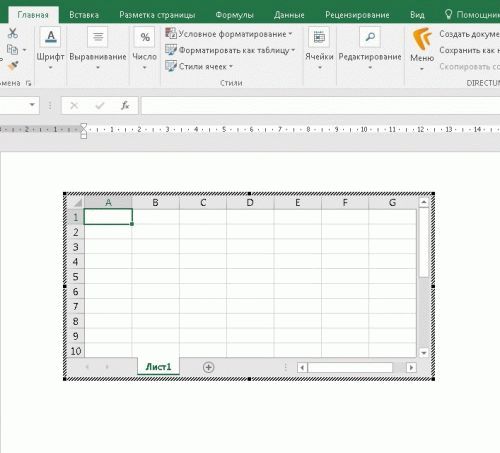
This option for pasting Excel may be useful for those who want to work with Excel in Word as with regular Word tables.