Vba date selection from calendar on form. Dropdown calendar in Excel without macros
Each time you enter a date in a cell, questions arise: should I print DD-MM-YYYY or in a different order? Use "-" or "/" as separator? Will Excel recognize the entered value as a date and display it in the correct format? This is where a pop-up, or drop-down, calendar comes in handy. It is indispensable for working with personal and work to-do lists, schedules and plans, project schedules and financial reports in Excel.
When it comes to keeping everything centralized, this is perhaps one of your best options. The advantage of this is the ability to access from any location and device. This control saves us a lot of trouble, because sometimes people enter dates in an invalid format or just swap a day for a month and cause problems that are difficult to fix later.
It is known, however, that this control is only included in the. Using control commands and buttons, no matter how simple they are, can help us in many everyday tasks. So, in order to learn how to perform this action, we must act as follows.
Popup Calendar is a reliable and proven date picker trusted by 30,000+ Excel users:
- Intuitive to use: select cells - insert date
- Drops out next to the cell, displays the numbers of weeks, days of the week, the current date
- Fills columns, rows, and any ranges with dates in seconds
- Lots of default date format options
- Works in 64-bit and 32-bit versions of Excel
Check here if you don't have one! Let's say you want to create some sort of action schedule that will run on certain days. When following this procedure, note that the selected date will appear directly in the requested cell. Keeping in mind that the code presented in today's class will introduce an annual calendar for the year you specify. If you need a code that creates a monthly calendar of a specific month and year on your worksheet.
To finish, a new box will appear, in which you select the year of your calendar. Below is the loading of the table we made in the class. And learn how to solve any problems you run into to download, open, or run our spreadsheets.
Video language: English. Subtitles: Russian, English. (Attention: video may not reflect latest updates... Use the instructions below.)
Add "Popup Calendar" to Excel 2016, 2013, 2010, 2007
Suitable for: Microsoft Excel 2016 - 2007, desktop Office 365 (32-bit and 64-bit).
How to work with the add-in:
Attention: undo of the last action (UNDO) is not possible. We recommend that you keep a backup copy of your files or use XLTools Version Control to track changes.
The code was reformulated and corrected. Do you need to insert a calendar into your table? So, you are at the right post. Remember, this code will enter the monthly calendar of one month and year that you specified. If you need a code that creates an annual calendar on your sheet.
Keeping in mind that our calendar planner with account planner for the year is now available for download. Let's start creating this calendar. Clear This will be the area where the calendar will be inserted. If you edit the insertion area, be sure to edit the cells below to avoid mistakes. Now is the time to check.
How to insert or change a date in a cell using Popup Calendar
- Select a cell.
- In the Date / Time group, click on the "Insert Date" button\u003e A calendar will pop up next to the cell.
Ctrl +; - Select the desired date from the calendar\u003e Done.
Pay attention to the format: is this what you want? You can change the default date format. - To change the date value, click on the calendar icon to the right of the cell\u003e Change the date.
The Pop-up Calendar remembers the last used date to make it easier for you to enter the next date.
In the window that opens, enter the desired date and year on one line without any symbols or special characters. The account name must be entered in the language in which your office is located. Right that you can use the letter abbreviation for each month: January will be January, February will be February, etc.
Don't forget to check it out and choose your preferred one. You can use it to create many other things, including calendars. The calendar, when implemented in a spreadsheet, is fully editable and has many options for changing layout, color, and time frames. It will appear in your book.
- This button will look like a hammer and a wrench.
- Right-click the area you want to insert into the calendar.
Attention: after entering the date, the cell is automatically assigned the Number / Date format. If you later remove a value from a cell, the cell itself will retain its Date format, and the calendar icon for that empty cell will remain available. To remove the icon, change the cell format to General.

This will give you an idea of \u200b\u200bThen, for the top, you concatenate the cells and then write down the year you are interested in, for example, after you decide if you want to put bold, centered, background colors, or whatever. If you want to be able to set tasks, you won't be able to set tasks in the same cells containing days, so you have to compose columns next to each month. Personally, I like to do this column by column, but it doesn't take too long to insert, insert, insert, insert, obviously this is a problem with these annual calendars.If you want to do something other than simple coloring, it will soon be very wide for print, so we have a work area.
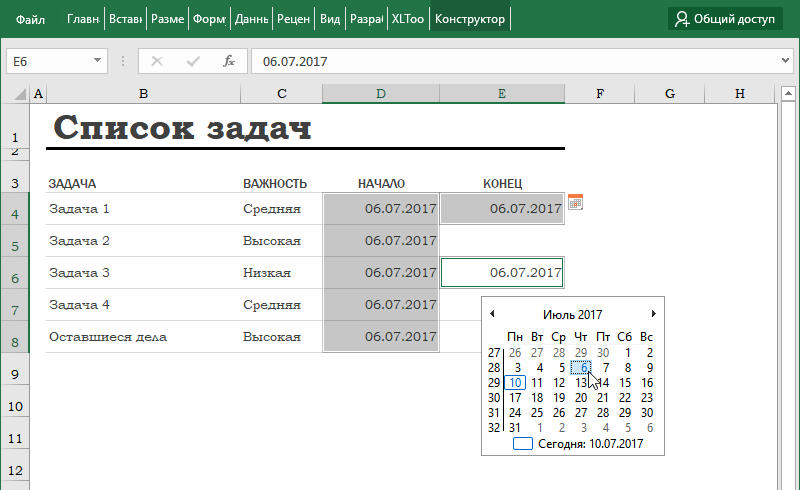
How to insert the current date from a calendar into a cell
- Select the cell where you want to insert the current date.
- In the Date / Time group, click on the "Insert Date" button\u003e Calendar will appear next to the cell.
Or: by right-clicking on the mouse, select "Insert Date".
Or: use a keyboard shortcut Ctrl +; (semicolon in English layout). - Click Today at the bottom of your calendar\u003e Done.
How to fill a whole column, row, or non-contiguous ranges with dates
With the Pop-up Calendar, you can fill a whole range with date values \u200b\u200b(limited to 4000 cells). Dates can be inserted into table columns, rows, merged cells, or any arbitrary range, just like a single cell:
We know that January, regardless of the year, Anyway, it is 31 days. It's not very difficult. Then, on the second day, that's the best day, plus one. It also allows the columns to be reduced to a large extent. Now, once we have January, obviously in quotes, we are going to copy that column and paste it in February, just that, unlike the first formula, it won't be the first month, but it will be the second month. This way we can provide an absolute link to help you copy and paste.
Now, in the month of February, there is a difficulty, it is not always the same number of days. It depends on whether the year is a frog leap or not. There is a technical possibility to hide 29, 1 and 2 if they exist, and we know that in any case there will always be 28 days, but there will not always be 29, 1 or 2, then, being sure that there will never be 1 or 2, therefore, you can already delete the formula that is there. But on the 29th you need to cope a little, and there are many ways to do it. Thus, we have solved the problem leap years... Then we go to Mars, we copy and paste, but we are going to change the month, which is not a month, but it is the third month.
- Select a range.
- In the Date / Time group, click on the "Insert Date" button\u003e A pop-up calendar will appear.
Or: by right-clicking on the mouse, select "Insert Date".
Or: use a keyboard shortcut Ctrl +; (semicolon in English layout). - Select a date\u003e Done. The entire range is filled with the value of the selected date.
Quick tip: Learn how to fill cells with consecutive dates. - To change the date value, click on the calendar icon to the right of the cell\u003e Change the date.
Attention: after entering the date, the cells are automatically assigned the Number / Date format. If you later delete the values \u200b\u200bfrom the cells, the cells themselves will retain their Date format, and the calendar icon for these blank cells will remain available. To remove the icon, change the cell format to General.
March also has 31 days, which makes it easier for us in this case, and we continue all the other months. And there, at the level of months, adjust, put four and so on. This is done, we have columns for each month. Now, what is often asked is the opportunity to see the weekend. New rule using formula. So, if one of these two criteria is met, we would like to place it in a specific color, then we will see that the weekend is well set in the desired color. If we want to adapt this now, there are several ways, for example, I like what I like.
How to fill a range with consecutive dates
With the Popup Calendar add-in, you can quickly fill a range consecutive dates (days in order):
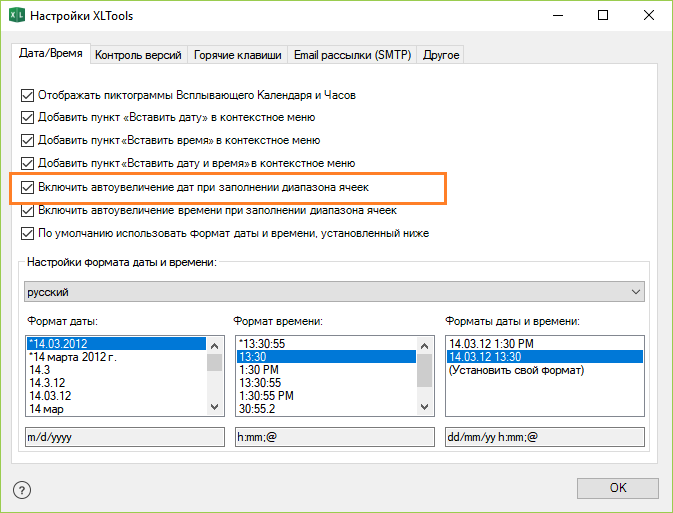
- XLTools tab\u003e Settings button\u003e Date / Time tab\u003e Check Enable Auto Increment Dates When Filling Cell Range\u003e OK.
- Select a range.
- In the Date / Time group, click on the Insert Date button\u003e A pop-up calendar will appear next to the cell.
Or: by right-clicking on the mouse, select "Insert Date".
Or: use a keyboard shortcut Ctrl +; (semicolon in English layout). - Please select start date \u003e Done, the entire range will be automatically filled with consecutive date values \u200b\u200bin 1 day increments.
Conditional formatting... Rule management. Edit, copy the formula that is, then select "February". We can move on to the next column. We're only going to do March and April. Conditional formatting New rule. Subsequently, only for the remaining remaining months. You can provide a more efficient table with drop-down lists in cells where the user can answer “Yes” or “No”, select a date from a calendar, or select an item from another list you create.
More on dropdowns
You can control dates, times, even the length of the text you enter, or simply provide a list of acceptable options to eliminate any potential error.
Using the dropdown list
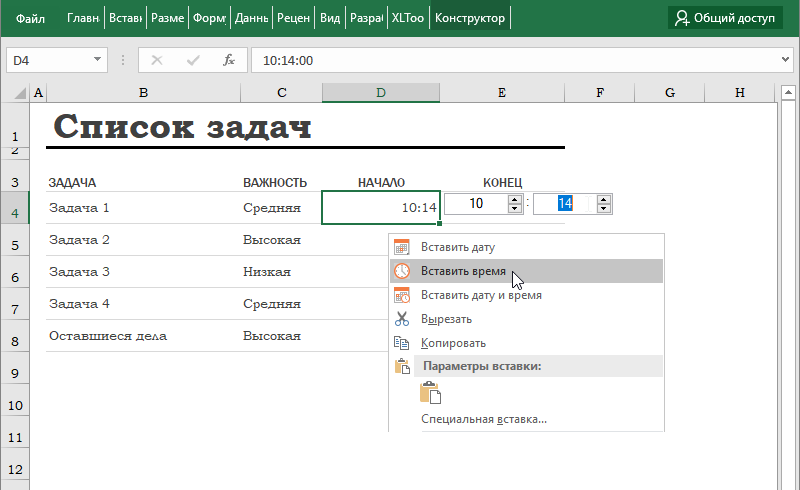
After creating the dropdown, make sure it works as expected. For example, you can check if there are enough cells to display all of your records.How to insert both date and time into a cell at once
- Select a cell.
- In the Date / Time group, click on the Insert Date and Time button\u003e A pop-up calendar with a clock will appear next to the cell.
Or: by right-clicking on the mouse, select "Insert date and time".
Or: use the keyboard shortcut: press Ctrl +; (semicolon in English layout) then release the keys and press Ctrl + Shift +; (semicolon in English layout). - Set the time using the mouse scroll wheel or Up / Down arrows\u003e Select a date from the pop-up calendar\u003e Done.
Pay attention to the format: is this what you want? You can set a different default format for the Popup Calendar and Clock. - To change the value, click on the icon to the right of the cell\u003e Change the date and time.
Attention: after entering the date and time, the cell is automatically assigned the Number / Date format. If you later remove a value from a cell, the cell itself will retain its Date format, and the calendar clock icon for that empty cell will remain available. To remove the icon, change the cell format to General.
If the list of entries in the dropdown is in a different sheet and you want to prevent users from viewing or making changes to them, consider hiding and protecting this spreadsheet... Under Block cells to protect them. Add or Remove Items section in the dropdown list. You can download a sample workbook that contains several data validation examples like the examples in this article. You can follow them or create your own data validation scripts.
Therefore, for this, we will add a control that is not in the standard list, perhaps not yet present on your computer. First, we'll get the control to install. We'll place ourselves in the Developer tab, on a button to insert other controls.

How to insert only time (no date) into a cell
Use the Popup Clock add-in to set and insert times in cells and ranges:
- Select a cell or range.
- In the Date / Time group, click on the Insert Time button\u003e A pop-up clock will appear next to the cell.
Or: by right-clicking the mouse, select "Insert time".
Or: use a keyboard shortcut Ctrl + Shift +; (semicolon in English layout). - Set the time using the mouse scroll wheel or Up / Down arrows\u003e Press Enter\u003e Done.
This list is of course different from each post depending on your applications. Your cursor will turn into a cross and you can draw the shape of your control on your sheet. Then it will create a dropdown for you to select a date.
After you fill out your control's form, you will change the properties of the control so you can edit the cell with the date you selected in the new calendar. To do this, right-click on the control and select Properties.
And now the control is ready to use. All you have to do is close design mode by clicking the appropriate button on the ribbon. Likewise, if you want to change it, you will have to reset this button to do so. And so you get the control you need to give your forms the professional look.
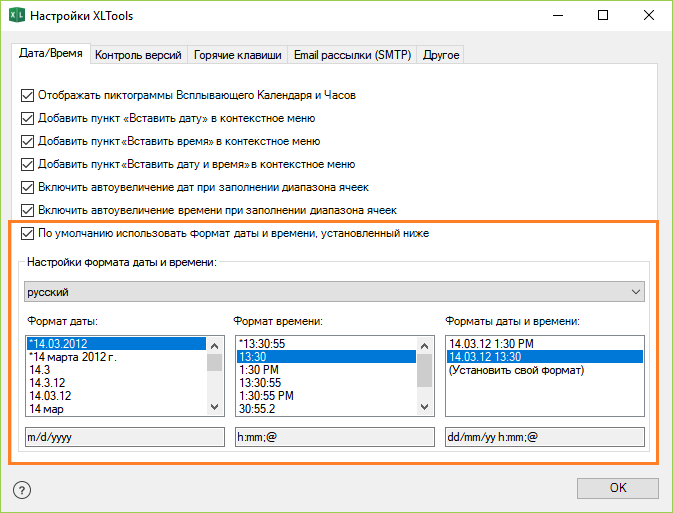
How to change the default date format for Calendar Popup
To change the default format for Popup Calendar:
- Click the Settings button in XLTools panel\u003e Date / Time tab.
- Check the box next to "Use the date and time format below by default."
Note: if you uncheck the box, Popup Calendar will use the format set in your system settings. - Please select suitable format, e.g. accepted in your country or in your language.
Or: set "Custom format". - Click OK\u003e Finish.
To make your spreadsheet more efficient, you can use drop-down lists in cells where users can select Yes or No, a date from a calendar, or an entry from another list. This short video explains how to do it. 
Once you've created your dropdown, make sure it works the way you want it to. For example, make sure the cell is large enough to show all the items.
If the list of entries in the dropdown is on a different sheet and you want to prevent users from viewing or making changes, evaluate the ability to hide and protect the worksheet. You can download a sample workbook with several data validation examples similar to those in this article. You can follow existing test scripts or create custom scripts.
You may find that some cells do not follow the specified Calendar format. This means that the cells were previously assigned a different date format. In this case, change the format of the cells:
- Select Cells\u003e Right-click and select Format Cells.
- Number tab\u003e Date Format\u003e Set the date format you want.
Initially, Popup Calendar uses your system settings default date and time format. You can completely change the system settings. Please note that this will change the settings of all accounts on the computer:
It's free - don't think about any royalties or annual fees. No language barriers - available in a large number of languages \u200b\u200band new ones are constantly being added.
- This long history means it is a stable and functional product.
- Compatible with all popular competing file formats.
- Control Panel\u003e Clock, Language, and Region\u003e Change Date Formats.
- Formats tab\u003e Set date and time formats, first day of week.
- Location tab\u003e Specify the country of your location.
- Advanced tab\u003e Change system language\u003e Restart your computer.
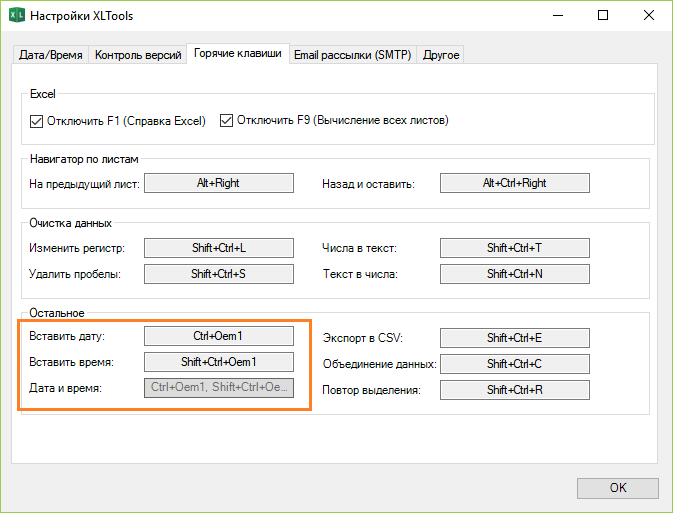
How to change the keyboard shortcut for the Calendar Popup
For your convenience, the default keyboard shortcut for Popup Calendar is Ctrl +; (semicolon in English) is the same combination that Excel uses to insert the current date. You can change the hotkeys for the Popup Clock at any time:
XLTools tab\u003e Settings button\u003e Hotkeys tab\u003e Set another shortcut\u003e OK.
How to add / remove the Popup Calendar icon
A calendar icon (icon) appears to the right of the selected cell if the cell is formatted as Date. Clicking on the icon opens the date picker.
- To turn off the display of the Calendar icon:
- Click the Settings button in XLTools panel\u003e Date / Time tab.
- Uncheck Show Popup Calendar & Clock Icons\u003e OK.
- Done! The icons will no longer be displayed, the Calendar and Clock will still be available for use. Icons can be returned at any time.
![]()
- To customize the appearance of an icon next to empty cells, columns, rows, or an arbitrary range:
- Home tab\u003e Number group\u003e Date\u003e OK. So, the cells will be assigned the date format.
Or: insert any date using the Popup Calendar\u003e Press the Delete button. This will delete the values \u200b\u200bdirectly, and assign the selected cells the date format. - Done! Now, if you select any cell in this range, a Calendar icon will appear next to it.
- To remove the Calendar icon from empty cells:
If the cell is empty, but the icon still appears, it means that the cell is assigned a date or time format. To remove the icon from empty cells, change their format to General:
- Select a blank cell or range.
- Home tab\u003e Editing group\u003e Clear Formats.
Or: Home tab\u003e Number group\u003e Select General from the dropdown list.
Or: by right-clicking "Format Cells"\u003e "Number" tab\u003e Select "General" format\u003e OK.
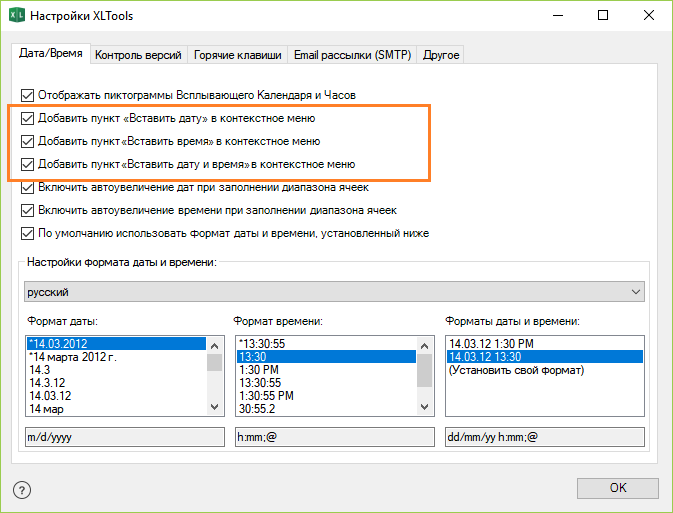
How to add / remove "Popup Calendar" from the context menu
- Click the Settings button in XLTools panel\u003e Date / Time tab.
- Check or uncheck the corresponding options:
- "Add item" Insert date "to the context menu"
- "Add item" Insert time "to the context menu"
- "Add item" Insert date and time "to the context menu"
- Click OK\u003e Finish.
How to embed a pop-up calendar in an Excel workbook
XLTools Calendar Popup add-in cannot be embedded in a workbook. The Calendar Popup will be visible and available only to those users who have the XLTools add-in installed.
If you need to send your book to others, try our embeddable calendar, an online add-on. No installation required on your computer: send the file to your colleagues and they can also use the calendar. This web application is convenient for sending out schedules, schedules, plans, etc.