How a frame is made in a Word. How to create a frame on a page
Create a document using the New command from the File menu. If you are using Word 2003, go to the Format menu and click Borders and Fills. Go to the "Page" tab. On the left side of the window, you can select the type of frame: regular, with a shadow or volumetric. Click on the frame you like.
In the section on the right in the "Type" window, you can choose from various types of frames: dotted, single, double, zigzag, etc. If you need a colored frame, click on the down arrow to the right of the Color box and click the appropriate shade in the palette. To increase the selection, click More Line Colors. In the Width box, select the width of the border lines.
You can create a combo box with different types of lines to mark the vertical and horizontal sides of the document. Find a suitable line, choose a color for it and in the "Sample" section click the button for the desired border. Then select the new line and click the different border button. Create a frame for the page this way. Click the Options button and edit the frame view if required.
In the Apply To list, specify where the frame will be placed: on all pages of the document, on the current page, or throughout the document except the current page.
If you have a later version of Word installed, go to the Layout tab in the main menu and select Page Border. Then proceed in the same way.
How to remove a border from a page
Right-click on the frame and select Format Frame from the context menu, then click Delete.
There is another way. Find the Remove Borders button on the toolbar. Click the down arrow and in the drop-down section, click the buttons with the border you want to remove.
Instructions
Open the text file around which you want to create frame, in Word. If you are dealing with a file of the type for which an association with this program is established, simply double-click the file icon. You can load the file into the program using the "Open" command from the "File" menu.
By means of Word you can create frame around the fragment text, paragraph, or apply this design to the entire document. If you need to pick up in frame only part text, select this fragment with the mouse.
Open the appearance settings window using the "Borders and Fill" command from the "Format" menu. If your document contains selected text, the default window will open in the Border tab. On the left side of this window, select the type of frame by clicking on one of the icons. The program allows you to create an ordinary frame, frame with shadow effect, volume and more complex.
Select the line style for the frame from the list with a scroll bar. If necessary, you can customize the border color and its width in points. The default colored frame will be black.
From the drop-down list on the right side of the window, select the scope of the design. If you preallocated part text, the list will make it possible to frame a paragraph or part text... In the latter case, the frame you configured will surround each line of the selection separately. If you need to pick up in one frame a whole paragraph, select "Paragraph". Click OK.
In the Word program, it is possible to create frames, consisting not only of lines, but also of images. Such frames can only be applied to the entire page. If you need just such a design, go to the "Page" tab in the border settings window.
Select from the "Picture" drop-down list one of the available types of images that will make up the frame. In the "Width" field, set the width of the frame in points. On the right side of the window, select the scope of the selected design from the drop-down list. Click on the OK button.
Placing hidden blocks text improves the visual perception of the website page - it is loaded into the browser exactly as the designer designed, regardless of the amount of information posted. In addition, it is more convenient for the visitor - in search of the necessary block of information, he does not have to look through the entire array, but only small "tips of the icebergs".
You will need
- Basic knowledge of HTML and JavaScript.
Instructions
Use a custom JavaScript function to hide and display the blocks you want in your HTML page text... A common function for all blocks is much more convenient than adding code to each of them separately. To the heading part source code page, place the opening and closing script tags, and between them create an empty function with a name, for example, swap and one required input parameter id:
Add two lines of JavaScript code to the body of the function, between the curly braces. The first line should read the current state of the block text - its visibility is on or off. There can be several such blocks in a document, so each must have its own identifier - it is his function that receives id as the only input parameter. Using this identifier, it searches for the necessary block in the document, assigning the value of visibility / invisibility (the state of the display property) to the sDisplay variable: sDisplay \u003d document.getElementById (id) .style.display;
The second line should change the display property of the desired block text on the opposite - hide if the text is visible, and show if hidden. This can be done with the following code: document.getElementById (id) .style.display \u003d sDisplay \u003d\u003d "none"? "": "none";
Add the following stylesheet to the header:You will need it to display the mouse pointer correctly when you hover over an incomplete link tag. With the help of such links, you organize in the page toggle the visibility / invisibility of text blocks.
Place these toggle links in the text before each hidden block, and in the blocks at the end text - add a similar link. Enclose invisible text in span tags that have invisibility specified in their style attributes. For example: Expand the text +++ In this sample, clicking the three plus link will call the above function on the onClick event, passing it the ID of the block to be made visible. And inside the block is a link of three minuses with the same functions - clicking on it will hide the text.
Create the required number of text blocks similar to the one described in the previous step, remembering to change the IDs in the id attribute of the span tag and in the variable passed to the function by the onClick event in the two links.
Word is a handy universal program for typing and editing text included in the Microsoft Office suite. It offers users almost unlimited word manipulation options. Use a text box to make your document look business or to highlight certain points.

You will need
- - installed software package from Office.
Instructions
Open Word on your computer. Enter the required text. If the file with the text for the frame is already typed, then just open it.
You will find everything you need to create a frame for your text in the program itself. Pay attention to the version installed on your computer word programs... You can find it out by right-clicking on the program icon on the desktop. Select "Properties" from the pop-up menu. Program version is the number that follows the word Office.
Related Videos
note
In order to remove the border from an element, you need to write border-style: none for it. But this is far from all the possibilities that are available for styling frames in CSS. We can set completely different values \u200b\u200bfor all four sides of the frame: top, bottom, right and left.
You can frame anything with CSS! We also get great opportunities to form the framework. To business! In principle, you will not open space here. For the border, you can set the thickness of the lines (border-width), their style (border-style) and color (border-color). The line width of the frame is specified in pixels.
In the article with photos and videos, we will talk about one of the most frequently asked questions: how to make a frame for text in Word. This will not amount to much work, but it can be beneficial. As a rule, it is necessary for cover pages essays, diplomas, term papers, she is decorated with congratulatory texts.
Application versions Microsoft Word several, the most popular now are: WinWord 2007, WinWord 2010, WinWord 2012. All of them are somewhat different from each other in design and location of the main interface menus.
How to insert a frame for text in Word 2007 and 2010
Versions of Word 2007 and 2010 are similar to each other in the layout of the menu, and therefore it is impractical to consider the issue separately for each version. Let's start in order, using Word 2010 as an example:
- On the menu bar at the top, find the "Page Layout" section and click on it;
- At the very right end of the new tabs that opened after going to "Page Layout", select "Page Borders";
- A window with a menu will open, in which we go to the "Page" tab (upper sections of the window);
- After the transition, on the left we will see "Type:". Select "Frame" and in the "Type" menu, which is slightly to the right, look at the frames you like;
- We selected a frame and confirmed it by pressing the "Ok" button.
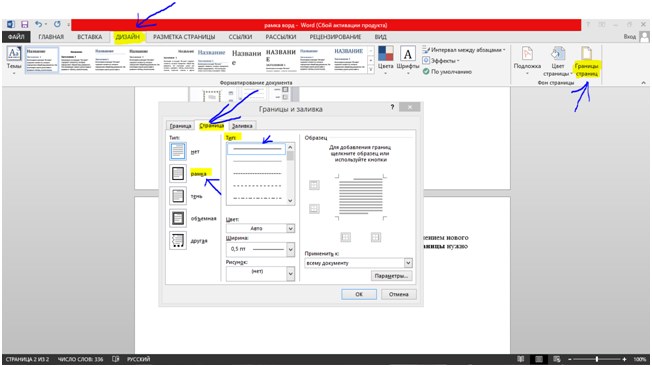
Word 2012 differs slightly from previous versions, first of all by adding a new section to the menu - "Design". Now, to insert a frame around the page, you need to select not "Page Layout", but, accordingly, "Design".
- Select "Design" in the menu above;
- At the very end, top right - "Page Borders";
- Further, everything is identical with the above instruction.
Frames can be made in the form of pictures, choose width, color. In general, format it as your heart desires and for a specific task. I don't think you will be praised if you title page thesis there will be colored Christmas trees.
How to make a frame in Word in the form of color drawings:
- As shown in the instructions, go to the menu "Page Layout" и "Page Borders" и "Page";
- At the very bottom there is a menu "Pictures", click on the down arrow and select the type of pictures.
There you will also find width formatting, color selection.
In the "Page Borders" menu, on the right, you can choose in relation to what the frame will be created: to the entire document, only to the first page, or to specific section... In the parameters below, you can set additional settings.
As you can see, the Word 2007, 2010 and 2012 application provides its users with a wide selection of all kinds of settings, including when creating a frame for text or a page as a whole. Here you have both pictures and the ability to choose color, line width, dotted lines, solid and more. You can use the Word for more than one year, but every time you discover more and more new positive aspects of the editor. Thank you Microsoft for such a gift. Get to know the office application further, because it will greatly facilitate your life and work!
Video of creating frames in Microsoft Word