Windows 8 external hard drive does not appear. Windows does not see the hard drive
Operating systems very often do not see some devices, but hDD stands out among them. After all, this detail is very important in common work computer, so it must be installed correctly. The problem can arise both during the installation of the operating system and during the installation of hard drives. The elimination method is different for both options, so it is worth considering them in more detail.
Windows 8 can't see hard drive - solution
Often during the installation of the operating system, there are no drivers on the hard drive, so the system does not see it. But this almost always applies to laptops, on PCs this problem is less common. You need to look at the certificate of your computer, and find out which processor is used. Next, download and install the storage technology driver.
All this must be done on a separate device, unpack the archive. We drop it on a USB flash drive, in the same place where it is located operating system... Further, during installation, you need to go to the "Downloads" tab and select the installation of drivers. When it completes, new partitions of the hard drive appear, the problem is solved.
There is another variation of the problem - when the computer itself does not see the hard drive if it is connected via an external media. The problem is solved like this:
- Open the control panel and set the "Large icons" for the view parameter. Go to the administration section and select PC control;

- Now we run this tool and look in left menu, we need to find - Storage devices. Next, go to disk management and view all connected devices.
![]()
If you have an eight or ten, then the procedure will go very quickly, but if you have XP, there are slight differences. For example, administration can only be opened through the Programs tab after clicking the start button.
Many Windows 8.1 users have already encountered this problem. It happens that after attaching an external hard drive with USB 3.0 interface to the computer, it does not detect it. The newly connected drive is not detected by the operating system and, accordingly, the data on it is not visible from Windows Explorer. It is possible that the only reason for this problem is the incorrect installation of the USB drivers on the computer.
Therefore, first you need to determine the type of error that occurred. Second, you need to run the Hardware and Device Troubleshooter or the Windows USB Troubleshooter and see how they work. These utilities will automatically check if they are connected correctly USB devices to the computer, correctly qualify the known problem and try to fix it on their own.
The next thing to do is to check if the Windows Update installed on your computer is up to date. Some updates are related to the correct operation of the drivers and must be installed on the computer. Therefore, be sure to check that they are installed on your computer. Also visit your disk manufacturer's website and find the latest driver for your external storage device model.
Download and install the driver on your computerand then check if the connection issue is resolved.
If that still doesn't work, try the following steps.
Remove the external drive from the system and disconnect from the computer
1. First, uninstall and disconnect the external hard drive. To do this, type in the search box "Search box" the name of the device manager utility "Device Manager" and click on its icon.
3. Immediately after programmatically removing the external drive, disconnect the computer USB cable. Wait one minute and reconnect the device to your computer. The driver will be installed automatically.
Check if the external USB drive is visible in Windows Explorer.
This method works well if you have problems with the USB driver itself. This can manifest itself as an unstable or malfunctioning USB drive.
1. Open the Device Manager again and expand the section with USB controllers "Universal Serial Bus"
2. Then, right click on the first USB controller and click “Uninstall” to uninstall it. Repeat for all other controllers.
3. Restart your computer. Drivers for all USB controllers will be installed automatically.
1. Click on the battery icon visible on the desktop taskbar. The computer is now configured for the power plan you specified. Click on the "Change Plan Settings" link to change it.
2. For the current power plan, in the new dialog box, select the “Change advanced power settings” option to change the advanced power settings.
3. In the new window, in the list of additional parameters, find the "USB Settings" section. Open it up.
5. If you are using a laptop, click on the "On battery" link and select "Disabled" from the drop-down menu.
6. Click successively on the "Apply" and "OK" buttons.
Remember to create a system restore point before starting your experiments. Also, do not forget to roll back your changes if you notice that they did not have an effect.
before that, we considered the option when, that is, it does not react to any of our actions, in the same article the computer turns on, but the operating system boots up with an error, namely, the installed hard drive cannot be detected.
In principle, this malfunction is somehow connected with the hardware of our computer, that is, with malfunctions and errors of the operating system itself or with incorrect settings.
So our computer turned on safely, went through the post procedure, but instead of a greeting on the screen, the inscription "" Non-System disk "or" Operating system not found "says that the operating system cannot find the system files necessary to load it. Let's consider all the possible the reasons for this error.
- The most common is the priority of boot devices incorrectly set in the BIOS, that is, in the Setup BIOS menu in the parameters responsible for loading the operating system, the first device is, for example, a CD-ROM, the second is a hard disk, and there is not a boot disk or the first boot disk in the drive at the moment. the device has a floppy disk drive and it does not have a bootable floppy disk, you need to remove them and try to boot again.
- Sometimes there is no disk in the drive and the floppy drive is empty, in which case the operating system should boot according to all the rules, because the second device is set to the hard disk and the operating system is on it, but the boot does not take place. In this case, you need to enter the BIOS parameters First Boot Device and set the hard disk as the first boot device. In this photo we can see that the hard disk is exposed as the first boot device.
- Let's say it didn't help and anyway, let's think further. If the hard drive is not detected at all in the BIOS, we look correctly and whether it is well connected with us. We try to connect it to another controller on the motherboard, change the cable, it sometimes fails, we try to load the BIOS settings in the optimal settings. How to do this in our article. If you have a hard disk of the "IDE" interface, see if this controller is disabled in the BIOS, for example, it may be called "Marvell IDE controller", if disabled, enable it, save the settings and reboot.
Marvell IDE controller state enabled.

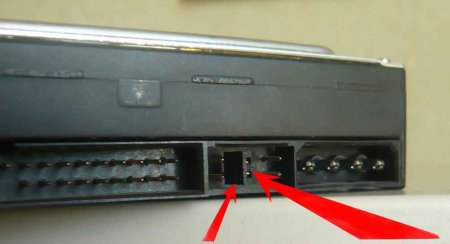
The hard disk may not be detected in the BIOS if the jumpers are incorrectly configured, which switch the hard disk to Master, Single, Slave, Cable Select modes. For correct connection you need to adhere to the scheme located on the hard disk sticker, you can read our article

Hard disk jumper "IDE"
I had such a case, I changed the BIOS settings, rebooted, but the settings remained the same, that is, they did not change. The problem turned out to be in a dead CMOS battery, after replacing it all my changes took effect.
Another case was even more interesting, when connecting the second hard drive to the system unit, he did not want to see him in the BIOS and, accordingly, Windows did not see him point-blank, although before that I connected this hard drive alternately to two system units and everything was fine there. It turned out to be a faulty 350W power supply, it simply did not pull two hard drives at the same time. After replacing the power supply, the two hard drives worked just fine in this system. So keep in mind that a faulty power supply can be a problem for even one hard drive.