How to make a table smaller. Fixed size Word cells
For creating simple tables small size use button Add table in the toolbar Standard... When you click on this button, a grid appears in which the required number of rows and columns are selected with the mouse pointer. A subsequent click will cause the table to be inserted into the document at the cursor position. The table created in this way is located across the entire width of the page - from the left to the right margin, regardless of the number of columns. In the future, the inserted table can be edited, added rows and columns, changed the width of columns, etc.
2 way To specify more precise initial table parameters, use the menu command Table4 Add to4 Table... A dialog box opens (Fig. 9.1), in which the number of rows and columns, as well as the width of the columns, are set.
Figure: 9 .1. Dialog window Insert table
If, instead of a specific column width, you leave the value Auto, then the table will be placed across the entire width of the page. Mode Autoselection allows you to flexibly format the table according to its content. This mode is set by the corresponding switch: · constant width - the total width of the table is equal to the width of the page (from the left to the right margin), and the width of each column is constant and depends on the number of columns; · by content - the width of each column is proportional to the amount of data it contains; · by window width - a special mode for tables located on Web-pages (the final formatting occurs while viewing the table). For ordinary printed documents, this switch sets the mode equivalent to the first ( constant width). Button AutoFormat opens an additional dialog box in which you can select any of the proposed table formats. 3 way It is convenient to create tables with a complex structure using the "drawing" method. To do this, run the command Table4 Draw table or click on the corresponding button in the toolbar Tables and borders... The mouse pointer on the stage changes to a pencil. Using the stretching method, it draws a rectangle whose width is equal to the width of the table. The height of the rectangle can be arbitrary - later it can be easily changed. The resulting rectangle is the outer border of the table. For other boundaries, it will be reference, i.e. all other lines must begin and end at this boundary. Then vertical lines are drawn. These are internal boundaries, but for the horizontal lines that will rely on them, they function as reference.
The width of any column, as well as the width of the entire table, can be changed later.
Tool Eraser you can delete any of the drawn internal boundaries. Removal is done with one click.
External boundaries ( reference rectangle) cannot be deleted with the eraser.
Editing a table
When we talk about editing a table, we will mean changing its structure. Editing of content is done with the usual text editing tools. Editing commands can be executed with:· menu item Table,
· toolbar buttons,
· context menu of any cell or range of selected cells.
Selecting table cells
- To highlight a separate cell you need to place the mouse pointer at the left border of the cell (it will take the form of a right pointing arrow) and click.
- To highlight all strings you need to place the mouse pointer on the left margin of the page (opposite the highlighted line) and click.
- To highlight multiple lines - drag the mouse pointer over the left margin of the page while holding down the left button.
- To highlight column you need to place the mouse pointer over the top cell of the column (it will take the form of a black arrow) and click.
- To select several columns - drag the mouse pointer over the table while holding down the left button.
- To select a range of cells - drag the mouse pointer over the cells while holding down the left button.
- To select the entire table, click on the table move handle.
Adding and removing rows (columns)
To add a row inside a table, select the row before which a new row is inserted, right-click on it and select the command Add lines... Columns are added in the same way.Adding lines can be done using the menu Table4
Add to
or using the dropdown button Add to in the toolbar Tables and borders... In this case, you can choose to add rows above or below the selected row (columns - to the right or to the left).
Comment ... When a row (column) is selected in the table, the button Add table in the toolbar Standard turns into a button Add tostrings (columns).
To insert several rows / columns at once, it is enough to select the required number of rows / columns and give the command to insert.
To quickly enter a new line after the last one, just put the cursor in the last table cell and press the TAB key.
The commands for deleting rows and columns are executed in the same way.
To delete whole table
, you need to select it and execute the command
Table4
Delete4
Table.
Attention!
Keystroke
Merging and splitting cells
To combine several table cells, select them and click Merge cells.
The same command can be selected from the menu Table or in the context menu of the selected cells.
Cells can be merged both horizontally and vertically.
To split a cell, select it and click the button Break cells (you can use the menu Table or cell context menu). When splitting, a request appears - how many columns (rows) you want to split this cell.
Move through cells
and formatting their content
To place the cursor in any cell of the table, just click on it with the mouse. This changes ruler view document, - separate sections appear on it according to the number of table columns. ( The vertical ruler will show the structure of the lines.)
Keystroke
All teams formatting text refer to the selected item. The highlighted item can be cell, range of cells or whole table generally.
Alignment of text in a cell (both horizontal and vertical) is performed using the cell context menu (command Cell Alignment) or the drop-down button in the toolbar Tables and borders.
Comment ... Only horizontal alignment of text in a cell can be done with the paragraph alignment buttons in the toolbar Formatting.
To change the direction of text in cells (from horizontal to vertical and vice versa), use the corresponding button in the toolbar.
You can sort the data in the table in ascending or descending order of the values \u200b\u200bof the selected column using the buttons on the toolbar or in the dialog box Table4 Sorting.
Formatting table structure
Formatting tables can be done in command or interactive mode.
IN interactive In this mode, the table is formatted using markers that appear when the mouse pointer is placed over the table or its elements.
Table components
In fig. 9.2 shows the view of the ruler and table markers when the non-printable characters display mode is on.

Figure: 9 .2. Table components
The marker in the upper left corner of the table allows you to move it across the working area of \u200b\u200bthe document. The marker in the lower right corner allows you to control the overall dimensions of the table. Resizing handles that appear when you hover the mouse pointer over the table borders (at the table borders, the mouse pointer becomes a double-headed arrow), allow you to resize columns and rows by dragging and dropping. Columns (rows) can be resized by dragging the separators on the coordinate rulers. If you hold down the Alt key at the same time, the exact values \u200b\u200bof the column (row) sizes will appear on the ruler.
Table properties
IN command mode to format the table use a dialog box Table propertiesopened from the menu Table or from the context menu of the table. Window Propertiestables has several tabs, the elements of which allow you to perform various actions to design the table. In fig. 9.3 shows a tab Table this dialog box.

Figure: 9.3 Setting table properties
· Width whole table set by checkbox Width in the tab Table window Propertiestables... The width value can be specified in absolute units (centimeters) or as a percentage of the page width. By default, the width of the table is set from the left to the right page margin.
· In the tab Table you can ask alignment method tables relative to the document page.
· Method interaction with text set on the tab Table in field Wrapping... If the value is selected Around, then the button becomes available Accommodation, which opens a new dialog box in which you can refine the position of the table and set the distance of the table from the text.
· Determine Option registration external and internal table frames , and you can also customize the appearance of cells (fill) on the tab Table, - button Bordersand fill.
· Button Options in the tab Table will open a new dialog box in which to set the sizes of the inner margins of the cells and cell spacing tables.
· Assign table row parameters can be on the tab Line... For each line, you can set the exact height value in centimeters or determine the line height by its content (value Minimum).
· Check box To repeatasheadingon every page for the selected row will declare this row hat tables. If the table spans several pages, then its header will automatically appear on each page.
· Assign table column parameters can be on the tab Column window Table properties.
· Options the current or dedicated cells tables are set in the tab Cell window Table properties... Here you can define the width of the cells and how the text is vertically aligned in the cell.
· Equal size for selected rows (columns) is set using buttons Align line heights (Alignwidthcolumns) in the toolbar Tablesand borders.
Calculations in tables
Word allows you to perform some computational operations on numeric data in tables. To do this, place the cursor in the cell where the result of the calculations should appear and execute the menu command Table4 Formula... A dialog box will open Formulashown in Figure 9 .4.
In field Formula the computed function is specified. If there is a column of numbers above the current cell, then in the field Formula the function of summing the elements of this column is automatically set. Formula should start with an equal sign. The required function can be entered manually or selected from the field drop-down list Insert function.
You can use standard arithmetic signs in formulas (+, -, *, /,%).
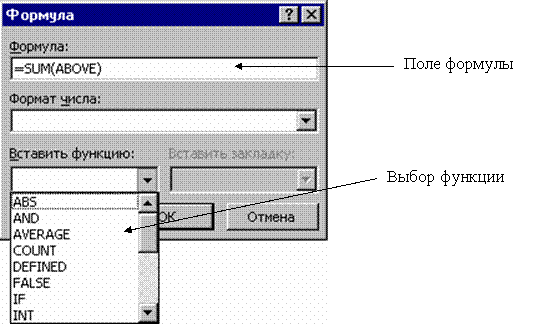
Figure: 9 .4. Insert a formula into a table
Formulas use cell references when referring to them addresses... The columns of the table are identified by Latin letters (A, B, C,…), and the rows are identified by numbers (1, 2, 3,…). The cell address is written in the form - letter-number, for example, A1, B5. A colon is used to denote a range of cells, for example, A2: C6.
For example, if in cell C2 you need to get the product of numbers located in cells A2 and B2, then you need to place the cursor in cell C2, call the dialog box Table4 Formula and in the field Formula write down: \u003d A2 * B2.
When you change the data in cells that have references in the formula, the result of the calculations does not change automatically. To update the result, select the cell with the formula and press the key
1. If ruler display mode is disabled, select the command View\u003e Ruler... Please note: when the cursor is within the table, special markers appear on the vertical and horizontal rulers that allow you to change the height and width of the cells (Fig. 7.7). In addition, the horizontal ruler contains markers for adjusting the indentation of the text of the current cell or selected column from the cell borders. Move these markers yourself and study their effect on the appearance of the table.
2. Drag the border marker between the first and second rows of the table down 1 cm.
3. Click on the top cell of the table.
Figure: 7.7. Table rulers in Word

Figure: 7.8. Table Properties Dialog Box in Word
4. In the toolbar Tables and borders click the arrow to the left of the alignment mode button and select the button in the palette that opens Align Center.

Figure: 7.9. Adjust table sizes in Word
5. To increase the font of the heading cell, select from the drop-down list The size toolbars Formatting number 18.
6. To precisely set the width of the table, select the command Table\u003e Table Properties... The dialog box shown in Fig. 7.8. It has four tabs with which you can adjust the settings for the selected rows, columns or cells, as well as the table as a whole.
7. On the tab Table check the box Width.
8. Enter the number 30 in the counter of the same name.
9. Click the button OK... The table will now be 30 divisions wide, as shown in Fig. 7.9.
10. Move the pointer over the vertical border line between the first and second columns so that the icon becomes a double-headed arrow, and press the left mouse button.
11. Drag the border to the right so that the text of all cells in the first column fits on a single row. We adjusted the width of the first column, but it turned out that the second column was too narrow. Let's align the width of the four right-hand columns of the table.
12. Click the left mouse button in the January cell and drag the pointer to the bottom right cell of the table. The four right-hand columns will be selected.
13. Click the button Align Columns Width... The selected columns will have the same width.
14. Select the last four rows of the table by dragging the mouse to the left of them. Select Team Table\u003e Table Properties... In the tab Line of the opened dialog box, check the box Height and enter in the counter of the same name the number 1. Then click or the OK button. The table will become as shown in Fig. 7.10.

Figure: 7.10. Table with customized cells in Word
These tips can help you work with other versions of Word as well.1. Insert the table into the document - select the menu.

2. In the window that appears, enter the required number of columns. The number of lines can be any - it's easy to add them later.
3. To remove (hide) a table grid , put the cursor anywhere on it and select the menu Table | Select | Table... Click on the button on the Outer Boundaries toolbar, select the No Boundary button. Usually borders are needed in the header, so select the first row (or as many as needed) of the table and select the borders for it "All Borders". To make the grid gray , select the menu Format | Borders and shading ... or display the Tables and Borders panel by right-clicking on the toolbar. Select the desired border color, set the borders.

4. Customize the table. To select a table, select the menu Table | Select | Table... Select menu Table | Table properties ....
4.1. The "Table" tab. Click the "Options ..." button. To increase the spacing between table rows , in the window that appears, set the "Default Cell Fields Top" and "Bottom".
Do not insert extra blank rows into the table!
Don't insert blank paragraphs at the end of each line!

4.2. "Line" tab. To prevent text in a table cell from wrapping to the next page , uncheck the box. To set the line height automatically, uncheck the box.

5. To adjust the width of each column, move the cursor to the border of the column - the cursor changes to a double-headed arrow. Make the width of the columns with numbers (number, quantity) smaller, the column with the name larger.
6. Select the heading, set it to center alignment. If headings span multiple lines, you can center them vertically ( right mouse button -\u003e align -\u003e center vertically), you can change format -\u003e text direction.
7. To keep the heading numbers repeated on every page , put the cursor on this line, select the menu Table | Split table... Select this line again, select the menu Table | Headings... To narrow the break before this line, select an empty line of text, select the menu Format | Font…... Check the box Modification | Hidden. Option: manually set the font size 1.

8. So that the title of the inventory section does not break away from the text and didn't stay on the previous page, select the entire table row ( Table | Select | Line), select the menu Format | Paragraph… Check the box on the "Position on page" tab.
![]()
9. To automatically number lines (e.g. case numbers), select the first column ( Table | Select | Column). Select menu Format | List… Select "Numbered List". Click the button Change ...... Delete the period in "Number Format". Set the "Position of the number" to the left edge to 0 cm. Set the "Position of the text" - tabulation after 0 cm, indent 0 cm. For the required lines, release the button "Numbering".
For the convenience of working with the table, place the quick access buttons on the toolbar Service | Setting ...:
1. Hide / Show Grid
2. Merge cells
3. Add line
4. Delete line
5. Add column
6. Delete column
7. Align Top
8. Center vertically
You are free to use this text, provided it is distributed unchanged. Reprinting and modification is allowed only after agreement with the author, Sergei Alexandrovich Plotnikov - [email protected].
Download Tutorial for working with tables when preparing inventories (ZIP archive 100 Kb)... A4 sheet in PDF format, ready to print one copy.
When we create a letterhead, word table, we need that when filling the cells their size does not change so that the table does not move. To do this, you need to install fixed cell size in the tableWord
... How to make a booklet in Word, see the article "Create a booklet in Word".
How to change the row height in a tableWord.
To change the width of rows, columns, you first need to select them.
First option.
It is advised to go to the "Page Layout" tab in the "Page Settings" and on the "Line" tab set the required line size. On the "Column" tab set the size of each column. 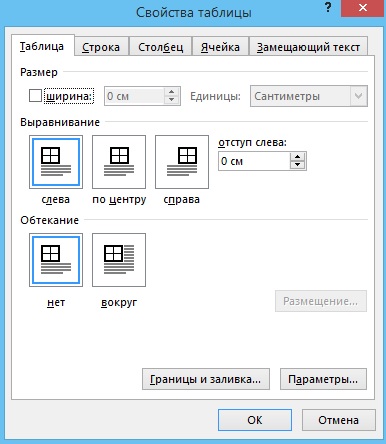 How to pin a table toWord.
To prevent the table from moving along word sheet, on the "Table" tab, press the "Around" button. Click on the "Placement" button - set up the table placement parameters.
Second option.
Click on the table and on the "Layout" tab adjust the sizes of rows and columns. In the "Cell Size" section, click on the "AutoFit" button. If we click "fixed column width", then the column width will not change when filling the cell.  But, the trick is that in some versions of Word, the Page Setup window is completely different. There are no "Row" and "Column" tabs.
How to freeze row height and column width Word, in this case.  First, we will place the button for the "Table Properties" function on the Quick Access Toolbar. Push button "Customize Quick Access Toolbar" ("triangle with dash" button). We select the function "Other commands".


This button appeared on the Quick Access Toolbar and is called Table Properties. It becomes active when we click on the table.

 We need fix the height of the rows in the tableWord.
In the "Row Height" section of the dialog box, set "Exactly". And in the line "Value" we put the number of the line height. But the value is not in mm. or see, and in PT. PT is a point.
1 pt \u003d 0.35 mm. Easier - the standard row height in the table is 12pt. A4 sheet height portrait orientation - 878 pt (29 cm borderless).
Let's put "48 pt". Uncheck the box next to the words "Allow line wrapping to the next page".
 Click "OK". It turned out like this.


