Rules for laying ceramic tiles in the bathroom. Five simple rules for laying tiles in the bathroom. Application of grout
Self-laying tiles in the bathroom is a responsible event that requires some skill and adherence to the technology of this type of decoration.
It is imperative not only to perform high-quality waterproofing, but also to be especially careful about the choice of an adhesive composition.
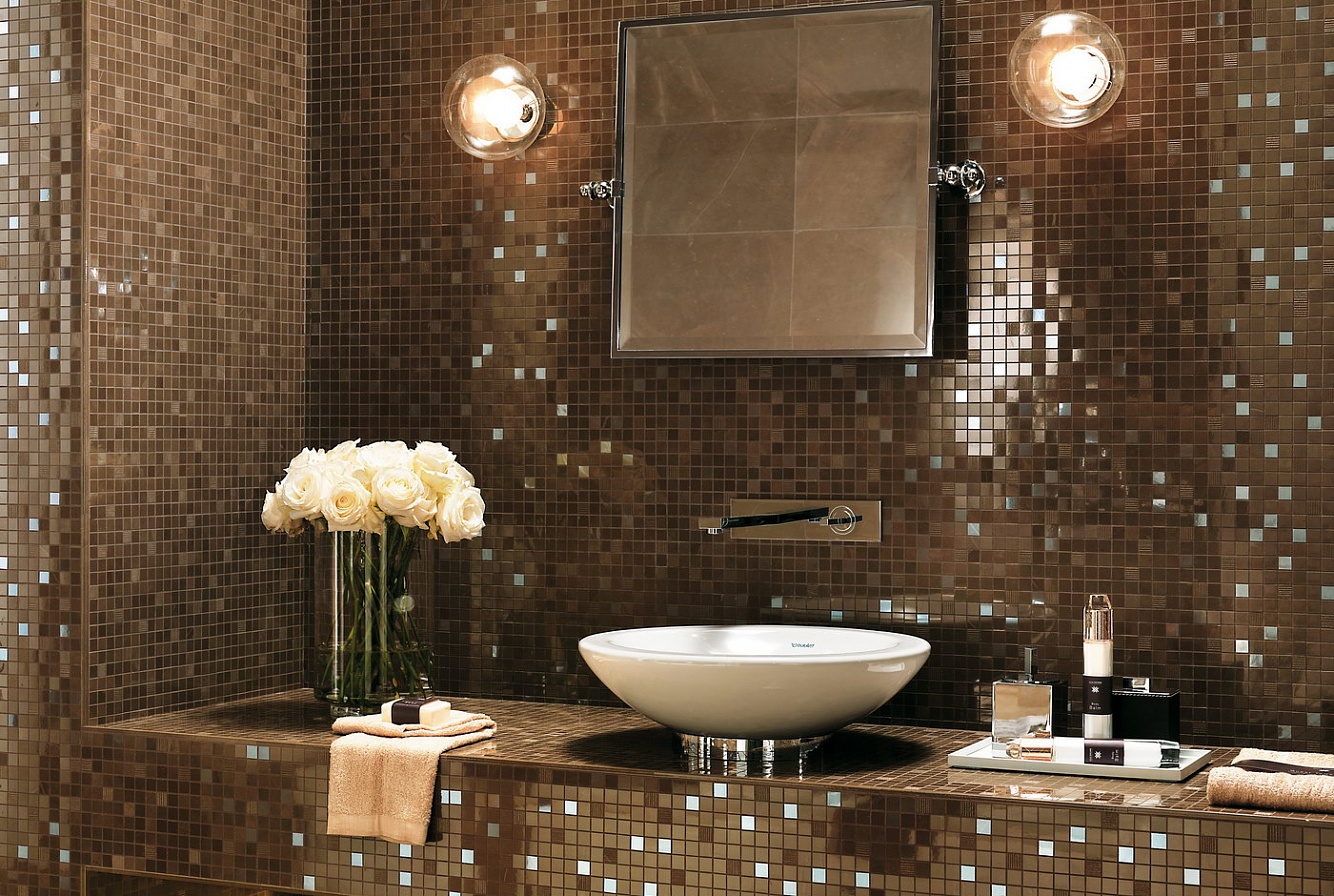
An excellent way to decorate wall and floor covering in a room with high humidity is traditional tile or modern ceramic tiles, as well as very beautiful and durable porcelain stoneware elements.
The disadvantages of such a cladding with your own hands are represented by some features and nuances of installation, as well as the need to make the right choice of finishing material:
- . Small tiles require more skill in laying and very good preparation of the floor or wall surface. It is most convenient to use medium-sized tiles for decoration, the easiest to install on their own.
- Rough or corrugated surface of elements. Smooth tiles are very easy to clean, but such a surface is more slippery and traumatic, which is extremely important to consider when decorating the floor. Wall surfaces can be tiled with both smooth and rough tiles.
- Colors and design elements. Plain tiles are laid more simply, which is very important in the absence of skills and experience in working with this type of finishing material. Decorative elements or simple stains differ in a similar effect.
The bathroom, as a rule, is a very small room, therefore, design experts recommend refusing too bright colors and flashy shades when decorating the floor and walls.
Finishing tiles are not only the most hygienic, moisture resistant and durable, but also the most versatile material used for cladding in rooms characterized by temperature extremes and high humidity.
Place of installation: floor, walls
Before proceeding with the independent decoration of the room with tiles, you must select the type of layout and the preferred installation option. The cladding method is selected depending on the characteristics of the surface and finishing material, as well as the availability of experience in performing such work.
The main ways to lay out tiled elements on the floor or wall:
- straight - the simplest and most often used in bathroom decoration;
- diagonal - the ideal choice when decorating a square room with curves and uneven surfaces;
- chess - the most popular way to form a classic design in a room using elements of different colors;
- with an offset - an option characterized by individuality and the absence of pronounced seams, which is especially important in a rectangular room.

Wall tiles - a bright solution
Required tools and materials
Tiling work on surfaces involves the use of:

- electric or manual tile cutter, and a small amount of finishing material can be cut using a standard glass cutter;
- traditional grinder with a special nozzle for mixing adhesive solution;
- building level;
- aluminum guides;
- small trowel for applying adhesive;
- notched trowel;
- cement-type tile adhesive or “liquid nails”;
- mallets (rubber mallet);
- plastic marking crosses for joint space between tiles;
- a rubber spatula for grouting;
- grouting composition.
Hand cutters for tile elements are simple and easy to use, and also quite affordable. To properly cut, you must first outline a pencil line.
A grinder with a diamond disc quickly cuts the finishing tile, but the quality characteristics of the cut are not high enough, therefore, the edges are cleaned with a file or sandpaper for finalization.
Waterproofing
The bathroom is characterized by a special microclimate due to a high level of humidity, constant steam generation and temperature extremes, therefore, before laying the finishing materials, a reliable and is equipped. For this purpose, several hydro-barrier options are used:
- Paint shop waterproofing based on bitumen or polymer mastic, without fail applied in several layers. The resulting waterproofing is notable for its smoothness and absence of joints, which is very important for finishing tiling.
- Coating type waterproofing, represented by a dry mixture based on fine-grained sand, polymer additives and cement. The mixture is applied with a trowel and a trowel, which allows a thicker layer of screed to eliminate gaps and unevenness.
- Oleechnaya technology, assuming the protection of vulnerable spots of "wet zones" with moisture-proof self-adhesive or guided materials on a bitumen or fiberglass base with the creation of a kind of "hydro-trough".

Waterproofing coating in the bathroom
Less demanded is the expensive version of flood-type waterproofing as a result of the arrangement of a single monolithic concrete hydro-barrier.
The choice of waterproofing technology directly depends on several factors, which include the option of equipment installed in the plumbing room, indicators of temperature and humidity levels, as well as the material of the floors.
Primer
The primers used in the bathroom are presented in two main groups, radically different in their characteristics and properties, which allows you to choose the most optimal option.
Deep penetration primer has become widespread due to a large number of positive qualities:
- universality of application. The compositions are suitable for the treatment of plaster, brickwork and concrete, gas and foam blocks, as well as;
- affordable cost. The average price varies in a wide range, which makes such material available to consumers with any income;
- simplicity and ease of use and self-application, regardless of the type of surface to be treated;
- a wide range and the presence of various additives, due to which the moisture resistance of the finish increases and the coating is given antiseptic characteristics.
Less common are adhesive-type formulations, which have a number of undeniable advantages:
- the ability to work on such types of surfaces as a concrete base, materials coated with alkyd and oil compositions, including metal and high-strength plastics;
- the presence of a quartz filler in the composition significantly improves the adhesion of the facing elements on the treated surface.
Adhesive-type primers have different consistencies and are sold only in finished form, packaged in containers of different volumes.
Adhesion properties in modern priming materials are successfully complemented by high moisture-repellent characteristics, which is due to the polymer base of the composition.
Laying procedure
The technology that allows you to tiled walls and floors in the bathroom does not have too noticeable, fundamental differences:
- study of the design of the layout of tiled elements;
- marking in accordance with the sketch on the working area with a laser level.
Phased features of wall cladding:
- outline of the approximate location of the side elements;
- determination of the position of the second row with fixation of a wooden plank, steel corner or metal profile to prevent tiles from slipping;
- preparation of adhesive solution;
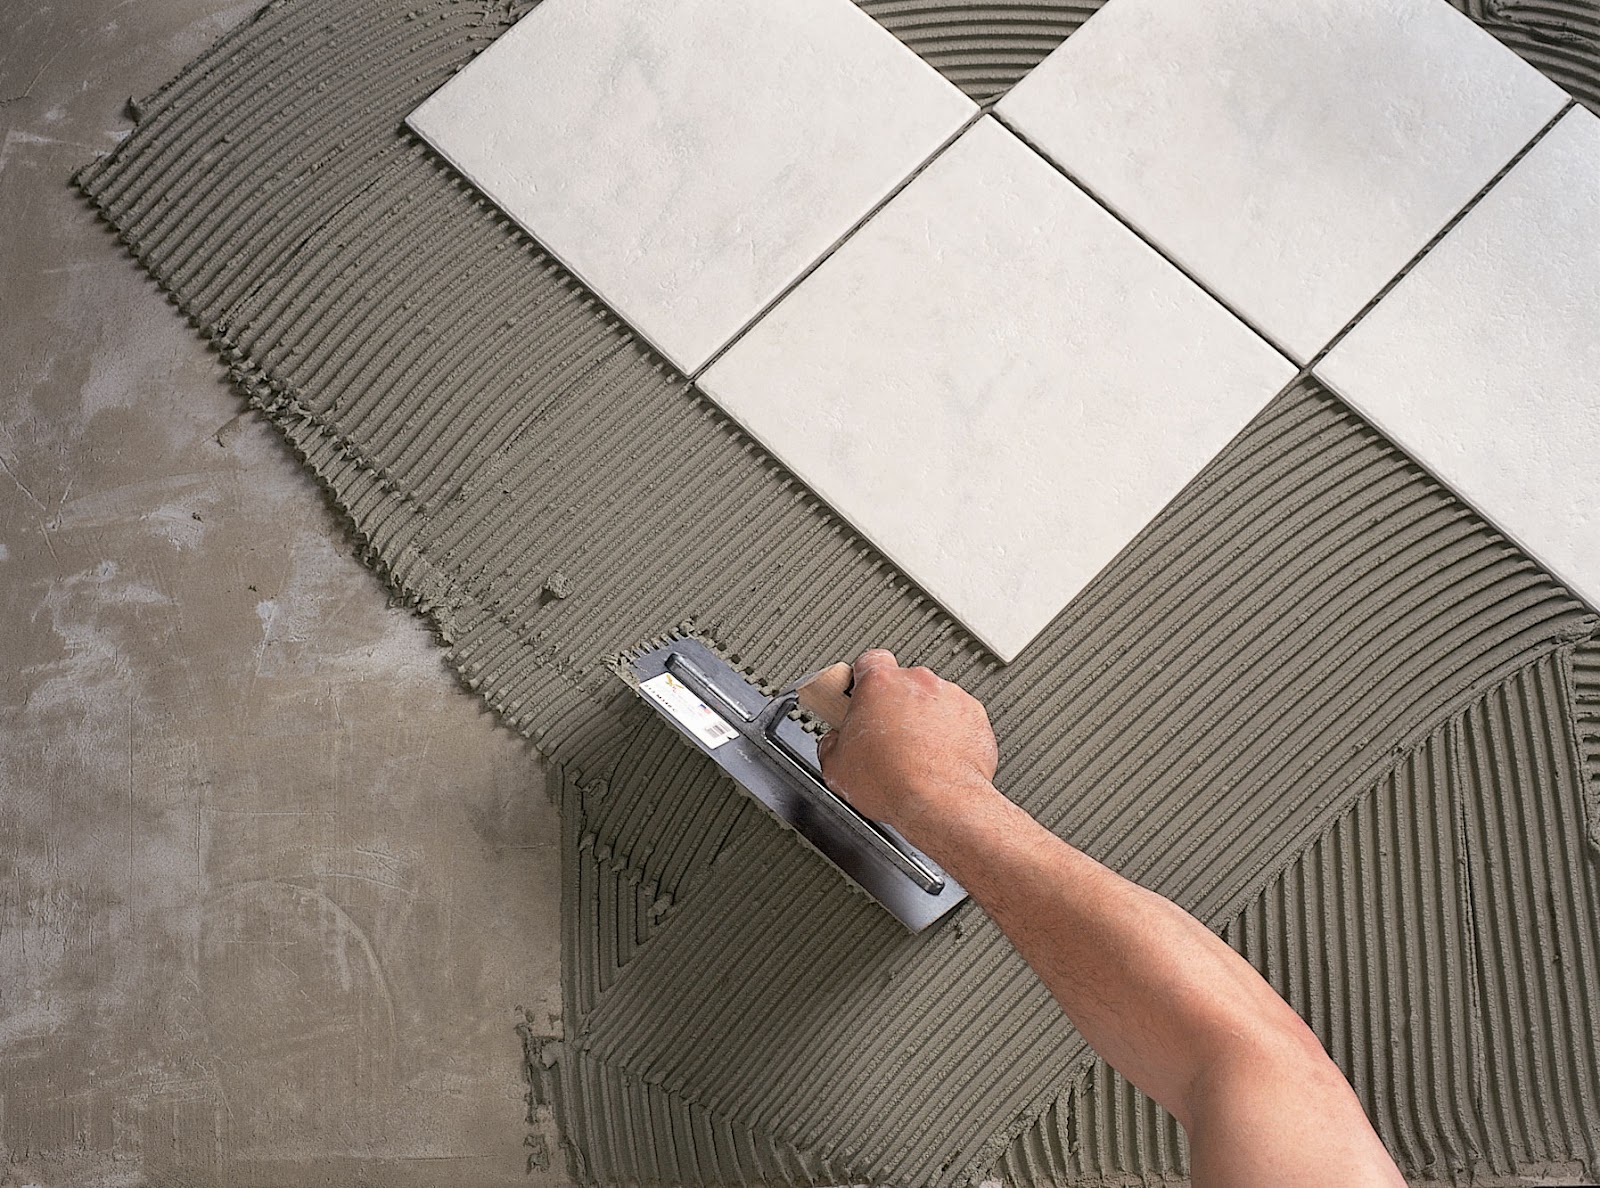
- applying glue to the wall surface with a notched trowel;
- fixation of finishing elements on the surface treated with glue with the installation of plastic regulatory cross-beacons;
- checking compliance with the level of arrangement of elements;
- installation of the lower row and subsequent removal of the support strip.

Turnkey solution
Floor cladding is performed from the visible farthest corner, from the threshold or from the center mark. The latter option is optimal for a spacious sanitary facility with a central open area.
If tiling the bathtub or removing the curbs is planned, then finishing can be carried out from the curb up the walls or below, in accordance with the standard technique, but the first option is more preferable.
What tile adhesive to use
 in the bathroom must have sufficient moisture resistance:
- cement adhesives are presented as universal, lightweight, specialized and strong mixtures;
- epoxy two-component adhesives are produced in the form of mixtures with mineral and thin fillers, as well as flow types;
- dispersion adhesives have high adhesion, but do not penetrate too deeply into the substrate, therefore they have proven themselves perfectly when working with plasterboard surfaces.
For surface finishing with large-sized ceramic granite, universal mixtures cannot be used, therefore, an adhesive with a high level of adhesion is required: within 1.3-1.5 MPa.
Adhesives with high adhesion rates, as well as decent moisture and heat resistance, are represented by the brands Litokol, Knauf, Vetonit Ultra fix, Ceresit and Unis Plus.
Installation of tiles
Facing ceramics or tiles are installed in stages:- measurement of the length and height of wall surfaces, the size of door or window openings and niches, as well as any structural elements for the correct placement of finishing components;
- plastering and leveling of surfaces;
- marking and installation of tiles with the application of glue and pressing the installed elements.
Further work on finishing the room with tiles is carried out only after the adhesive has completely dried.
It is necessary to proceed to the installation of a water-repellent tile coating in the bathroom only after the finishing primer layer has completely dried.
Grouting
The final stage of self-laying tiles is the processing of joints between finishing elements. affects the durability of the coating and its hygiene.
The main criteria for choosing a trowel:
- color gamut is a fundamental factor that allows you to get a beautiful appearance facing. Color is added to standard white mixtures, if necessary;
- properties and composition of grout. Ready mixes can be based on gypsum, Portland cement, alabaster and epoxy resins. The latter option is optimal for a room with high humidity.

Grouting
Standard tile grout is intended for self-treatment of the wall joint space, but such material needs to be periodically updated. It is advisable to use more tenacious, viscous and thick compounds for the joints of the floor cladding.
The tile laying technology predetermines the standards and regulations that are required to be guided by when installing elements. The recommended space between tiles is usually 2-5 mm.
Seam processing
The reasons for the obligatory suture treatment in the bathroom:- the shrinkage process causes a slight displacement of the finishing elements;
- wall and floor surfaces "breathe" through the cracks in the cladding;
- treatment helps protect walls from water penetration and prevents the formation of fungi or mold in the seams;
- correct processing improves the adhesion of the fragments.
With proper processing of the seam space, there is an excellent opportunity to get a neat and even surface with masking of defects in the form of chips or notches at the edges of the tiles.
The processing of seams between decorative elements affects not only the aesthetics of the finish, but also allows you to maintain the operational characteristics of the facing material.
The decorative qualities of the finished tile cladding directly depend on compliance with all stages of the finishing technology. To hide the joints between the tiled floor and the wall, it is quite possible to use skirting boards or a decorative strip, which are fixed at the very last stage of the cladding with a waterproof sealant.
24-08-2015Before you start tiling the floor, you must at least study the rules for laying tiles - where to start, what tool to choose, how to choose materials and many other nuances that are invisible at the beginning of work. Such rules are generally accepted and are based on the many years of experience of the tilers.

Laying of floor tiles must be done on a cleaned and leveled surface.
Creating and passing them on from generation to generation, we took care first of all to protect our students from mistakes, help in learning and save their own time. Why go so far as to what is already known and has been repeatedly tested in practice?
Where does the process begin
It all starts with an inspection of the room in which you need to complete the finishing work. Anything that might interfere with normal work is removed from the floor.

Floor tile laying sequence diagram.
- The perimeter is measured, the corners are checked for discrepancies.
- The type of base and the need for dismantling work to remove the old coating are determined. At this stage, the type of facing material is immediately determined. In relation to tiles, these are dimensions, type of front covering, thickness, layout option, selection of colors.
- List of necessary mixtures for cladding - glue or adhesive, base primer, waterproofing (if necessary), grout, protective compound, detergent for final cleaning. Also identified with a set of tools.
The core toolbox will include:
- puncher;
- mixer attachment for preparing mixtures;
- hammer;
- tile cutter;
- notched spatula;
- rubber spatula for grouting;
- construction level;
- rubber hammer.
Additional materials you will need:
- plastic crosses for aligning tile joints;
- twine;
- rags;
- soft sponge;
- containers for solutions.
Back to the table of contents
Preparation and layout
Based on the measurements of the room, the required number of tiles on the floor is calculated. For clarity of the laying scheme, you can make a markup directly on the floor if the room is small in area, or put on paper a plan of the room in a convenient scale proportional to the size of the tiles you are buying, and already on it you can count the number of rows along the width and length of the floor.

Working with tiles: 1- fitting the tiles dry; 2- laying tiles with glue; 3- checking the horizontality of the laid tiles; 4- tile marking; 5, 6 - cutting tiles.
- The calculation operation itself is mathematically simple. The area of \u200b\u200bthe room is divided by the area of \u200b\u200bthe tiles, the number of whole tiles is obtained, the numbers after the decimal point are discarded. When calculating the tile size, half the width of the tile joint is entered.
- In any case, there will be a row under the walls, which must be laid out with cuttings. You can cut the trimmings of the same width around the entire perimeter or reduce them to two adjacent walls. It all depends on the purpose of the premises, the future layout. If this room is residential, a corridor or a kitchen in an apartment, then purely for aesthetic reasons, it is better to cut off the edges around the perimeter.
- Another nuance is taken into account when laying out. Depending on the chosen tile placement option, when facing, the trims can be less than or more than half of the whole tile. Narrow tile trims do not look very attractive and immediately attract attention, while a trim larger in width than the width of the tile does not visually stand out.
In order to get such a layout, the tiles should be laid according to the classical scheme. The number of whole tiles is counted along the width and length of the floor, one tile is removed and the installation starts from the center. To find the center, a twine is used, stretched diagonally from the corners of the room. If the number of ceramic tiles in a row is even both in width and length, then the first laying is made of four tiles around the center. If it is odd, then the center tile will be the beginning.
Back to the table of contents
All the markings should be done from the center, for this, two perpendicular lines are drawn through it, from which the necessary markings are made. To visually correct the layout, the cladding is laid dry on the surface.

Tile application table.
Immediately prior to installation, all tiles are removed from their packaging, sorted by size and inspected for chips, cracks and other obvious damage to the face. In sizes, a deviation of no more than 0.5 mm is allowed.
When buying a facing tile, an additional 10% is added to the estimated amount in case of a fight, marriage or replacement in case of damage during operation.
An unreasonable waste of time will be trying to fit the size of the room to the size of the tile to avoid trimming, and you should also not do it in the opposite order - the size of the tiles to the size of the room. It is enough to adhere to the rules for laying tiles on the floor and it is guaranteed to get a high-quality cladding.
Back to the table of contents
Basis preparation: nuances
Floor tiles must be installed on a firm, level and completely clean surface. To do this, remove the old coating, glue or mortar to the level of the base. In an apartment building, it will be concrete floor panels, in a country or private house - a cement screed.

The order of laying tiles on a warm floor: 1 - primer; 2 - elastic, thin-layer adhesive solution; 3 - insulating plate or film; 4 - electric heating mat; 5 - wide elastic grout; 6 - waterproofing in at least two layers; E - screed; F - tiles.
There are also soft bases, for example, sand or expanded clay, if before that there was a wooden floor on the rafters. For any type of base, if the height of the ceilings allows, it is better to make the screed with a self-leveling cement mixture in order to obtain an optimum base in terms of smoothness.
On concrete, the screed can be only a few millimeters in order to fill in all the irregularities. This also applies to the old cement screed, because during the period of dismantling the previous floor covering, it could be damaged or run with irregularities. The screed is laid on a soft base with a thickness of at least 50 mm, or even more, depending on the expected load on the coating.
The newly laid cement screed must be primed. In rooms with high humidity, and especially under a ramp (a floor with a slope to drain the liquid into the drain), a layer of waterproofing is applied.
Laying tiles
The technology for cladding flooring and walls is almost the same. The only difference is in the thickness of the adhesive mixture and the facing material itself. There are also differences in the spatulas with which the adhesive solution is applied.
The trowel for working with floor covering has wider teeth, therefore, the distance between them is greater. You should pay attention to this circumstance when buying a tool.
The laying of tiles on the floor with the classic layout starts from the center of the room.

Scheme of tile laying options.
After laying the center plates, the advance occurs first to the wall opposite from the entrance door, then to the side ones, and only then to the adjacent to the entrance.
This procedure will allow you not to step on the already laid rows. The building level is constantly monitoring the installation. When the tile protrudes, it is knocked out with a rubber hammer, followed by the removal of excess solution, when the solution subsides, the solution is added.
Adhesive mortar
Currently, manufacturers of facing tiles on packaging give their recommendations for choosing an adhesive mixture for different types basics. More information can be found on the Internet. If possible, it is better to purchase the recommended composition of the glue, protecting yourself from poor-quality connection of the tile and the base.
On the package with the adhesive mixture, the setting time and setting time, as well as the required temperature and humidity of the ambient air, the possibility of using it outside the premises, and the procedure for obtaining the finished mixture are indicated.
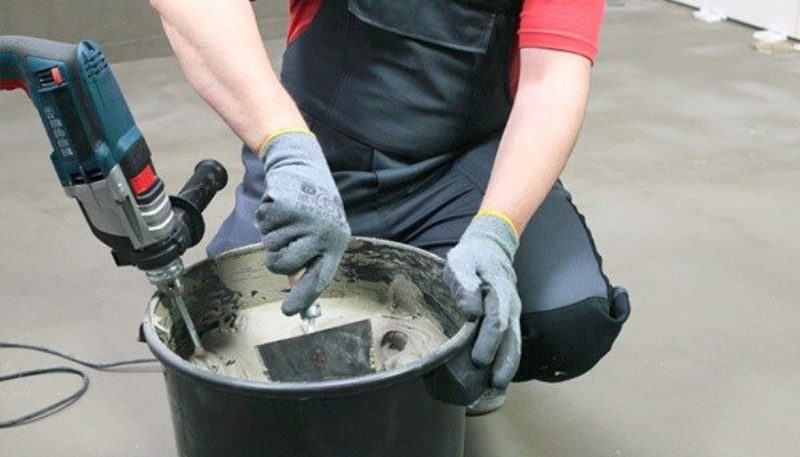
It is necessary to dilute the composition strictly according to the recipe. To obtain a homogeneous mixture, it is recommended to use a mixer attachment for a drill or rotary hammer with a torque. Knowing the consumption (indicated on the package) of the adhesive mixture per 1 square meter, the solution should be prepared in the amount that can be produced before it dries. If you cannot quickly lay the tiles, the portions of the adhesive mixture should be made small.
Ceramic tiles are one of the best materials for finishing premises with special operating conditions. Such cladding is not afraid of the effects of high humidity, temperature changes, abrasive load, in itself is very attractive in appearance, it is easy to clean. In a word, for kitchens, bathrooms, toilets - it's better not to find. And what is more important - it is quite possible to cope with the process of laying it on your own.
Why does it make sense to try to do it yourself? It's just that even if the surfaces for laying are perfectly flat, you will have to pay about the same amount for the services of the master as the material itself, and this is even in the best case. Such expenses are quite avoidable. After reviewing our instruction article how to lay tiles on the wall, the reader will get a clear idea of \u200b\u200ball the stages of work, from the preparation of surfaces and the choice of tiles to the sealing of joints. And he will surely make sure that there is nothing supernaturally difficult in performing such a finish.
Preliminary stages
Preparation of surfaces for finishing
It is completely pointless to start facing work on an unprepared wall. Some novice home craftsmen naively believe that a layer of ceramic tiles will reliably hide all the "ugliness" of the surface, and the result will be a straight, beautiful wall. They are cruelly wrong!
What does the preparation process involve?
- It is imperative to get rid of the old wall decoration. It will not, for example, hold the adhesive tile on the painted surface. Completely excluded or even small fragments. If previously there was a tile on the wall, then after dismantling it, all flows and drops of frozen glue should be removed.

- The quality of the plaster layer, if any, is checked. All problematic, crumbling areas are removed immediately. It is necessary to tap the entire area, to identify the places of instability, which must also be removed. And most often it happens that if a peeling area is found in one area, then everything else will be pulled from it, that is, the plaster has to be completely knocked down.

- In no case is it disregarded if traces of their biological damage are found on the walls - mold stains, fungal colonies, etc. Antiseptic priming is carried out on all surfaces without exception, but if this microflora has already settled, then you will have to carry out preliminary "treatment" of the wall

- There should be no cracks or cracks on the surfaces. If they are identified, appropriate repair work is carried out for their high-quality termination.

- The wall should be flat, that is, it should be a plane, and not a twisted, collapsed, protruding or concave surface. The tiles can be laid on the aligned walls without problems. Yes, there are techniques for leveling walls precisely by installing ceramic cladding. But, believe me, not even all experienced craftsmen like to do this, since this task is extremely difficult. And if a newcomer is about to "debut", but there is nothing to even think about. It will be much easier to align - and the finish will definitely be of high quality.
There are many ways of leveling, and some of them, for example, using moisture-resistant drywall or gypsum fiber slabs are not so complicated and will not take much time.
Prices for moisture resistant drywall
moisture resistant drywall
How to level the walls yourself for finishing?
Do not be afraid of this task in advance. There are many technologies available that even beginners can quickly master. Moreover, for laying tiles, the ideal smoothness of the surface is not required - the correct geometry is enough. are discussed in detail in a special publication of our portal.
- Ceramic tiles are most often installed in rooms with high humidity, so you should also think about reliable waterproofing. To a greater extent, this applies, of course, to the floor, but on the walls it makes sense to provide waterproofed "Belt" at least 100 ÷ 200 mm high from the floor along the entire perimeter. In addition, it is advisable to reinforce with waterproofing the sections of passage through the walls of water supply and sewer pipes, the area around water sockets.

And in frankly "wet" areas of the wall, for example, around a bathtub, washbasin, shower stall, etc., it is generally better to perform a solid waterproofing. Approximate dimensional standards for these areas are shown in the illustration:

- Finally, the wall must be carefully primed with a deep penetration compound. This measure will completely remove dust from the surface, eliminate the phenomenon of moisture absorption. That is, the wall material will not take water from the tile glue, allowing it to harden in optimal conditions. The best adhesion performance is achieved. In addition, many primers also have antiseptic qualities, and such preventive treatment will never be superfluous.

If the absorbent qualities of the material are high, then the primer treatment is performed twice, necessarily waiting for the first layer to dry completely. As a rule, the primer is applied immediately after the completion of the preparatory work. But if for some reason there is a significant time gap between this stage and finishing, then it would be desirable to apply the primer again - a day before the installation of the tiles. So a quality result will be guaranteed.
Wall primer prices
primer for walls
Drafting and selection of the required tiles
It is clear that these two issues are closely intertwined. In this publication, we will not analyze design approaches to choosing the interior of a room - we will dwell only on some practical aspects.
Planning the placement of tiles on the walls
Of course, the owners should already imagine what they want to see in the end. Surely familiarized with the approximate assortment of tiles presented in the store. That is, it remains for them to "fit" the selected collection into the specific dimensions of their premises.
Here you should not rely on the "eye". The best option is to draw up a graphic diagram for each of the walls separately. Moreover, if it is not supposed to be a solid cladding with one type of tile, but with decorative inserts or friezes, or with division into sections. Some material manufacturers offer online programs on their official websites to optimally place tiles on the walls. If this is not possible, you will have to sit by yourself or in a graphic editor, or just over paper diagrams.

- In horizontal rows, you can start with a whole tile from one of the corners, that is, the cut edge will be on the opposite side of the wall. Naturally, in this case the least noticeable angle is chosen. But you should immediately estimate, and which fragment will remain in the corner? If it is too narrow, then it will be very difficult to remove this area accurately, if not impossible. And on the front side of the room, that is, attracting the eye of the incoming person, such an arrangement will also look very ugly. Therefore, it often makes sense to choose such an arrangement to start from the center of the wall - andlater from it is laid to the edges with the same trimming on both sides.

It all depends, of course, on the size of the wall and tiles. It often happens that the layout seems to be optimal when the vertical axis of the wall coincides with the center of the tile, and then there is a layout to the sides with again symmetrical trimming along the edges.
The trimmed edges can be easily hidden by installing solid tiles from the corner on the adjacent wall. If two cut edges converge in the inner corner, then this can also be solved - by grinding one of them. At the outer corners, a decorative corner copes well with this task. More details will be discussed later.
- Show the necessary "creativity" and when planning vertical rows. So, laying looks not particularly advantageous, which will end under the ceiling with a narrow section. It is better to plan a solid tile for this place, especially since its upper edge is very often covered by a suspended or stretch ceiling.

But a narrow section can be launched first from the floor - there it is hardly noticeable, and the cut edge of the tile will not be at all visible in the corner between the floor and the wall. More precisely, this bottom row is generally recommended to be laid out last, so no problems with accurate pruning are foreseen. All this will be shown below.
However, other circumstances may influence the choice of the starting horizontal line. This can be the features of the design project (for example, the use of contrasting rows or friezes), and the placement of plumbing devices. For example, it is always recommended to place the tiles near the bathtub so that the horizontal seam is hidden below the rim by 20 ÷ 30 mm. This will not disturb the aesthetics of the styling, and will remove the vulnerable seam from the "wet" area.

- When planning the placement of rows, vertical and horizontal, do not forget about the thickness of the tile joints. Let it not seem like a trifle: when using not very large tiles, but on the wall of a large area, the difference is considerable.

Too large thickness of seams is often not required when laying on the wall. Usually limited to gaps of 1.5 ÷ 2 mm. Moreover, after grouting with a fugue, the visual effect of thickness will change somewhat - the gaps will seem wider.
- It is clear that when drawing up diagrams, it takes into account the number, size and location of inserts - friezes, borders and other decorative elements. If a fully-fledged plan for each of the walls is constantly at hand, then during the installation process there is much less chance of making a mistake.
Some nuances of choosing ceramic tiles for walls
Wall tiles are much easier than floor tiles. The indicators of its strength, abrasion resistance, roughness, etc., are fading into the background, since they do not play a decisive role here. You can concentrate on decorativeness and, of course, the quality of the material.
We will not talk in detail about all the intricacies of the choice - this is a separate topic. But some important points should still be emphasized.
Prices for ceramic tiles
ceramic tile
- There is a very wide variety of formats on sale. But you should not immediately chase large tiles. First, it doesn't look appropriate everywhere. Secondly, when laying it, a lot of waste can remain, and since it is usually not cheap, it turns out to be expensive. And thirdly, the installation of such a cladding requires some experience, and a novice master may not cope with the task - any mistake will be in plain sight.

If the first independent laying of tiles is to be done, it is better to proceed from its average size, for example, up to 300 ÷ 400 mm along the long side.
- should have a water absorption of no more than 3% - this is usually indicated on its packaging.
- If wall cladding is planned in unheated rooms or even on the street, then you should look for the material marked with a snowflake pictogram - it is not afraid of freezing.
- Without fail, all purchased packages of tiles of the same type are checked for consistency. The fact is that the same article, but released in different shifts, may slightly differ in the color tone. Visually, this is most often not noticed in the store. But after laying on the surface, even a slight difference can spoil the overall appearance.

- Of course, they are trying to purchase tiles of the highest possible grade. Even at factories, products are sorted, and products with distorted shapes are sold as second or even third-rate. With them, you can be exhausted when laying.
- Manufacturers sort the tiles by caliber. It is clear that they always try to bring the dimensions of the finished product closer to the declared standard. However, the specificity of ceramic production does not yet allow achieving a unique coincidence of the sizes of all tiles without exception. On the packaging of a tile, its caliber may be indicated - by letter or number designation, and a plate with its decoding may be attached.

It is clear that tiles of the most accurate caliber have a higher price. But all preference should be given to her, since unjustified savings can lead to an unsuccessful finish, and in the end result total costs will be clearly negative.
- In any case, it will not be possible to do without tile waste. And sometimes it becomes impossible to acquire the missing quantity - the required batch may not remain on sale. That is, the stock is made in advance. Usually, they start from 10% - with a competent layout and high-quality cutting of the material, this is enough. If a diagonal layout is assumed, then the stock can be increased to 15% - there will be more waste in any way. But we note right away that it is not recommended to get involved with diagonal installation without good work experience. Therefore, in this article, intended more for beginners, it will not be considered.
- Do not hesitate to ask the store to inspect all purchased tiles - there is no guarantee that they will not be damaged in transit. And an obvious marriage sometimes comes across.

- Even top-notch tiles of the same batch and the most accurate caliber should still be carefully sorted into several groups at home. The highest quality, with perfectly matching dimensions, is best set aside for facing the most visible critical areas. The tile is a little worse - to push aside "to the periphery". And the one that has the most significant dimensional distortions or with small defects can already be used for cutting to fill areas along the corners or the floor.
- The number of tiles is usually calculated per piece. This can be done if a high-quality scheme is drawn up. And all the more you have to do this when you plan to use several varieties to create a special decorative interior.
But in the case when it is supposed to cover the entire area with one type of material, you can use the calculator, which is located below. There it will be necessary to indicate the area of \u200b\u200bfinishing, the dimensions of the tiles and the width of the tile joint. The spare 10 or 15 percent will be taken into account when choosing the layout principle.
There are a large number of finishing materials that can be used in high humidity conditions, but tiles have always taken a leading position. This material does not belong to the category of cheap, some collectible items do cost a lot of money, but such a finish is justified and pays for itself completely, as it is performed for many years. The quality of the repair depends not only on the right material, it is important to follow the order of laying the tiles in the bathroom and all the technological nuances.
The advantages of using tiles in rooms with high humidity are obvious and indisputable. The material has the following positive properties:
- Moisture resistance. The tile is absolutely not afraid of moisture, the liquid rolls off the glazed surface without penetrating into its structure.
- Hygiene. Tiled surfaces are easy to clean, which allows you to keep the bathroom clean without much effort.
- Durability. It is quite difficult to damage the tile, but it should be remembered that the material in terms of hardness and strength differs depending on the purpose - for floors or walls. This is evidenced by the corresponding marking.
- Refractoriness. The tile does not burn, does not melt, does not support or spread fire.
- Tiles in the bathroom interior can be successfully combined with other finishing materials - glass shower doors, metal and plastic surfaces.
- A wide range of offered colors, shapes and textures ceramics allows you to easily select the material for a particular design solution.

With the help of a properly selected shade, texture and layout method (checkerboard, diagonal order), you can visually correct the geometry of the bathroom space.
Of the nuances of using ceramics, the following can be noted:
- Products from leading foreign manufacturers are quite expensive. However, you can pick up material of decent quality and low cost from Russian manufacturers.
- If a sharp, heavy object, such as a hammer, falls on the facing, its integrity can be easily damaged.
- For high-quality ceramic laying, you need to have special skills or contact the services of craftsmen.

What to look for when choosing
The durability and quality of use of ceramic in the bathroom depends on the correct material. When choosing a material, attention is paid to the following criteria:
1. By moisture resistance ceramics are divided into 8 groups and not all of them have sufficient moisture resistance to be used in the bathroom. Therefore, you must carefully look at the information provided on the price tag or packaging, where the moisture resistance class is indicated.
Table 1. Levels of moisture resistance
Tile cladding from the three groups indicated in the table is best suited for cladding surfaces in the bathroom.
2. An important criterion is This factor is taken into account when choosing floor tiles. Of the 5 existing classes, a material belonging to 2 and 3 strength classes is suitable for creating a floor covering in a bathroom. Class 1 includes too "soft" products suitable for finishing ceilings and walls, and classes 4 and 5 include particularly durable tiles for rooms with high traffic - it is not advisable to purchase it because of the high cost.
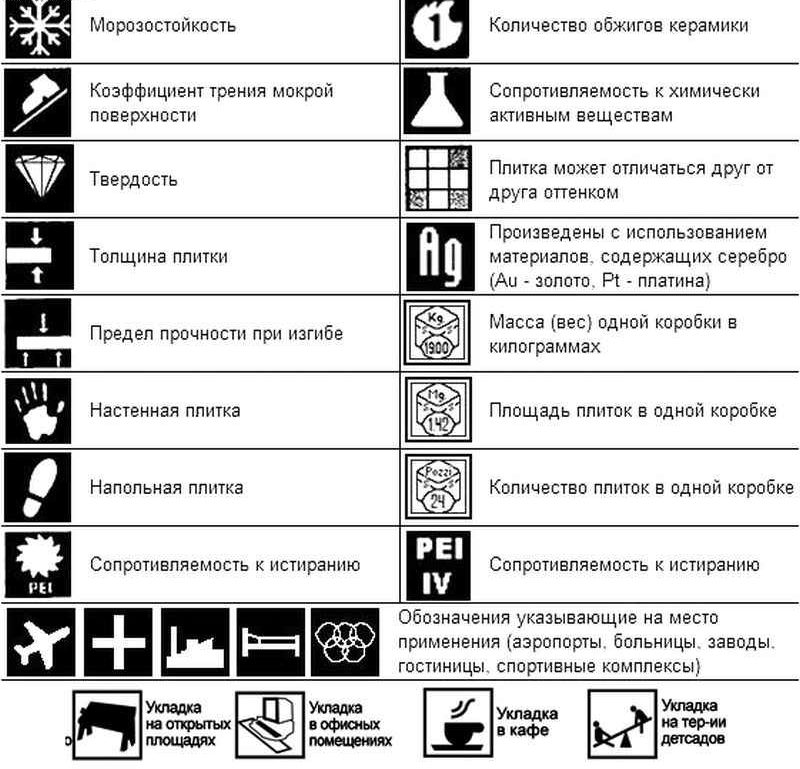
3. When choosing, it is important to carefully study the markings that indicate the purpose of the material. The wall tiles are symbolized by a pictogram depicting a palm, and the floor tiles are symbolized by the feet. Wall and floor materials differ in thickness. So, for the floor, it has a thickness of about 9 mm.
4. An important criterion is slip resistance level floor covering. A rough surface is safer than a glossy one.
5. Pay attention to shape and size of products. Rectangle and square are the most common shapes. The most common sizes are 10 x 10 cm and 15 x 15 cm, rectangular tiles 20 x 30 cm. The larger the size of the product, the less seams. However, it is worth considering the area of \u200b\u200bthe bathroom - such a cladding is suitable for spacious and medium-sized rooms. In a small bathroom, in order to visually expand the space, small elements or mosaics are recommended.
6. It is equally important to choose the right appearance and shadetile:
- it is recommended to choose pastel blue, beige, salad tones as the base color. Bright hues can be used to create accents;
- so that the interior is not too colorful and tiring, it is recommended to use no more than 2-3 shades for its decoration;
- it is better to refuse contrasting solutions and choose shades located next to each other in the color wheel.
Wall tiles
The most important criterion to consider when choosing a wall cladding is its size. How the area of \u200b\u200bthe bathroom will be perceived directly depends on this parameter - whether it will visually become more spacious and lighter, or vice versa, will turn into an uncomfortable, cramped room. Conventionally, tiles for wall cladding in the bathroom can be divided into 4 categories.
| Illustration | Category and size | Description |
|---|---|---|
 | Mosaic. From 1 x 1 cm to 5 x 5 cm | For high-quality styling, you will need professional skills - this is a laborious process that requires skill and care. A mosaic is produced in the form of a panel on a mesh basis, which makes the process of laying it easier and faster. |
 | Small. From 6 x 6 cm to 20 x 20 cm square and rectangular on one side not exceeding 30 cm | It is recommended to use small tiles in medium and small rooms, and to combine mosaics and small-sized products with larger fragments in spacious ones. Small cladding is least of all demanding on the presence of a perfectly flat base, it allows you to finish curved surfaces, curves, niches, ledges, arches. Among the disadvantages, the laboriousness of the laying process, the high consumption of the grout mixture, the requirements for the evenness of the joints, the decrease in the degree of waterproofing of the wall surface due to the large number of joints, and demanding care are noted. |
 | Average. From 20 x 20 cm to 30 x 30 cm square and rectangular on one side not exceeding 40 cm.Size 20 x 30, 25 x 30, 25 x 35 cm are common. | It is a universal solution for rooms of any size. Requires carefully leveled floor and wall surfaces prior to installation. Of the advantages, one can note the optimal number of seams, a convenient size for laying and transportation. |
 | Large. One of the sides exceeds 40 cm - 25 x 60, 30 x 90, 29 x 100 cm. | A good solution for spacious rooms. Of the advantages, the minimum number of seams, a decrease in labor costs and grout consumption are noted. The surface is more protected from moisture, the maintenance of tiles and joints is simplified. Of the minuses, the mandatory presence of a perfectly flat base is noted. |
Important! In a spacious bathroom, large items and mosaics will look equally good. But for small rooms, medium-sized wall decoration is recommended no more than 20 x 30 cm, floor decoration - 30 x 30 cm.
Depending on the chosen method of laying products, one or another optical effect can be obtained. For example, if long tiles are laid horizontally, then a cramped room will look more spacious. The height of the ceiling can be adjusted by stacking elements vertically with the same direction of the pattern.
Important! The size of a tile is directly related to the complexity of its installation, the features of its care and the consumption of materials.
Floor tiles
It is recommended to use square tiles for decorating the bathroom floor. More often, products are laid on the floor in sizes that exceed wall ones. The most common sizes are 30 x 30 cm and 35 x 35 cm.The maximum size of a tile for a bathroom floor is 60 x 60 cm.An important role is played by the thickness of the products; mm up to 12 mm. The thicker the material, the more expensive it is.

For the installation of flooring, tiles are purchased specially made for these purposes - they have an appropriate thickness and a wear-resistant front surface. This material must meet the following performance characteristics:
- Minimal water absorption.
- Resistant to chemicals and abrasive cleaning agents. The degree of resistance of the material to chemicals will be indicated by the marking: AA - products with the highest resistance, A and B - with medium, C and D - with low resistance.
- The floor covering must not slip even if water gets on the surface. This criterion is reflected by a pictogram with the letter R and a number indicating the degree of resistance of the surface to sliding. Coatings with a number of at least 9. The front layer of such a finish is rough.

Prices for Tarkett floor tiles
floor tiles tarkett
Adhesive mixtures and their application
The success of the renovation, involving the decoration of the walls and floor of the bathroom with tiles, largely depends on the correct adhesive composition. On the construction market, they have a wide assortment and differ in bond strength, setting speed and purpose: for interior wall decoration, for laying cladding on the floor and for outdoor work.
The glue should have a high viscosity and adhesive capacity, good adhesion and an acceptable hardening time, which should be sufficient for high-quality installation and fixation of the finish.

Since the bathtub is a closed room with a high level of humidity and moderate load, when choosing an adhesive, take into account the material of the base of the floor and walls, the size of the tile and the type of floor - normal or "warm".
Now in the construction market there are several types of "warm floors". They differ in the type of coolant and work efficiency. How to choose a warm floor for tiles?
Depending on the composition, the glue can be:
- cement-based;
- dispersive;
- epoxy.
Prices for tile adhesive "Ceresit"
ceresite tile adhesive
Cement based
This type of adhesive is versatile and inexpensive. It consists of 90% cement and is sold as a dry mix. It is diluted with water in a ratio of 3: 1, where 1 part of water accounts for 3 parts of cement. This mortar has excellent adhesion to concrete and cement substrates.
Such an adhesive composition has high adhesion when working with drywall, and for concrete foundations it is contraindicated. It contains acrylic, astringent additives and artificial resins. Sold ready-to-use - packed in plastic buckets or jars. This has its advantages:
- There is no need to waste time preparing the solution.
- Contamination of the construction site has been reduced.
- The working consistency of the solution is determined by the manufacturer, therefore the option of preparing a poor-quality solution and overspending of components is excluded.
The dispersion adhesive is solvent-free and has a bonding interval of about 40 minutes. With this adhesive, the cladding can be laid over old, painted and cement surfaces, plasterboard and plywood.

Epoxy adhesive is a two-component compound that is divided into a flowable mortar and a paste filled with mineral fillers. It shows itself perfectly in working with any surfaces: wood, plywood, concrete, metal.
Important!There is a direct relationship between the viscosity of the adhesive and the size of the tile. The larger it is, the higher the viscosity of the adhesive should be.
The enhancement of adhesion is influenced by the presence of quartz sand and liquid latex components in the adhesive. As for the floor tiles, an adhesive with a high degree of elasticity is chosen. If the cladding is laid on a "warm" floor, plasticizers must be present in the adhesive.

Table 3. The most popular types of adhesives
| Illustration | Description | Average cost, RUB / 25 kg |
|---|---|---|
 | "KNAUF Flisen" belongs to the category of the best adhesives that have been approved by professional craftsmen-finishers. The composition is universal and can be used both for laying wall and floor cladding on any surface. Thanks to the optimal drying speed, installation, cleaning of joints and grouting are carried out efficiently and on time. "KNAUF Flisen" belongs to the category of economical compounds, as it can be applied in a layer up to 7 mm without loss of adhesion quality. The composition is quite elastic, which makes it possible to use it in areas of complex configuration. | 250 |
 | The high adhesion and drying speed of Eunice glue suggest a dynamic pace of work, since the pot life of the mortar is 3 hours, and the tiles should be laid and adjusted within 10 minutes. On the facing laid on the floor with such glue, you can walk after 24 hours. | 250 |
 | "Mastplix T-12" has leveling properties and is not afraid of significant differences in the base. It can be used not only for working with ceramics, but also for porcelain stoneware and natural stone. At the same time, finishing can be done in any direction, due to the excellent adhesive properties of the glue. | 250 |
 | "Ceresit CM-11" is universal, even a non-professional can work with it. It's okay if the wall is not very even. This glue has excellent adhesion, which prevents the finishing material from sliding vertically. | 265 |
 | IVSIL Mosaik has a snow-white color, excellent adhesion strength, high adhesion and belongs to the category of professional formulations. It is used when working with mosaics, glass and translucent cladding. Assumes a dynamic pace of work. | 480 |
 | Litoflex K80 is a professional adhesive for working with porcelain stoneware, but can be used for laying ceramic wall cladding. The operational properties of the composition allow it to be used in the "warm floor" system. It is economical to apply and has good elasticity. | 530 |
 | Bergauf Mosaik is used for laying mosaics, standard ceramics, decorative and natural stone and large slabs. Thanks to white, this glue can be used when laying mosaics on a translucent or plain base. The composition has high adhesion, plasticity, elasticity. Not picky about the preparation of the base. Can be applied to walls made of bricks, cement, plaster, concrete, metal, plywood. | 645 |
 | MIRA 3130 glue is specially designed for finishing wet rooms. It involves working with all types of ceramic cladding, including mosaics and thin translucent cladding. | 650 |
 | Professional cement glue "Sopro" has a reinforced formula with reinforcing fibers, which guarantees a long service life of the cladding and excludes damage and splitting. Used for working with mosaics, natural stone and traditional ceramics. | 700 |
 | Keraflex Maxi glue does not form dust when mixed, does not require leveling the walls before laying, and is suitable for working with various building materials. Possesses plasticity and good adhesion, holds heavy large-format elements in a vertical position, excluding their slipping. The composition is flexible and can be used in any conditions. | 1100 |
How to make a hole in a tile
In the process of laying tiles in the bathroom, it is often necessary to cut holes in the tiles for pipes, sockets, a drain for a washing machine, for a toilet bowl outlet, faucets and other communications. The following instruction will tell you how to do this correctly.
Table 12. How to make a hole in a tile
| Illustration | Description |
|---|---|
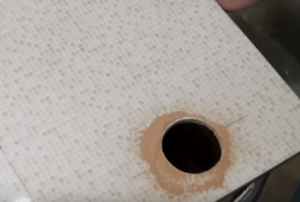
 | The best way to make holes in the tiles is to use a diamond core bit of the correct diameter. It offers excellent quality and high speed. But it is necessary to take into account the high cost of this tool. The service life of such a crown on hard tiles or porcelain stoneware is sharply reduced. |
 | A cheaper analogue for drilling holes in tiles is the "ballerina". Its advantages lie not only in its affordable cost, but also in the ability to change the drilling diameter within the required limits. But it is worth considering that, in comparison with the diamond crown, the "ballerina" is sharply inferior in the quality of the hole being made and the convenience of work. |
 | The tile is applied to the wall in places where there should be holes, observing the conditional seams. |
 | On the tile, mark the middle of the future holes with a pencil |
 | Then the tiles are placed on the side and the middle of the holes on the other side is marked. |
 | With the help of a ruler on the tile, they indicate the intersection of the marks, simultaneously controlling the distance between them. |
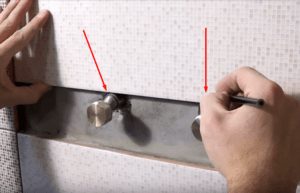
 | The maximum hole diameter should not exceed the size of the decorative cap that will cover the mixer inlet. |
 | Using a template of the required diameter, circles are drawn, taking the intersection of the lines as the center. |
 | The holes can be drilled with a small diameter tile drill. This is the cheapest but most laborious way to make holes. The drill is inserted into a screwdriver and holes are drilled sequentially along the drawn circle on the surface of the tile. |
 | When small holes are made, they need to be widened on the back. |
 | To do this, use the same drill, performing rocking movements with the tool, combining small holes into a single line. |
 | Use pliers to trim sharp protrusions inside the hole |
 | The inner side of the hole is sanded with sandpaper. |
 | A hole in a floor tile, due to its thickness, cannot always be made as described above. Especially if it is porcelain stoneware. In this case, using a grinder in the tile, you can make the necessary cut, and the missing fragment can also be cut out with a grinder and inserted into place. |
 | To make a hole for the exit of the toilet bowl, sectors are applied on the tile with the help of a small grinder in a delineated circle. The more sectors, the easier it is to machine the inner edges of the hole. |
 | Then, with the very tip of the grinder, carefully cut the tile along the outlined circle to form a small groove. |
 | Using the pliers, the resulting sectors must be broken down by tapping on them. The inner side of the resulting hole can be sanded with a small grinder. |
Seam processing
At the final stage, it will be necessary to finish the tile joints so that the repair in the bathroom looks complete, and the walls acquire additional protection from moisture in particularly vulnerable places. Conventionally, the seams to be finished with a protective compound are divided into three groups:
- Tile joints, which are formed between the individual cladding elements.
- The seam between the bathtub and the adjacent wall.
- The seam between tiles and skirting boards, curbs or fillets.
Table 13. The main stages and features of the sealing of tile joints in the bathroom
| Illustration | Description |
|---|---|
 | Before starting to join the walls, it is recommended to practice on a small probe. Glue several plates on a drywall sheet, forming seams with the help of distance crosses and repeating the layout by color - adjoining dark and light tiles. In this case, it will be much easier to select a fugue by color. |
 | To work with the probe, it is enough to pour 100 g of dry trowel mixture, which is closed with a special liquid. In this case, it is very important to observe the proportion. Otherwise, even the shade of the fugue may change. |
 | Moisten the seams on the probe by spraying with water. |
 | Using a small rubber trowel, apply the diluted joint to the seams. It is important to try to fill the seam to its full depth, which will ensure its durability. |
 | The fugu is left to dry for 10-15 minutes. |
 | The appearance of a slight dullness of the seam will be a signal that it is time to use a sponge to clean the tile surface with light movements, without removing the joint from the seams. The final movements of the sponge are performed diagonally. |
 | When working with floor tiles, the joint is applied along the entire depth using a rubber trowel. To work through the seam to its full depth, the fugue should not be too thick. For the different holes in the floor, the same application technique is used to the full depth of the previously cleaned cavities. This will make the seams more durable. What width should be the grouting joints and how important it is, read . Important! Cement-based grout will gain strength in at least 2 weeks. |
 | If there is a need to use grout of different color, then it is worth considering that they are applied sequentially - one after the other has dried. To do this, a plastic insert is installed at the intersection of the two colors, which does not allow the fugue to get into the "foreign" seam. |
 | Additional protection of the seams in the bathroom consists in strengthening their outer layer with a special compound. The seam becomes more waterproof and resistant to mold growth. The composition must be applied with a brush exclusively on the seam in two layers. |
It is important to observe not only the sequence of work, but also to perform each stage with high quality, then the result will delight for more than one year.
Video - Grouting after laying tiles in the bathroom
13-02-2015
There is a special procedure for laying tiles in the bathroom. In order to start it, you first need to decide on the size of the elements. The size of the tile is selected according to the size of the bathroom: if it is narrow with high ceilings, then the laying should be carried out horizontally, due to which it will visually expand. You need to decide on the pattern along which the styling will take place.

It is necessary to start laying the tiles in one vertical row and horizontal along the bottom, then you will only need to fill the remaining space with tiles.
After this issue has been resolved, you need to make a preliminary calculation of the ceramic tiles for installation. To do this quickly, you can draw a drawing on a piece of notebook paper in a box, according to which you plan to carry out styling, and determine where your decorative moments will be located. With such a plan, you can easily calculate the required number of tiles, but you need to buy it with a margin of about 15% of the total. These tips will help you keep your bathroom tiles tiled.
Room preparation
Before you start laying the tiles, it is imperative to check all the walls of the room for perpendicularity, if the walls are poorly aligned, then after laying the tiles it will be visible.
It is better to prepare the surfaces well for laying: this will save you a lot of time in the future. In order to level the walls, you can use plaster or drywall. Faster and more reliable is drywall, but if your room is small, then you will need to either accept the loss of several square centimeters of the area of \u200b\u200bthe room, or choose plaster as an alternative option.

To install tiles in the bathroom, you will need the following tools:
- tile cutter;
- level;
- smooth, comb and rubber spatulas;
- machine for sawing corners at 45 degrees;
- tile;
- grout for joints;
- glue for tiles.
Back to the table of contents
Laying tiles on the wall
You must first lay it out on the floor to see the full picture. It is necessary to immediately indicate how the elements will be located on the wall. If the width of the wall in the bathroom is a multiple of the width of the tiles being laid, then the width will be laid without trimming. It is necessary to lay out one row vertically and at the bottom a row horizontally, and then gradually fill in the space that remains. And if there is no multiplicity, then you need to start laying from the most noticeable angle so that the pruning is at the end of the row, so it will not be noticeable.
This option is suitable if the trim is less than half the width of the stoneware. If the trim is larger, then the wall must be divided equally into two parts, and the trimmed tile is placed along the edges of the wall, while the width of the trimmed tile on one and the other side of the wall is the same.
Back to the table of contents
Laying sequence

Tiles in small rooms, such as a bathroom, begin to be laid up from the floor. In other cases, when the tiles are laid on the wall adjacent to the bathroom, you need to start from the edge of the bathroom. To do this, at the bottom, at a short distance from the floor, at the level of the second bottom row, in which whole elements will be laid, you need to attach a bar, from which the whole process of laying tiles in the bathroom begins. The strip is removed only when all the solution is dry and the tile is securely attached. After the plank is removed, a basement row is formed from the trimmed elements. From the floor itself, installation begins only if the floor surface is perfectly flat. It is imperative to make sure that the edge of the bathroom coincides with the beginning of the new row, that is, with the seam.
If you start from the edge of the bathtub, then the plank is attached to the edge of the bathtub and, after laying the top rows, it is removed, and then you can put several rows down. To prevent overlapping rows, you need to mark the beginning of each row with a pencil.
The wall cladding with the entrance door to the bathroom is the last thing to do. First, the tiles are laid in the corner, then above the door. After these places are lined, we lay two rows: one horizontally, the second vertically, on the remaining walls. To maintain the same level, you need to push off from the tile joints on the other wall.
And then we fill in the remaining space. The seams on all walls must be at the same level, for this you need to use special plastic crosses to mark the width of the seams. If there is a corner that protrudes into the bathroom, then it is lined with a plastic corner, or the elements at the very corner are sharpened at an angle of 45 degrees so that the sides of both tiles are connected when they touch at the corner.
The solution should be applied to the wall on a small area, about a square meter, so that you have time to attach the elements and the solution does not dry out. When the solution dries, it must be removed.
Back to the table of contents
Features of laying on the floor

The easiest way to lay stoneware on the floor is to lay it parallel to the walls. If you are the lucky owner of a spacious bathroom, then it is better to lay it diagonally. In any case, you need to pay attention to places that are immediately striking. In such places, it is better to lay tiles without cutting, so as not to spoil the appearance of the entire room.
Correct cladding begins with the fact that first all the elements are laid out on the floor, so the overall picture and the cutting points will be visible. It is better to start from the threshold of the room to the middle, it is better to stop there and give time for the solution to grab. It is better to continue styling the next day. After the floor is ready, you need to let it stand for several days so that the solution is completely dry.