Windows server remote desktop connection. Remote Desktop Connection
/ Connecting to a remote desktop
How to connect to a virtual server via RDP?
Remote desktop connection is made using an RDP client. RDP (Remote Desktop Protocol) client is installed in all Windows operating systems starting from Windows XP. There are also versions of remote desktop clients for Mac and smartphones based on Android. For Linux, you can use rdesktop, FreeRDP or Remmina, for iPhone - we recommend standard RDP or an alternative iTap RDP To run the RDP client under Windows, run on your computer:
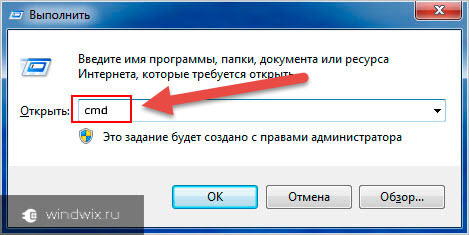
1. To connect via RDP, use the Win + R key combination in the window that opens, enter the mstsc.exe / console / admin command and click OK
Pay attention to the parameters / console / admin - they are used to connect to the "console" of the server, instead of creating a new session. Thus, you will always connect to your previously launched session, instead of creating a new one, which will avoid the problems of "double launching" programs and parallel sessions.
2. Or Start -\u003e Programs -\u003e Accessories -\u003e Connect to Remote Desktop
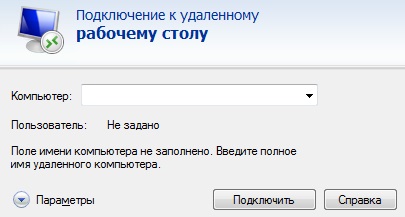
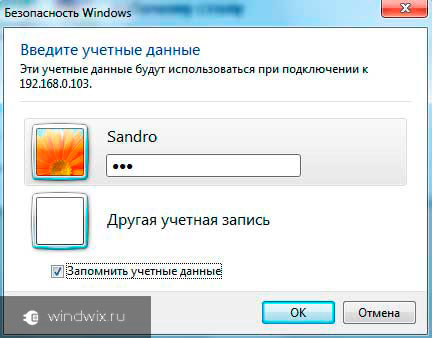
In the window that opens, you must specify the IP address of the server to which you want to connect. IP-address and all data for work (indicated in the letter with access data), after entering the address, click the "Connect" button, after a few seconds a window for entering the password will appear. Carefully enter your username (by default for all new servers "Administrator" and password and check the box "Remember credentials":

Please note, the password must be entered manually, "copy-paste" does not work. If you entered your username and password correctly, you will connect to the remote desktop of your VDS Windows. When you connect for the first time, you will see information about an untrusted security certificate. This is due to the fact that the server encrypts the transmitted data with an SSL certificate, which was automatically generated by the server itself. This is not a security issue, it is just a notification that encryption is being done using a certificate that was issued by an unauthorized authority.

Here you need to check "Do not display a request for connections to this computer again" and click "Yes".
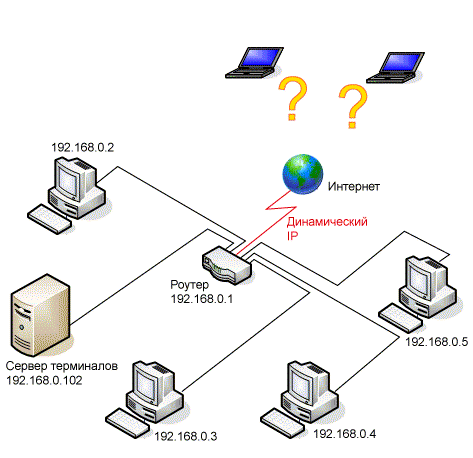
We have: inside a small corporate network there is a Windows 2003 Server with 1C: Accounting.
A task: set up a connection to this server from the Internet so that accountants from anywhere in the world where there is an Internet can work with it.
Since there is little sensible material on this issue and many nuances had to be "googled" bit by bit, and this post was written.
1. Solving the problem of dynamic ip-address
Since providers in most cases provide a static IP address for separate money, there are several solutions to this problem:
- Pay extra to the provider for providing static ip address... This method is the most reliable since we do not depend on any third-party services (see next paragraph).
- Dynamic DNS (Dynamic DNS, Static DNS for Your Dynamic IP) - using this service, we assign a permanent domain name to our device with a dynamic IP address (in this case, the router).
- Learn any way currently valid ip-address. The problematic nature of this method depends on how difficult it is to recognize it and how often it changes.
For ourselves, we have chosen the second method - with dynamic DNS. Fortunately, there are still enough services that provide such a service for free:

1. Register on the site no-ip.com and click the Add a Host button
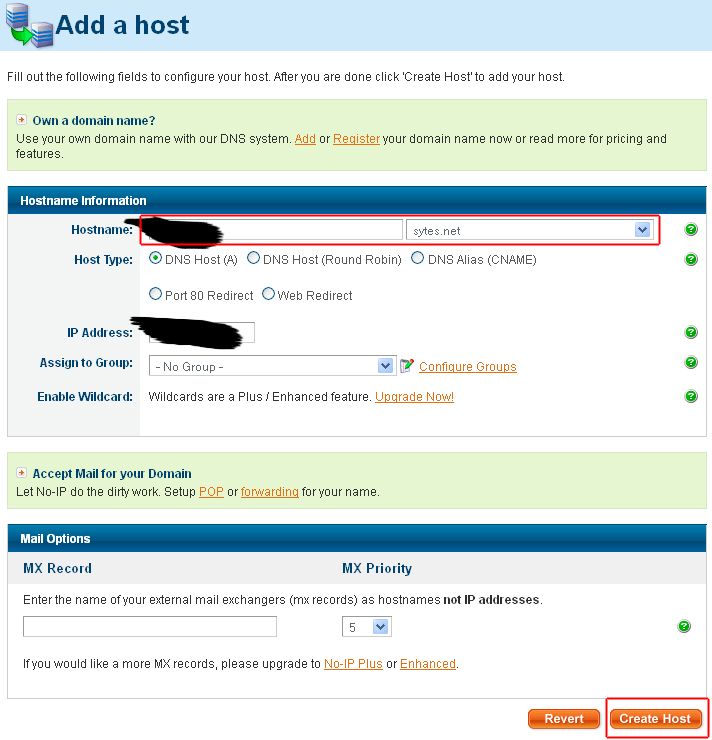
2. Come up with a name, choose a free domain and click the Create Host button
2. Binding to a dynamic DNS router
We are lucky, our D-Link DIR-615 router has built-in support for dynamic DNS. We go to the corresponding page "Tools" - "DYNAMIC DNS".

Configuring the dynamic DNS binding to the D-link DIR-615 router
Enable dynamic DNS - put a tick
Server address - the address of the server that provided the dynamic DNS (in our case it is “ dynupdate.no-ip.com»)
Host Name - the domain name that we have chosen for ourselves
Username or Key - the username that we chose for ourselves when registering on the No-IP.com website
Password or Key - the password that we chose for ourselves when registering on the No-IP.com website
Verify Password or Key - repeat password
Timeout- leave it as it is (576)
15-20 minutes after registration Status will change to Connected, which means that the binding was successful!
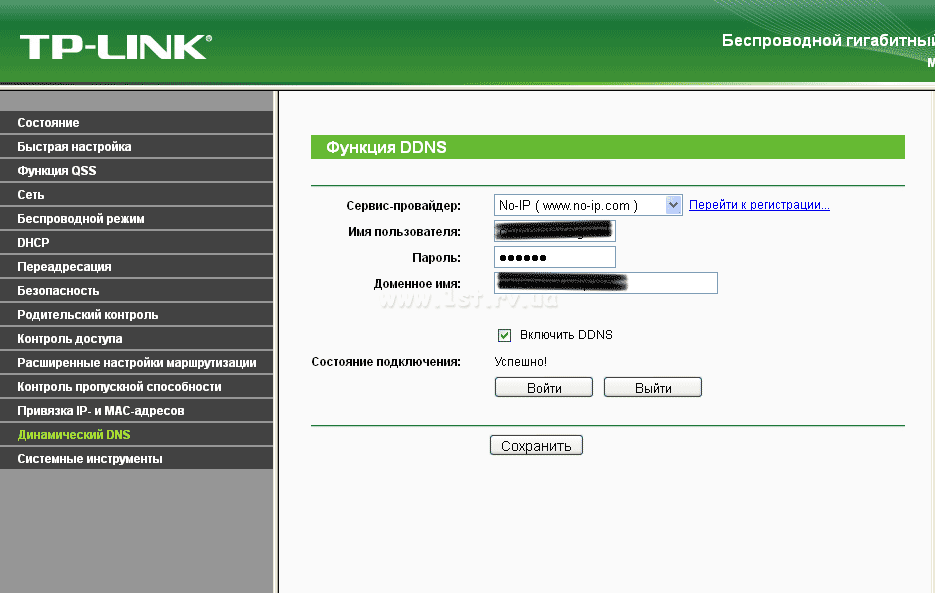
We configure the binding of dynamic DNS to the TP-LINK router: Select our service provider (No-IP) from the list, enter the username, password and domain name obtained during its registration
3. We open access to the server from the Internet
Now we need to redirect people connecting to the server from the router to the server itself. To do this, you need to redirect port 3389 on the router (it is this port that is used for RDP connections) to the server. We go to the router "ADVANCED" - "Virtual Server":
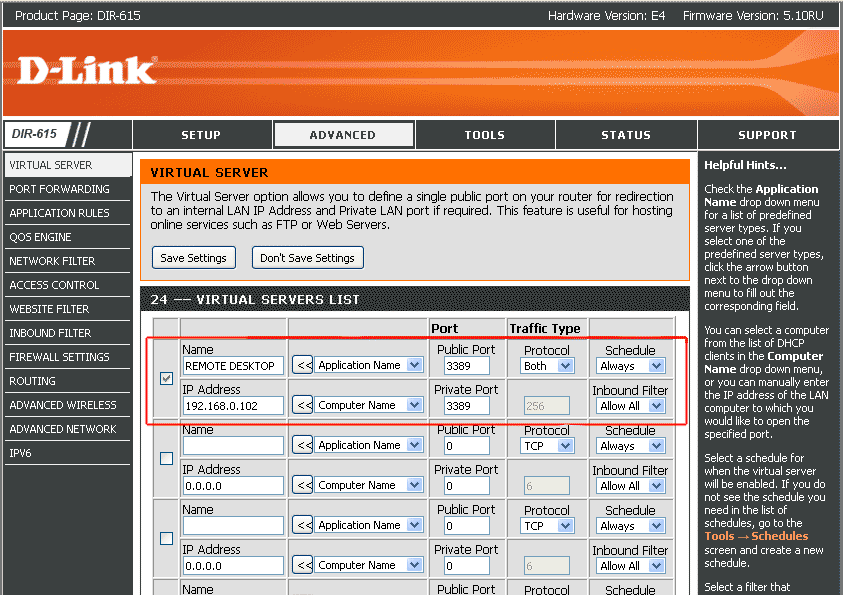
Name - any
Public Port — 3389
Protocol - Both
Schedule - Always (always)
IP Address - 192.168.0.102 (ip-address of the terminal server on the network)
Private port— 3389
Inbound filter - Allow All
Important! To successfully apply this operation, you need to REBOOT the router. Simple pressing of the “Save Settings” button does not give any result.
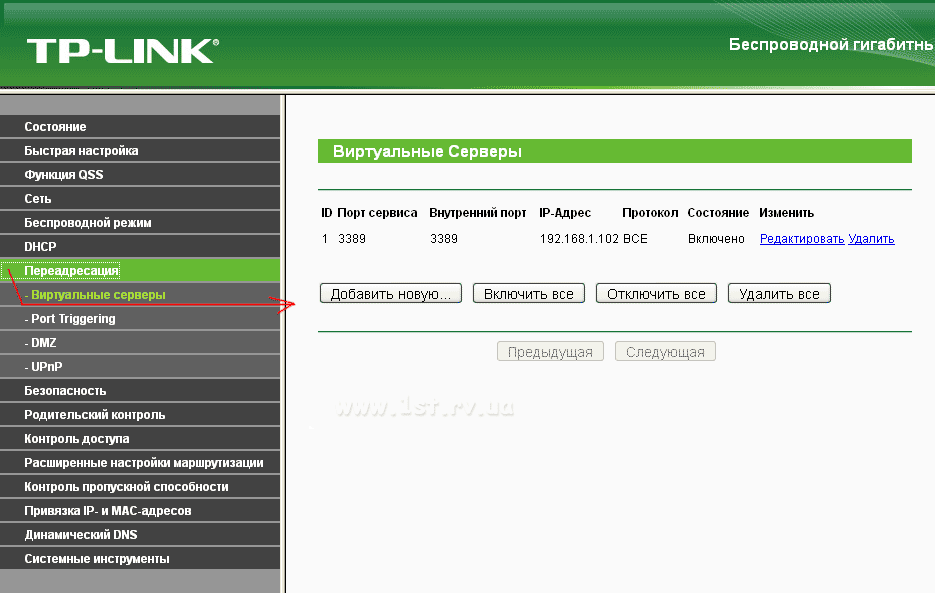
The same for TP-LINK routers: Forwarding - Virtual Servers - Add New ...
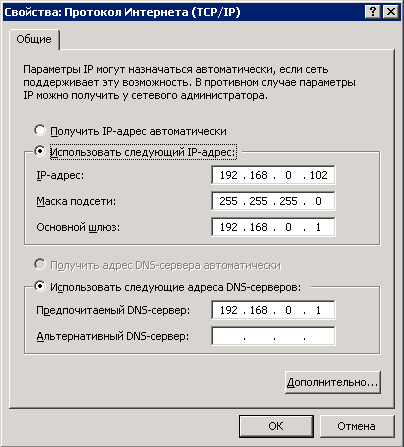
Desirable register your own ip-address settings on the server so that at the next reboot it does not change and port forwarding does not "go into the void":
Conclusion
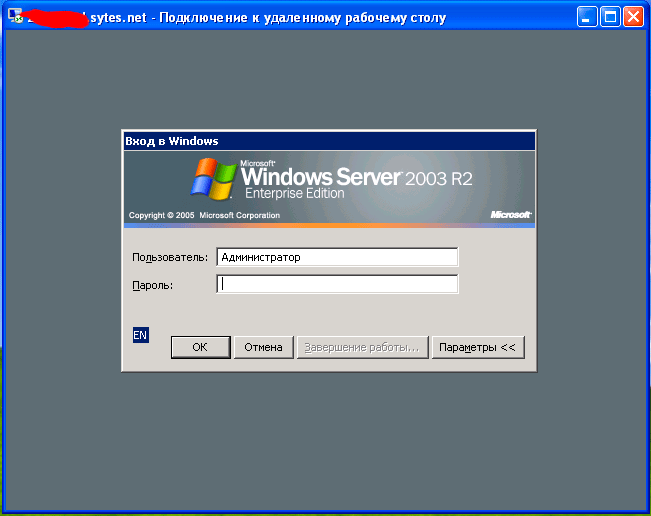
If everything is done correctly, then an attempt to connect to a remote desktop from anywhere in the world:

will complete successfully:
P.S.
Useful link: how to install and configure a bunch of Windows 2003 Server + Terminal Server + 1C Enterprise 7.7.
If you have increased requirements to stability and safety of work, round-the-clock support by technical specialists, you can order the placement of servers in the data center. In this case, many of the above questions will disappear by themselves.
Greetings, dear readers, and again Denis Trishkin is in touch.
I recently came across a question such as "Remote Desktop" ( RDP Windows 7). This tool allows you to operate your computer using a different device. So, for example, the user can use home equipment to perform all the necessary functions on a PC located in the office. Agree, in some situations such an opportunity is convenient. But at the same time, you must first debug everything correctly.
In order to enable rdp, you need to do a few things:
Establishing a connection( )
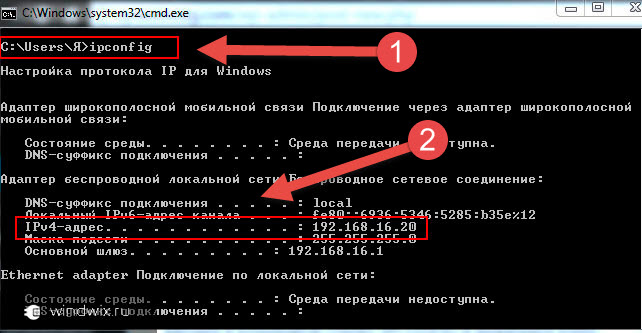
To establish a connection via rdp, you first need to know its IP address. To do this, on the desired device, go to the command line (open "" and write " cmd»).
In the window that appears, indicate "". A list will open in which you need to find a string with the IPv4 parameter. The numbers that are indicated opposite are the data we need.
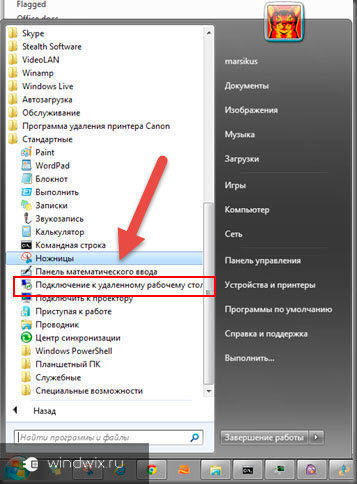
After that, on the computer from which we plan to connect, run rdp client or "". To do this, go to " Start"And then go to" Standard».
to enlarge
A window will open where the equipment address (IPv4) is set. Then press "".

If everything is indicated, as it should be, a menu will appear in which you need to enter your username and password to establish communication.
Before that, there is a choice of " Parameters", Where various rdp settings are provided:
Update( )
It is important to understand that with constant work with this tool, you need it to perform all its functions 100%. Otherwise, users may simply not achieve their goals.
All settings must be correctly specified for correct functioning. But in some cases this is not enough. It is also worth installing all upcoming rdp updates from Microsoft on time. This can be done not only in the appropriate center provided in the operating system, but also on the official developer page.
Changing the RDP port( )
For a standard connection to a remote computer, port 3389 is used. In this case, communication occurs via the TCP protocol. Therefore it is used without udp.
To increase the security of the connection, it is possible to change the RDP port. Changing the value will reduce the risk of intrusion into the system in case of automated password guessing.
For the procedure, you must use the registry editor:

No connection( )
Sometimes users may face a situation where rdp doesn't work. It is important to note that, judging by the statistics, the user still manages to get to the server, but some network tools do not let him go further. There are several effective ways to solve this problem.