RDP clients for Windows and MacOS
Supporting new version 8.0 Remote Desktop Protocol (RDP) for Windows 7 SP1. Even less known is the fact that after installing this update, RDP8 is not activated by itself and requires additional manipulations.
Activation
You need to start RDP8 support as follows:
- Open group policies - “gpedit.msc” in “Start” -\u003e “Run…”.
- Enable the following setting:
English version: Computer Configuration -\u003e Administrative Templates -\u003e Windows Components -\u003e Remote Desktop Services -\u003e Remote Session Environment -\u003e Enable Remote Desktop Protocol 8.0.
Russian version: Computer Configuration -\u003e Administrative Templates -\u003e Windows Components -\u003e Remote Desktop Services -\u003e Remote Desktop Session Host -\u003e Remote Session Environment -\u003e Allow Remote Desktop Protocol 8.0. - To restart a computer
Bugs
Of course, this was not without its problems. After activating RDP8.0, you may find that it is no longer possible to connect remotely. the absurd message “The connection was denied because the user account is not authorized for remote login.” (“Connection was denied because the user account does not have rights to log on remotely.”). We open “Control Panel” -\u003e “System” -\u003e “Setting up remote access”, and there - “Selecting users”.
The displayed window tells us in plain text that all computer administrators have access to the remote desktop by default, including the current user. However, this is a blatant lie. Press the "Add" button, and in the menu that opens, enter your username, press "Check names" and save this entry.
Only after that we will be able to remotely connect to the system under this account.
Benefits
A short list of new features in RDP8 is presented at the link at the very beginning of this post. From myself, I can only add that the idiot's dream has finally come true, and now when you launch 3D applications from an RDP session, they are displayed not as a slideshow, but much more vividly. With a static or not very rapidly changing picture, now the possibility of using them has become practically tangible. Not slowing down Ragnarok Online via RDP, a new miracle of the universe!
And you can also launch a video player on a remote desktop and it will also display video with almost no lags and brakes. But the sound was noticeably out of sync for some reason.
disadvantages
On the server editions of operating systems, one could find contrite reviews that the shadow command no longer works in RDP8, which allowed, when several simultaneous connections to the system, switch to displaying the desktop of another user without disconnecting it.
Also, the disadvantages include the inability to activate the Aero-Glass effect in a remote session. However, as it became known earlier, the ability to see the Aero effect was only possible when connected to a host with an operating system of the Windows 7 Ultimate class, while on the Professional edition this feature is blocked in any scenario and from any version of RDP, so switching to RDP8 we we do not lose anything.
You can find out if the RDP8 protocol is enabled by the small button displayed in the top bar of the remote desktop when it is expanded to full screen. The button is called “Connection Info” and displays a small menu with the most detailed information about the quality of the connection to the remote computer. The only inscription that I could see there is a line informing that the connection is “excellent”. And that's all. Regardless of the communication line, the distance of the host computer, etc ...
Among users, quite a few people have heard that there is a certain RDP client.
But few know what it is, why it is needed and how to work with it.
But in fact, it is simply an indispensable thing for those who need to work in several places, but there is no way to carry a laptop with them.
Content:Why do you need RDP
Imagine you are working in an office. Your responsibilities include paperwork and more. You perform all these tasks on your computer in the office. But the working day ends, the security guard says that he will close the premises and cannot stay in it, and you still need to complete several important tasks. Moreover, it will not work to postpone them until tomorrow.
And at this moment this very RDP comes to the rescue. Imagine being able to come home, turn on your home computer, and continue to work on the same desktop and data as you did on your computer at work. That is, being at home, you will, in fact, work on a work computer.
Interesting?
Then let's continue!
Decrypting RDP
RDP is a Remote Desktop Protocol. This is the definition given in official sources. This abbreviation stands for "Remote Desktop Protocol". Actually, this is translated as Remote Desktop Protocol.
There is no complicated science here. This protocol is really intended so that you can work with a desktop remotely. This means that you are at a certain distance from where the desktop is actually located, and at the same time you have the opportunity to work with it.
Actually, the RDP client is a program that allows you to implement the functions of this very protocol. In other words, it is a program that empowers the user. You can quite safely organize access to your computer, then connect to it from another device and continue to work. In fact, there is nothing complicated about it.

Figure: 2. Remote access to a computer from a tablet
Today RDP clients exist on a wide variety of operating systems, including:
- Windows;
- Mac OS;
- Android;
Users of all these platforms can easily organize remote access to their devices. Moreover, from a device on one OS, you can do the same for a device on another. For example, you can connect to a Windows computer.
All in all, a very useful and interesting feature. And now we will look at how to work with this protocol and programs for working with it.
RDP client on Windows
The earliest and most common example of a program for working with a remote access protocol is the tool for connecting to. Actually, the RDP protocol was developed for this operating system. And only then they began to use it in other operating systems.
To date, any version of Windows has a built-in tool called. It can be found in the Start menu or by searching. It is called the same everywhere.
To use it, you must first configure the computer to which you will connect, that is, with the desktop you are going to work with. To do this, do this:
- First, you need to recognize the computer, then give it to another device, from which the first control will be carried out. To do this, follow these steps:
- launch the program execution window by simultaneously pressing the Win and R buttons on the keyboard;
- in the window that opens, in the only input field, enter "cmd" and press Enter on the keyboard - thus you;

Figure: 3. Command to run the command line in the program execution window
- in the command line, enter the command "ipconfig" and press Enter again;
- all available network information will open, find there the line "IPv4 address" - opposite it will be the IP address, remember it (!).
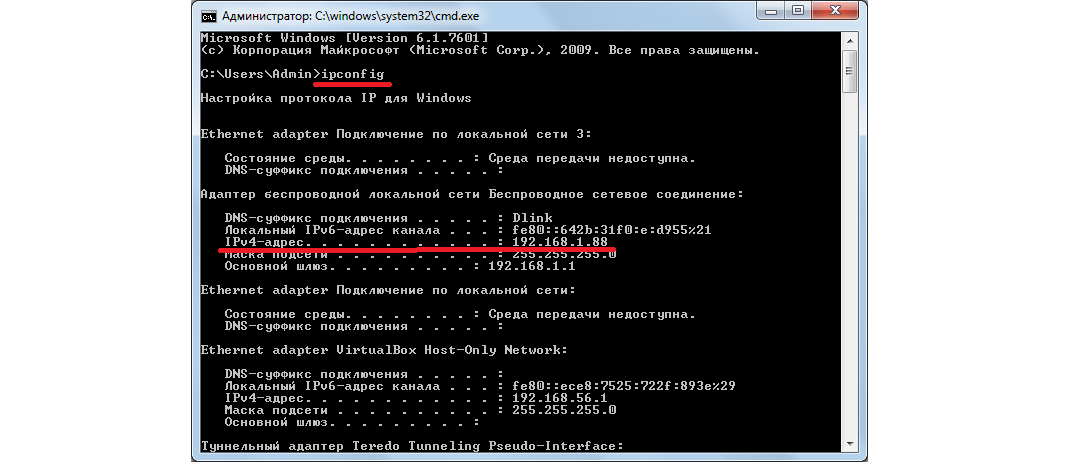
Figure: 4. Network information on the command line
As you can see, in our example, the IP address is 192.168.1.88.
- Now you should enable the ability to access the computer using the remote control tool. To do this, do the following:
- in the start menu open "Control Panel";
- click on section "System and safety";
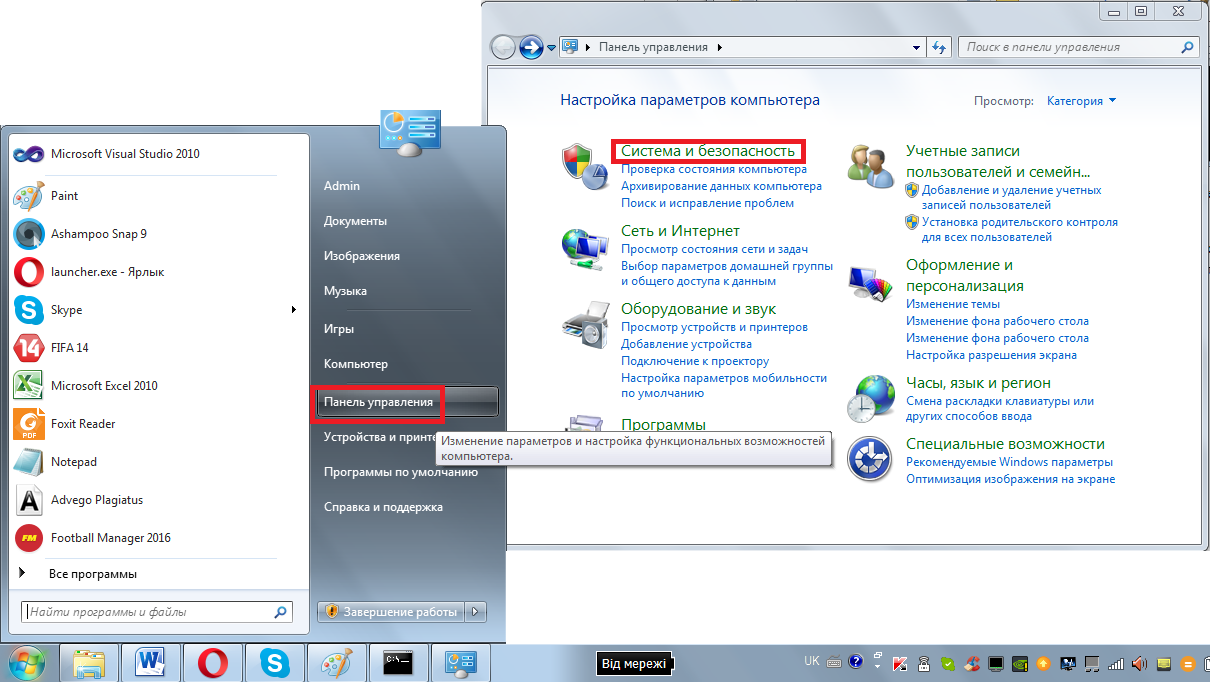
Figure: 5. Section "System and Security" in the control panel
- in the next window, click on the "System" subsection;

Figure: 6. Subsection "System"
- in the menu on the left, select "Additional system parameters»;
- in the window that opens, go to the tab "Remote access";
- put the checkmarks in front of the items highlighted in Figure 7 by numbers 1 and 2;
- close all windows, and before that click "Apply".

Figure: 7. Allowing remote control in the "System" section
Now you can safely connect to this computer. This operation is also quite simple. It is performed in the following sequence:
- Go to the "Start" menu, select there a list of all programs, then the "Accessories" section and click on the tool called "Remote Desktop Connection"... Finding it won't be difficult.
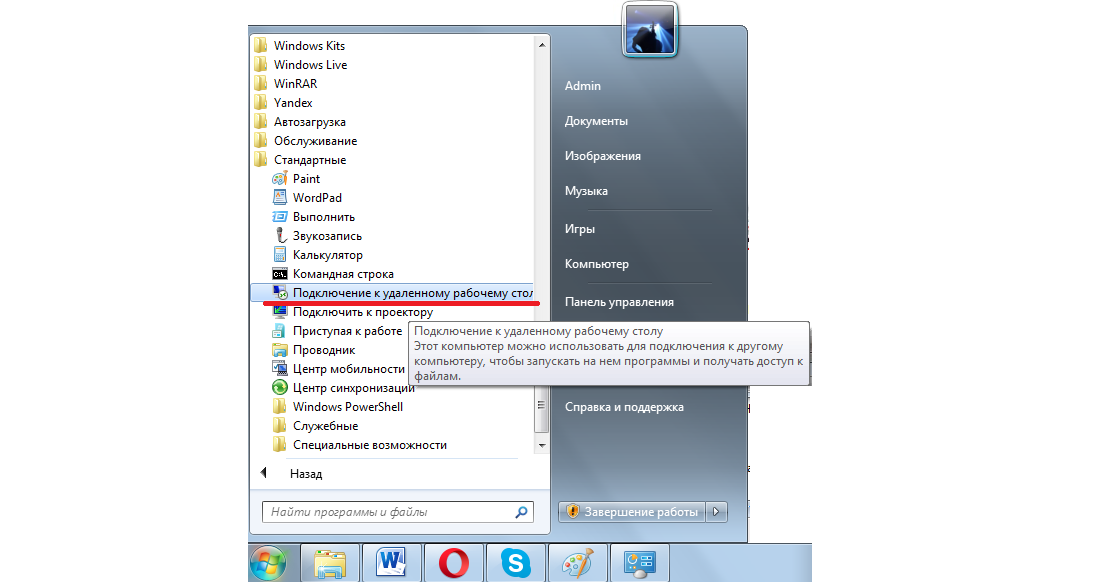
Figure: 8. Tool for connecting to remote desktop in the start menu
- Next, in the next window, you need to enter the IP address that we determined in one of the previous steps. Recall that in our example, this is 168.1.88. This address must be entered into this very window. When this is done, go to the next step, but do not click the Connect button yet. Instead, click on the "Options" label, which is located slightly below and to the left of the address input field.

Figure: 9. Tool window for connecting to a remote worker
- It is important that you have the ability to work not only with folders and files, but also with devices connected to the computer, which will be controlled. Therefore, in the drop-down window, go to the tab "Local resources" and put a checkmark in front of the "Printers" and "Clipboard" items. Now you can press the "Connect" button and thus proceed to the next step.
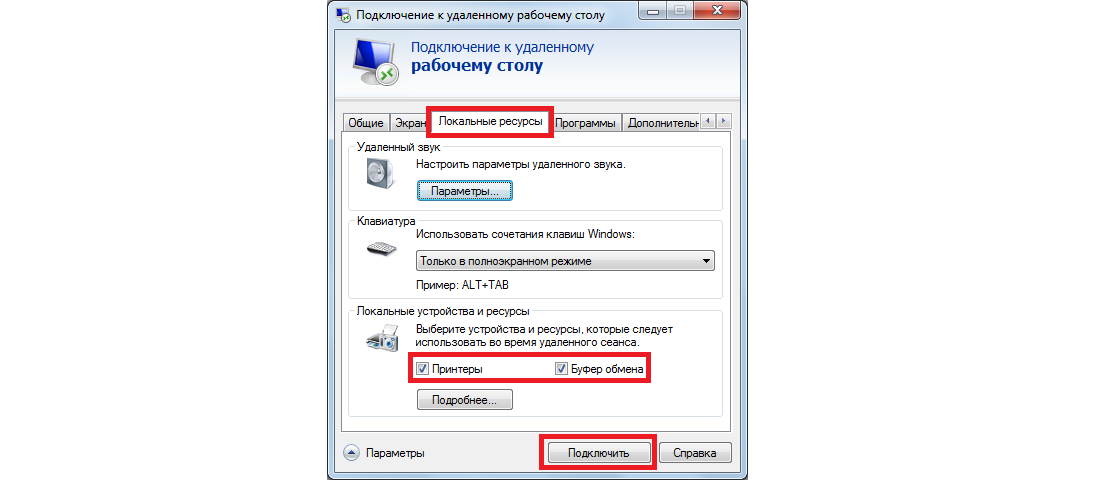
Figure: 10. Settings for connecting to a remote computer
After that, it will connect to the specified computer at its address. Some people install an account system on their devices. In this case, to connect, you will have to enter your username and password. But if at the first stage of the setup described above you did nothing to install such a system, you do not need to enter anything.
It's that simple! Is not it?
Now you know how to use the simplest RDP option and you can install remote connection... If you have any questions or difficulties, write about it in the comments below. We will definitely answer.
In the meantime, for a deeper understanding of the issue, let's consider some other programs that work as RDP clients, that is, they allow you to remotely control your computer.
Among users, quite a few people have heard that there is a certain RDP client.
But few know what it is, why it is needed and how to work with it.
But in fact, it is simply an indispensable thing for those who need to work in several places, but there is no way to carry a laptop with them.
Why do you need RDP
Imagine you are working in an office. Your responsibilities include scheduling, paperwork and more. You perform all these tasks on your computer in the office. But the working day ends, the security guard says that he will close the premises and cannot stay in it, and you still need to complete several important tasks. Moreover, it will not work to postpone them until tomorrow.
And at this moment this very RDP comes to the rescue. Imagine being able to come home, turn on your home computer, and continue to work on the same desktop and data as you did on your computer at work. That is, being at home, you will, in fact, work on a work computer.
Figure: 1.RDP allows you to work from one computer to another
Interesting?
Then let's continue!
Decrypting RDP
RDP is a Remote Desktop Protocol. This is the definition given in official sources. This abbreviation stands for "Remote Desktop Protocol". Actually, this is translated as Remote Desktop Protocol.
There is no complicated science here. This protocol is really intended so that you can work with a desktop remotely. This means that you are at a certain distance from where the desktop is actually located, and at the same time you have the opportunity to work with it.
Actually, the RDP client is a program that allows you to implement the functions of this very protocol. In other words, it is a program that enables the user to work with the computer remotely. You can quite safely organize access to your computer, then connect to it from another device and continue to work. In fact, there is nothing complicated about it.
Figure: 2. Remote access to a computer from a tablet
Today RDP clients exist on a wide variety of operating systems, including:
- Windows;
- Mac OS;
- Android;
Users of all these platforms can easily organize remote access to their devices. Moreover, from a device on one OS, you can do the same for a device on another. For example, you can connect to a Windows computer from an Android tablet.
All in all, a very useful and interesting feature. And now we will look at how to work with this protocol and programs for working with it.
RDP client on Windows
The earliest and most common example of a remote access protocol program is the Windows Remote Desktop Connection tool. Actually, the RDP protocol was developed for this operating system. And only then they began to use it in other operating systems.
Today in any version of Windows there is a built-in tool called "Remote Desktop Connection". It can be found in the Start menu or by searching. It is called the same everywhere.
To use it, you must first configure the computer to which you will connect, that is, with the desktop you are going to work with. To do this, do this:
- First, you need to find out the IP address of the computer, then give it to another device, from which the first control will be carried out. To do this, follow these steps:
- launch the program execution window by simultaneously pressing the Win and R buttons on the keyboard;
- in the window that opens, in the only input field, enter "cmd" and press Enter on the keyboard - this will launch the command line;
Figure: 3. Command to run the command line in the program execution window
- in the command line, enter the command "ipconfig" and press Enter again;
- all available network information will open, find there the line "IPv4 address" - opposite it will be the IP address, remember it (!).
Figure: 4. Network information on the command line
As you can see, in our example, the IP address is 192.168.1.88.
- Now you should enable the ability to access the computer using the remote control tool. To do this, do the following:
- in the "Start" menu, open "Control Panel";
- click on the "System and Security" section;
Figure: 5. Section "System and Security" in the control panel
- in the next window, click on the "System" subsection;
Figure: 6. Subsection "System"
- select "Additional system parameters" in the menu on the left;
- in the window that opens, go to the "Remote Access" tab;
- put the checkmarks in front of the items highlighted in Figure 7 by numbers 1 and 2;
- close all windows, and before that click "Apply".
Figure: 7. Allowing remote control in the "System" section
Now you can safely connect to this computer. This operation is also quite simple. It is performed in the following sequence:
- Go to the "Start" menu, select there a list of all programs, then the "Accessories" section and click on the tool called "Remote Desktop Connection". Finding it won't be difficult.
Figure: 8. Tool for connecting to remote desktop in the start menu
- Next, in the next window, you need to enter the IP address that we determined in one of the previous steps. Recall that in our example, this is 168.1.88. This address must be entered into this very window. When this is done, go to the next step, but do not click the Connect button yet. Instead, click on the "Options" label, which is located slightly below and to the left of the address input field.
Figure: 9. Tool window for connecting to a remote worker
- It is important that you have the ability to work not only with folders and files, but also with devices connected to the computer, which will be controlled. Therefore, in the window that appears, go to the "Local Resources" tab and put a checkmark opposite the "Printers" and "Clipboard" items. Now you can press the "Connect" button and thus proceed to the next step.
Figure: 10. Settings for connecting to a remote computer
After that, it will connect to the specified computer at its address. Some people install an account system on their devices. In this case, to connect, you will have to enter your username and password. But if at the first stage of the setup described above you did nothing to install such a system, you do not need to enter anything.
It's that simple! Is not it?
Now you know how to use the simplest RDP option and you can easily establish a remote connection. If you have any questions or difficulties, write about it in the comments below. We will definitely answer.
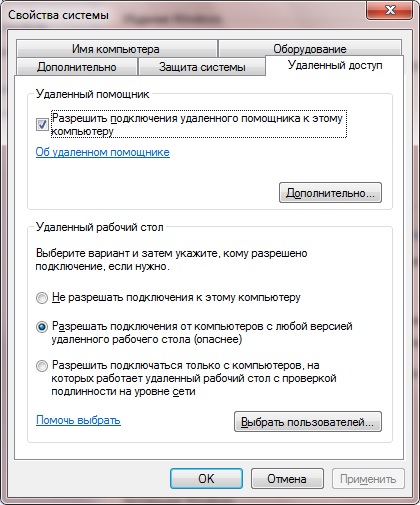
The RDP protocol allows you to connect to a computer that is connected both to a local network and located anywhere in the world. Using this protocol, the user will be able to see files and programs on another computer (both on the server and on the terminal), run them, work with them. But first, RDP needs to be configured.
Click the Windows Start button and open the Control Panel. Next, go to the "Security System", open the "System" and click on the tab " Remote access". We put a "tick" next to the item "Provide the ability to connect to other computers with desktops of any version."
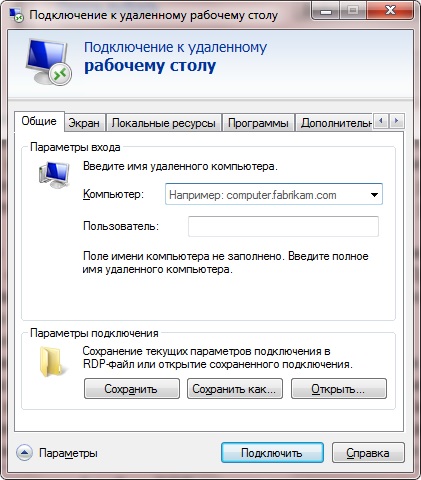
Then we start configuring the RDP client. Let's first look at what the client is for. These are components that exist, by the way, in any operating systemwhose job is to connect to the server (installed on the connected computer). In Windows "Seven" the client working for the RDP protocol is the built-in program MsTsc.exe. Now let's talk about setting up the client.
To do this, in Windows, click "Start" and go to the Run menu item. In the input field of the window that opens, write mstsc and click "Next". If you want to get normal access to the connected computer, its IP address is written in the input field of the client window that opens. Next, click on "Enter".
All. We have completed the setup.
If you want to adjust the display settings, the quality of the sounds for performing various actions on the connected computer, and so on, you need to configure additional connection settings (figure below).
You can also set color depth, desktop background, display brightness. Opening the section "Remote soundtrack", you can adjust the quality of sounds for any action.
Also, if the RDP client is working slowly, it is possible to configure it.
All users who have at least once worked with several windows systems constantly complain about the slow operation of RDP applications. Slow program performance is a constant trend among all Microsoft programmers. Therefore, the user has to speed up RDP on his own using the system registry, which can be edited either by entering the word regedit in the input field of the run window that opens, or by making changes to the reg file. The reason for the slowdown in the RDP channel in 100Mb (1Gb) is also the client. Mostly a client. Even with good channels, it is the rdp client that deliberately limits the speed of the Update. This trend has gone back to the days of DialUp modems. But in the modern era of powerful computers, such settings have already lost all relevance.
All its settings are in the system registry in the section (see the bottom of the figure):
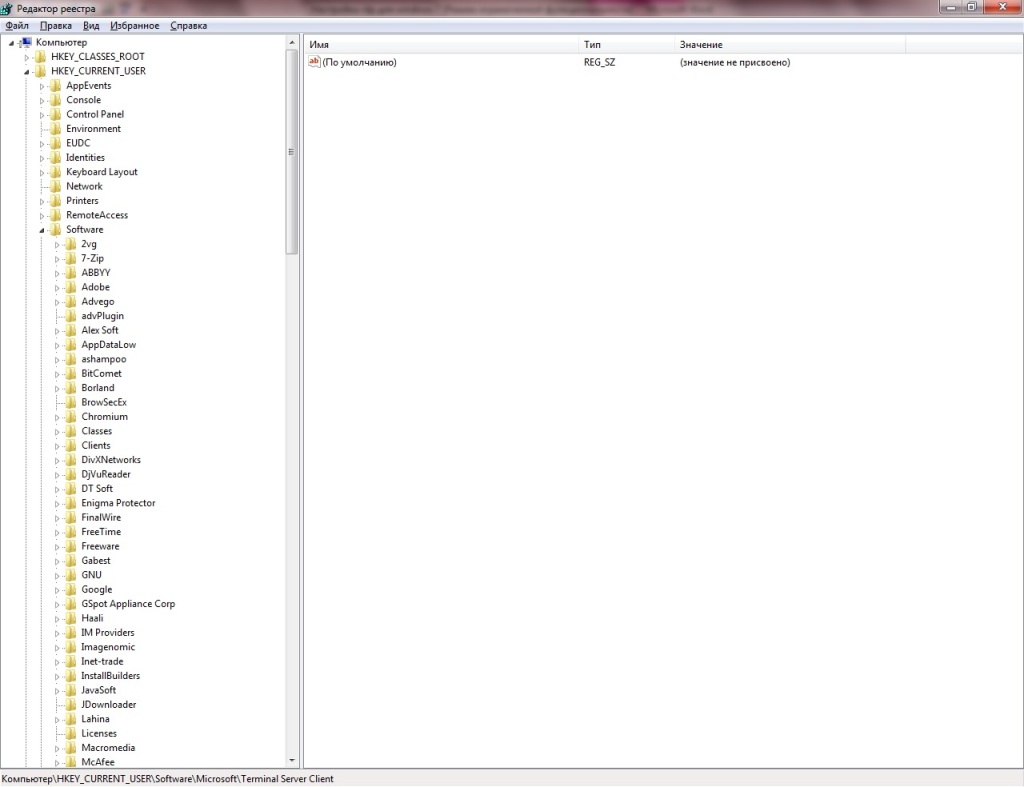
First of all, pay attention to the MinSendInterval parameter, the value of which is set to 120 ms (this is 8 frames per second). On the Internet, it is often recommended to write 1 for this parameter in Windows (for servers), but 5-10 is quite enough for connecting to a computer via a local network.
The BitmapCacheSize parameter specifies the size of the memory buffer for graphics. For example, 1000h corresponds to 24.5 MB. Change this value in Windows (both on the server and on the terminal) according to the graphics capabilities of your video card.
For the BitmapPersistCacheSize parameter (cache size for images) also in the Windows system registry (both on the server and on the terminal), you need to register a higher value.