How to enter BIOS on Acer laptop
So, there is a need to install Windows 7 or Windows 8 on an Acer Aspire ES1-511 laptop from a USB flash drive. We need to configure the BIOS on our laptop.
Turn on the laptop and press the F2 key to enter the BIOS. After clicking, we will see the Acer logo, and then we get, in fact, into the BIOS.
Let's immediately pay attention to the fact that the USB flash drive with which we will later install operating system, must be inserted into the black USB port of the laptop.
Go to the "Boot" menu tab.
In this window, go to the first line - "Boot Mode" with the cursor keys up / down ("?" And "?").
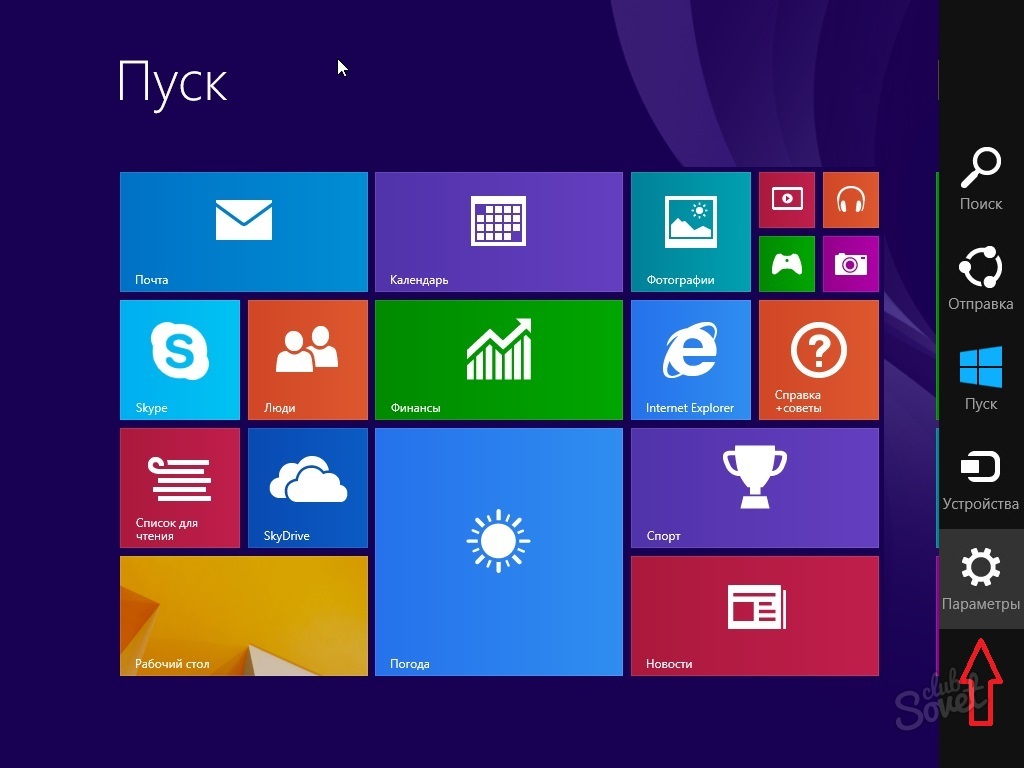
The default is "UEFI". We select this line with the Enter key. A new small window will appear.
In the small window that appears, select the value "Legacy". The computer may ask you about something a couple of times, we press Enter all the time.

After that, go to the "Exit" menu tab.
We have the first line “Exit Saving Changes” active. Press the Enter key. The computer will ask us about the need to save the changes and exit further.
Make sure that after the first press of the Enter key, the Yes value is active in the window that appears. We confirm our exit and save the changes by pressing the Enter key again.

The laptop should restart. At the end of the reboot, press the F2 key.
We find ourselves in the BIOS again.
We pass to the already familiar "" Boot "tab. We see in the window that the download sequence is already available. That is, where in turn the computer will look for our operating system to boot.
We find and use the cursor keys to switch to our USB flash drive. The title should look something like this. "USB HDD: model of our flash drive". In the picture, the name of our flash drive is Generic Flash Disc.

Go to the "Exit" menu tab. Press the Enter key. The computer in a new window will ask us about the need to save the changes made. Make sure that the Yes value is active and press Enter.
No matter how ideal our laptop works, over time it starts to slow down. This is affected by the heap of various kinds of programs, games and applications. Therefore, many decide on rather desperate measures - reinstalling the operating system. On the other hand, some people simply lack the power of hardware in applications or games. In this regard, we decided to tell you about how to enter the BIOS on Acer laptops. Thanks to our instructions, you will not face any difficulties in the process.
Key combination, as a way to get into the BIOS
It doesn't matter if you want to reinstall the OS, are going to overclock the processor or increase the frequency at which it runs rAM - we will definitely help you to enter the BIOS, where all this can be done. So, you must follow these steps: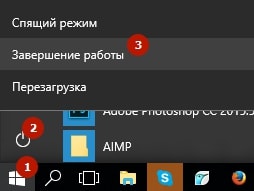
As you can see, the process is really extremely simple. However, there are some nuances here. For example, different keys may be used on different models. Moreover, key combinations can also be used. Thus, on older devices, you can get into the BIOS by simultaneously pressing CTRL + Alt + Esc, on others - F1.
What if none of the options fit?
Have you tried every BIOS entry method suggested above, but none of them worked? Then we advise you to pay attention to what is written below when starting the laptop. As a rule, developers indicate there:You need to pay attention to the item called "Setup" or "Setup BIOS". If the options above did not fit, it is possible that one of the following keys is used in your laptop to access the BIOS: Esc, Tab, F8, F10 or F12.
We still do not recommend that you do this if you are not sure that you understand its device, BIOS on acer laptops. The fact is that an inexperienced user can knock down the settings and then it will be problematic to restore them on their own. If you only want to reinstall the system, then it is better to use the ordinary Boot Menu.
For many people, computers have taken an important place in their lives and are successfully used at work or during leisure. But in order for the computer to work quickly and without interruptions, it is necessary Enter the correct settings in the program responsible for the operation of the equipment - BIOS Setup.
This program is responsible for the following parameters: setting the date, choosing boot devices (CD, HDD, Flash-Drive), processor operation and other parameters, which we will consider below. If configured correctly, you can increase the performance of your PC by an order of magnitude, but incorrect BIOS settings can lead to numerous system failures. At the same time, the prices for laptop repair at home are very significant today.
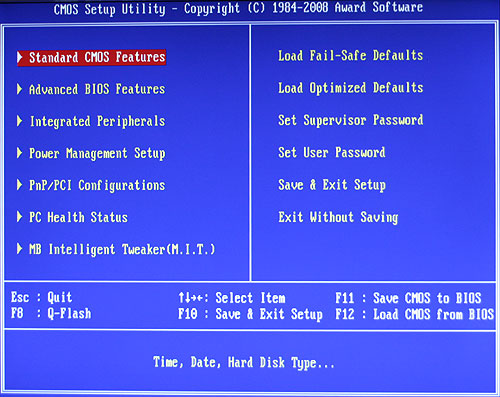
In every computer BIOS setup has parameters set "by default" by the factory, but they are not always optimal, which means that they do not give the maximum efficiency of the system. And if the performance of a PC can be increased by replacing hardware (without interfering with the BIOS), then in the case of a laptop, things are more complicated. It is worth noting that you need to change the BIOS settings only if you clearly understand what you are doing. Therefore, now, we will consider what it looks like Configuring laptop BIOS - in pictures and with a description of the basic settings. For this review, we will be looking at the Bios Setup of an Acer laptop.
In outline, Configuring laptop BIOS consists of the following items:
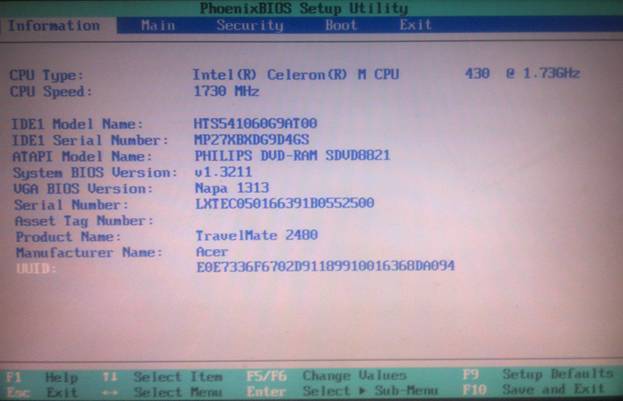
- Information - information about devices and BIOS settings
- Main - the main menu for installing Bios Setup, containing settings for controlling laptop equipment
- Security - setting passwords for entering Bios Setup
- Boot - selection of the priority of devices to boot the system.
- Exit - Exit and save BIOS settings
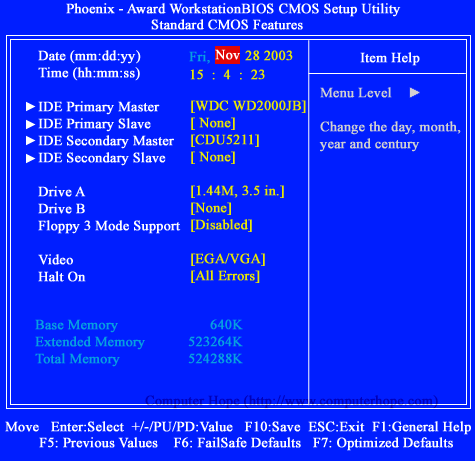
As for the first point, I think everything is clear here. Let's see if the time is set correctly, what devices are installed, the temperature of the processor.
With the second point, it is much more complicated, therefore, we will consider how in this point is carried out BIOS setup - in pictures and we will try to describe each item in more detail, since this menu is the most important for our system.

In this section, the first points BIOS settings ACER are date and time settings: System Time, System Date.
ParameterTotalMemory (also, depending on the BIOS version of acer laptop, you can find Extended Memory, System memory) - shows the amount of system memory. It cannot be changed - it is for information.
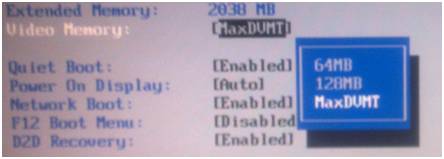
VideoMemory - the size of the memory integrated into the motherboard, video card. In our example, the video memory size is 128MB. Therefore, the following parameters are available to us: 64MB, 128MB and MaxDVMT (dynamic allocation of video memory within 128 MB.)
QuietBoot -This parameter allows you to select the type of download. The “Enable” value enables the silent boot mode - until the system boots, no information is displayed on the screen (except, possibly, the manufacturer's logo). If you disable this area (disable), the screen will display all information and test results carried out by the system before the OS is loaded.
Power On Display - has two meanings: Both and Auto. This item controls the Acer laptop screen. Depending on whether it is connected to the laptop external monitor - it will be determined: do not include the built-in screen or allow two screens to work together.
NetworkBoot - if literally, it is a network download. In most cases, it is best to disable this option (in some cases, the system boots faster). Basically, this option is needed in cases when your laptop is connected to a network with a raised TFTP server (a server that makes it possible to boot the system kernel over the network).
F12 Boot Menu -If you activate this item, before the system boots, a selection of devices from which you can boot your OS will appear.
D2D Recovery- activation of the system boot recovery function. Data is written to a hidden system partition. This function, in my opinion, is not very effective, and if you do not plan to use the Acer eRecovery Management utility, this function can be turned off.
Very rarely, but users have to enter the BIOS, for example, to change the order of boot devices when reinstalling the operating system, to disable unused components and deep self-tests, or when overclocking the computer.
For previous generation Acer computers and notebooks, a power-on self-test is initiated after power-on. You can enter BIOS only at this stage. While the Splash Screen of the motherboard manufacturer or the self-test results in text form is displayed on the monitor screen, press the key a couple of times "Delete"... A hint about which key or their combination to press is present on the start screen. Typically, for Acer computers, this is Delete, and for laptops of this manufacturer, F2. If you cannot enter the BIOS by pressing the indicated keys, we study the instructions for the motherboard or laptop. It is possible that for this model Acer has chosen a different combination, or the device is equipped with a new software interface. In any case, attempts to enter the BIOS should be made after the indicators on the keyboard blink or light up, but before the operating system starts loading.
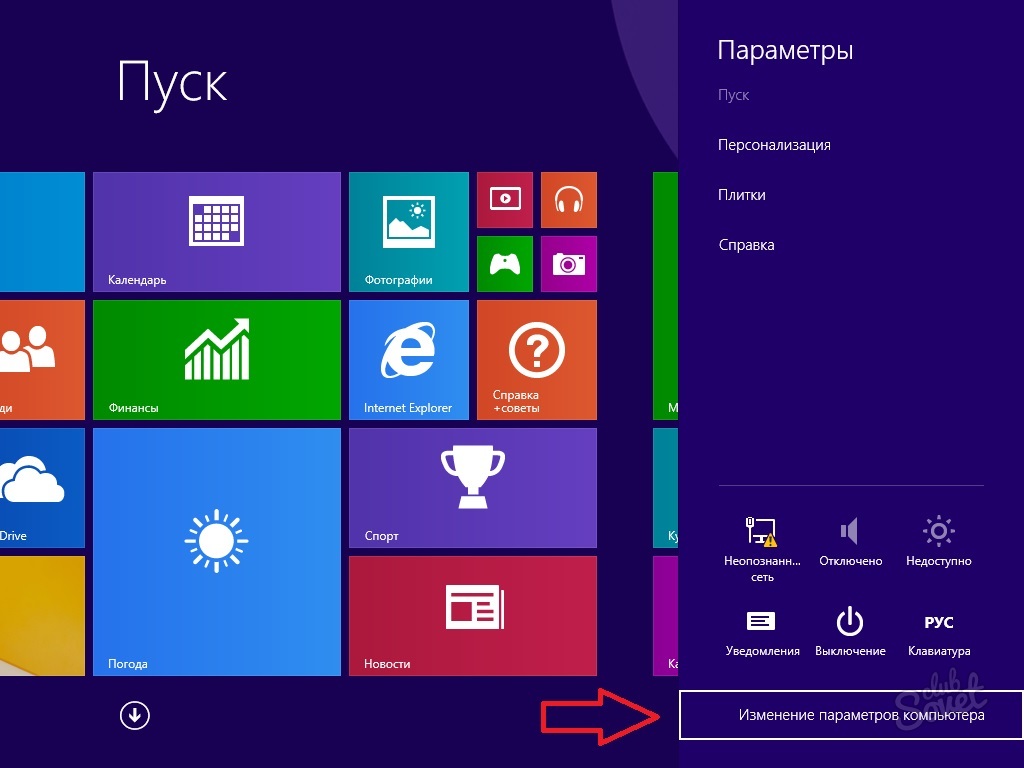

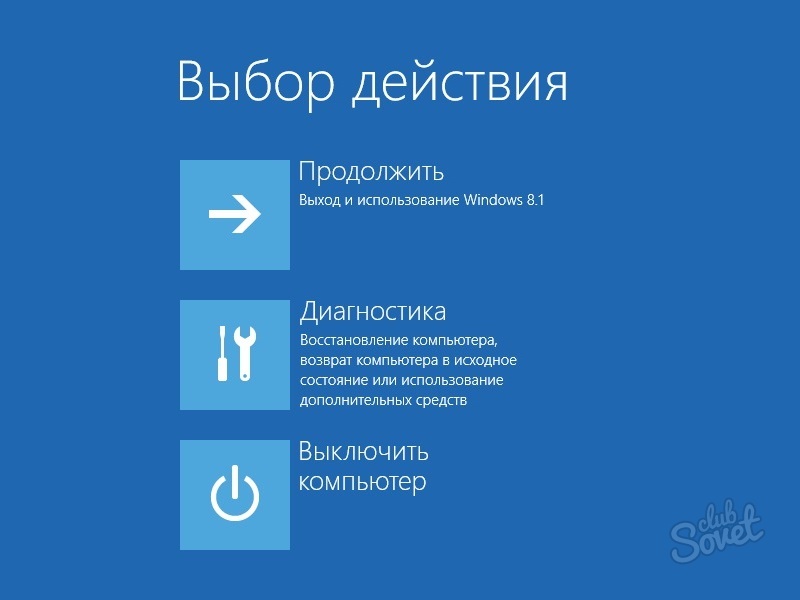

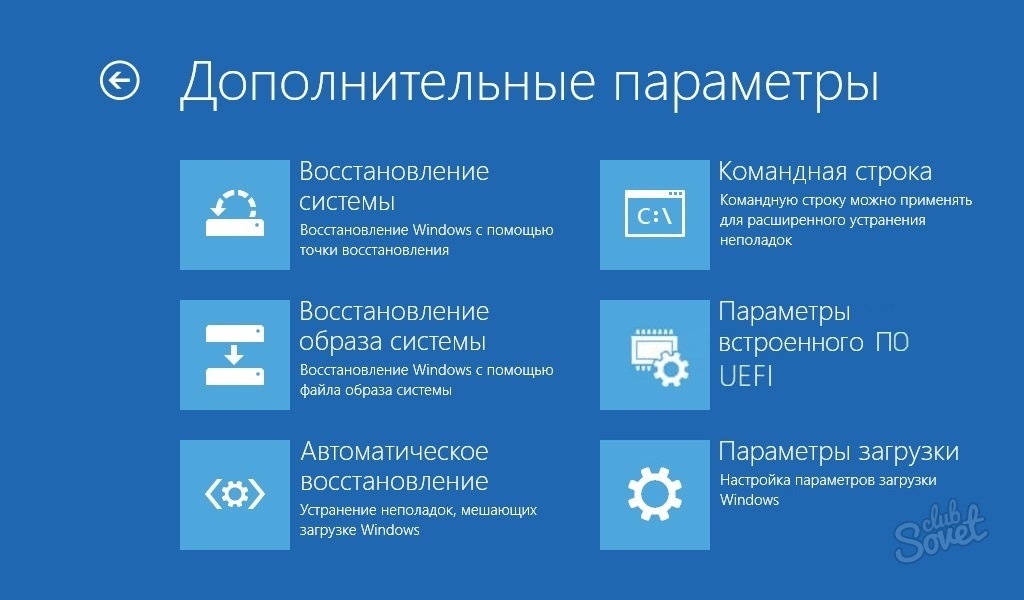


As a rule, there are no problems with entering the BIOS. The main thing is to press the hotkey in time or correctly perform a special restart in Windows 8 and higher.
Instructions
Anyone who has launched the BIOS control panel on any desktop PC is accustomed to frequently pressing the Del button to bIOS startup... This is due to the fact that the vast majority of motherboards have the same supplier of chips for the "Basic Input-Output System" (BIOS). With laptops, the situation is somewhat different - the BIOS launch key may differ from manufacturer to manufacturer.
Take a close look at the bottom of the screen when turning on the laptop. A message like “Press F2 to enter setup” appears briefly on either the left or right bottom of the screen. Perhaps, on your laptop, the inscription will be slightly different, but the most important thing is to remember the key indicated in this line. It is this key that plays the role of the “Delete” button when starting a regular computer.
Restart the laptop if you did not have time to press the key in time and immediately after starting the boot press the key indicated earlier several times (many, so as not to be mistaken, use the technique of repeated pressing until the BIOS screen appears).
You can also find out the required button from the manual for using the motherboard installed on your laptop. In the manual (often referred to as "manuals") look for the "Bios Features" section. It not only describes step by step the process of invoking the BIOS screen, but also recommendations for setting up your laptop, as well as a description of all the items contained there.
Download the motherboard manual from the official website of your laptop manufacturer in case the paper version of the manual was lost for one reason or another.
Often, PC users have problems configuring Bios to boot from disk... This function is sometimes needed not only to start installing Windows, but also to diagnose the operating system with various utilities.
Instructions
First you need to enter the BIOS - to do this, restart your computer and as soon as the device check starts and the letters appear on the black screen, press the Delete key. For newer motherboards and laptops, you can also use the F2 key. Navigation in the Bios menu is done by arrows. To cancel an action, use Esc, to reboot - Ctrl + Alt + Delete, to save changes - Enter.
Select item Advanced Bios Features and press the Enter key. In the menu that opens, find the First Boot Device, Second Boot Device items (depending on the motherboard and Bios version, the names may differ slightly). These options are responsible for the order of the devices from which the operating system will boot. By default, in the first item Floppy will be selected, in the second Hard Disk, and in the third - Cd-Rom. Highlight the First Boot Device item, press the Enter key, select the Cd-Rom boot option with the arrow and press Enter again. Next, select the Second Boot Device item and set it to Hard Disk. After that, go to the main Bios menu, select Save and Exit Setup and confirm the saving of changes. Your operating system will now boot from disk.
After completing the necessary steps for windows installation or System Diagnostics, revert to the original boot order, otherwise the boot procedure will run over and over again. To do this, enter Bios again, open the Advanced Bios Features menu. Then select the First Boot Device item, set it to Hard Disk. Set Second Boot Device to Cd-Rom.
Related Videos
note
When changing the Bios settings, be careful, incorrect settings may negatively affect the operation of the system.
Every user who strives to learn about his computer should work in the BIOS (BIOS). With its help, he can make many useful settings. But beginners often face the question of how to enter the BIOS. In fact, everything is very simple.
Instructions
BIOS is the basic input / output system. Designed to prepare computer devices for loading under the operating system. With the help of BIOS, the components of the computer take control of the computer and are accepted to perform their functions. Having a good understanding of the BIOS of his computer, the user can set the power supply values, device boot order, and so on.
Reboot your computer. At the moment when the screen saver passes, you must press a certain key. Sometimes guessing the moment of pressing is quite difficult, so many users press a key or key combination several times in a row. This is done to prevent inexperienced users from accidentally invoking the BIOS.
Now about the keys. Mainly the DELETE key is used. Less commonly, you can call the BIOS with the "F2" or "Esc" keys. On laptops, when calling the BIOS system, a fairly diverse keyboard shortcut can be used. Therefore, before trying to do this, you need to read the notebook manual. It contains all the information on calling the BIOS. The main keyboard shortcuts that are used to call the BIOS of notebooks are: "F1", "F2", "F10", "insert", "ctrl + alt + esc", "ctrl + s", "alt + enter".
BIOS is the holy of holies in the world of computers and programming. After all, this is a kind of "beginning" of working with a computer. It is thanks to the BIOS that you can install a new operating system, remove the old one, break hDD into several departments and much more. But how to get into this BIOS?
Instructions
To be fair, it is worth noting that most computers are very similar in their device. Consequently, in order to perform this or that operation, one should simply perform a certain set of actions. This applies not only to stationary computers, but also to laptops.
Therefore, in order to get into the BOIS, you must perform some actions in a certain sequence. As stationary