How to draw the eye of a smiling person. How to draw eyes with a pencil step by step. How to draw an eye with a simple pencil
People who are learning to draw are often interested in the question: how to draw eyes so that the drawing seems to be alive? Indeed, eyes always play a major role in a portrait. Therefore, learning to draw a person, of course, you need to pay enough attention to drawing the eyes. In this lesson, I will tell and clearly show, using my drawing as an example, how to draw eyes. If you do not get distracted by the details, then you need to assimilate a few key thoughts.
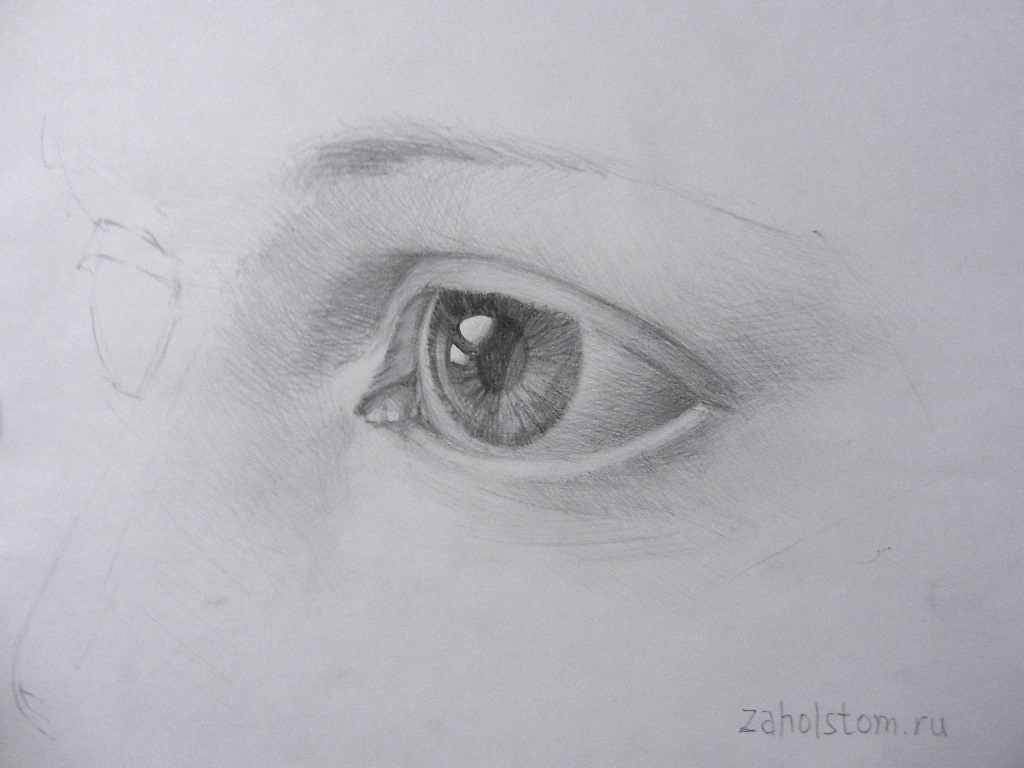
1. So the first thing. The eye is shaped like a ball. Therefore, it is not a flat, but a three-dimensional shape with the name "eyeball".

2. Second. The eyeball on top is protected by the eyelids, which form the familiar eye contours.

3. Third. The eye is located in a "depression" in our skull called the eye socket. Therefore, to draw an eye does not mean sketching the contours of the eyelid, but "sculpting" the volume of the eyeball and what surrounds it.

4. Each eyelid is thick and rises above the surface of the eyeball. In addition, the eyelids form characteristic folds of the skin.

5. To learn how to draw eyes, you need to understand the shape of the eye socket, eyelids, eyeball. To do this, I draw a conditional line in my drawing repeating the "relief". With this line, the shape of the eyes and all the curves are clearly visible. In the final version of the drawing, of course, this line should not be drawn. I added it only for educational purposes.

6. For even greater clarity, I apply a conditional shading to the shape of the surface. The lines of this hatch show all the curves. Our drawing, as it were, consists of planes or faces, with the help of which the form is "molded". Such a "faceted" drawing helps to understand the essence of the form, without being distracted by unimportant details. This greatly simplifies the drawing process for novice artists.

In conclusion of this stage of the drawing, I will add that each person, of course, has his own unique shape of the eyelids, eyebrows, nose bridge ... But we are all united by a number of features inherent in all people. Therefore, my drawing is conditional, conveying these key features.
7. Next, I proceed to transfer the volume using hatching (read about how to hatch). As you know, volume is transmitted according to the well-known law of chiaroscuro: the brightest place is a glare, then light follows, after light - partial shade, then a shadow, and finally - a reflex. It turns out such a toned stretch - from light to dark. Depending on the direction of the light, the person's face can be illuminated from above, below or from the side. Therefore, the transition from light to shadow can be not only from left to right, but also from top to bottom. Therefore, I shade the eyeball, eyelids, bridge of the nose, eyebrow area, taking into account this moment. For example, the area between the eyebrow and the eye will be the lightest on the left and top, and the darkest part will be on the right and bottom. The same applies to the upper eyelid - it will be the lightest on the left, and the darkest on the right. It turns out such a toned stretch from left to right. But the direction of the light can be different. For example, a person's head is not illuminated by the sun from above, but by a lamp from below. Then everything will be different. But the principle I am talking about will remain. Therefore, you need to understand how the light is distributed in shape, which side is the light source, etc.

8. Now I intensify the shadows that were only outlined at the beginning of the drawing.

9. I continue to work, working on the teardrop and lower eyelid.

10. I draw the iris and pupil of the eye. This stage always interests people the most. How to draw eyes so that they are "like living". To do this, you need to understand a simple principle, which I clearly outlined in the diagram below. If opaque spherical objects are light on the light side and dark on the shadow side, then transparent spherical objects can look just the opposite. Depending on what surrounds such a transparent object, it can look different. For example, it is often dark from the side of the illuminated part, and from the shadow side, on the contrary, it is light. It turns out that the usual chiaroscuro (flare, light, partial shade, shadow, reflex) will be absent here, since the object is transparent and shiny. Therefore, here you need to convey glare and reflexes (reflections) on the surface of the eyes. The iris and pupil are located under the transparent cornea of \u200b\u200bthe eye, which is shaped like a lens. The shiny surface of the eye (cornea) reflects light in the form of glare. In addition, everything that surrounds the eye is reflected on the surface of the eye. These reflections (reflexes) will not be as noticeable as highlights. The artist doesn't have to list all of these reflections. You should choose the most interesting and focus on them. Too many such details will not only complicate the work, but also ruin the drawing. Having coped with this stage of the drawing, the eyes will be "alive", with a "sparkle".

11. Now about the eyelashes. Most often, they should not be drawn in detail in a drawing. It is enough just to outline a dark line on the upper eyelid. This line will look like a row of eyelashes. However, in this tutorial I am making a detailed drawing. Therefore, I paint the eyelashes in more detail than usual. But even in this case, you should not draw them in the same degree of detail. For example, on one edge I make the eyelash line darker, and on the other - lighter. Those. I emphasize the center of the drawing. Also, the clarity of the drawing of the eyelashes will be different: somewhere they are more blurry, and somewhere more clear.
Learning to draw lips: s
1. Draw lips using simple paths

To draw beautiful lips, you first need to make a simple markup, in the form of three parallel lines. Do exactly the same as in my drawing, just keep in mind that the further the small lines are from the main line, the thicker the lips in the drawing will be.
In this figure, the distance between the upper and lower line is 4cm, the length of the central line is 13cm, the length of the short lines is 3cm.
2. Lips regain their original shape

Using the step-by-step drawing method, you can even draw very beautiful lips without being able to draw. You will see this at the end of this lesson. In the meantime, continue drawing the lips and connect the short lines, forming the corners of the lips.
Look, we can already say that you were able to draw lips.
3. Lips get real shape

It would be too easy to draw if all the lines in the portrait could be drawn with a ruler. You will have to use a little imagination and draw the "real" shape of the lips, divide the upper lip with a "heart" into two parts. You should reduce the upper lip contour, and increase the lower one.
4. How to draw a dividing lip line

First, remove the old markings with an eraser, and the lips look almost like "real". But you still need to draw a dividing line between the lips. To do this, almost repeat the contour of the upper lip to the main dividing line, slightly stretching its central part - "heart". It is advisable to do this exactly as in my drawing. Take your time to remove the scribing line from the drawing. It will not hurt to paint the lips. Just shade the fate resulting from the intersection of the lines with a soft simple pencil.
5. Lips drawing is almost finished

To make the lip drawing realistic, you need to make the lip drawing volumetric. Volume is done with shadows, so apply light shadows around the edges of the lips and where they join. Perhaps you will cut out the lips with colored pencils, then this can be done in this step.
If you decide to draw lips with a simple pencil, then you need to follow one more step.
6. How to draw human lips. Shadows

A person's lips have "wrinkles" or folds that stretch when they smile. To accurately and beautifully draw lips, draw these "little things". After that, apply the shadows with a soft, simple pencil and your drawing is now completely finished.
Now I hope you agree with me that drawing a person's lips in stages is quite simple.
How to draw lips with a pencil step by step
Step one. Sketch the guide lines for the face and hair elements.  Step two. Let's draw eyes, lips and teeth.
  Step three. Let's add shading on the face and lips to show shadows, this is a portrait after all.
  Step four. Let's remove the auxiliary lines and correct the contours. It should look like this:

Step 1.
Draw out the outlines of the lips as shown in the picture.
Step 2.
Start darkening your lips.
Step 3.
Darken your lips more.
Step 4.
Continue painting and darkening the lips.
Step 5.
Use a pencil to shade.
Step 6.
And add darkening to the area of \u200b\u200bthe skin around the mouth.

The mouth and lips are a very interesting part of the face. I will show you some points and give you a quick overview of how to paint the lips and mouth.

First, let's draw lines through the lips to describe the volume of the mouth. You see - the red lines go around all the volumes of the lips. Note that the upper lip is usually darker than the lower lip, as less light falls on it. Here we have a convex lower lip, so more light falls on it, it is completely light. Don't forget the shadows at the corners of your mouth! The corners of the mouth are often "recessed" into the cheeks, so we highlight them with dark ones.

In this picture, I have marked with purple the most shaded areas of the upper lip. As a rule, the entire upper lip is darker compared to the lower lip, but purple spots are especially dark.
In these places, the lip goes especially strongly inward, at a large angle.
This technique helps us to focus on the specific curve of the lips, see illustration below

Here I conventionally divided the lips into 5 parts.
Pay attention to the small central piece - this is the so-called "cupid's arc".
This is very important distinctive feature lips, always mark it when you want to give your drawing a personality, the cupid's arc can be very different for people!

Moving on to the lower lip: in orange I marked the shaded areas that are more angled "deep" of the cheeks and less bulge.
But all the same, the lower lip will be lighter than the upper one, because its main surface is facing up and forward - towards the light.

And here in green I marked the necessary shadows, which are always present near the mouth.
They represent the facial muscles that surround the mouth. The mouth of the iguba is not just stuck on a flat face! They must be "entered", not forgetting about the total volumes.
These shadows are not too deep, but nevertheless, they must be present under the lower lip and in the corners of the mouth.

And here, pay attention to the light areas around the lips!
This is a small but important detail, and the portraitist should never forget about it.
This is the most prominent "edge" of the lips, as a rule, it stands out quite strongly and is not colored. In these places neither a beard nor a mustache grow, and for dark-skinned people this edge is even more noticeable.
This edge stands out most strongly when the shadows fall, in the language of pilots - at 5 o'clock (that is, the light falls from above, slightly to the left).
 <= Рот - шаг за шагом
1. Make a sketch of the lips.
2. Fix the shaded areas on the upper and lower lips with hatching, select the light areas on the sides of the lower lip and on the upper mouth line.
3. Work out the hatching. Don't forget about the lip edges and facial muscles that need to be mapped out. Shade the dark corners of the mouth.
Start by drawing a slanted line that will be used to separate the two faces.

Step 2.
Now we need to outline the shape of the man's mouth as you see above, and then move on to the next step.
Step 3.
Now you should sketch the female lips as shown in the picture. The chin and lips should touch.
Step 6.
When you're done, your kiss drawing should look like this. I hope you enjoyed this tutorial on how to draw a kiss.
P.s. also lips all the same :)))
Step 1.
To draw lips, you need to imagine how they are arranged. First, let's draw a simple sketch that looks like a seed.
Step 2.
The upper lip consists of three parts - a convex middle and two parts on the sides.
Step 3.
The lower lip also divides into two symmetrical halves.
Step 4.
Starting to apply shadows
Step 5.
On both parts of the upper lip we will enhance the shadows, draw shadows under the lower lip, in the corners of the mouth and a depression above the upper lip.
HOW TO DRAW A SMILE?
It takes a very long time to draw a smile, but you can draw it using these step-by-step pictures. And so, we sketch out the lines on the sketch of our smile, then draw the shape of the lips and the lines inside for the teeth.

Ugly, brr: D
How to draw lips with a pencil: the first step
I sketch the marking B. The pencil can be 2B or 4B - this is not very important, since almost all pencils of the B mark are suitable for sketching.
The sketch turned out to be quite simple, consisting of only a few lines. There should be nothing superfluous in it. In general, the first stages of drawing in the lessons on how to draw eyes and how to draw lips are almost identical to each other. The sketch is done first, and then the shading.
How to draw lips with a pencil: steps two and three
At the second stage, I do light shading on the sketch and wipe the contours of the lips with an eraser, because it is almost impossible to shade and not go beyond the contours. Do not forget to wipe the sketch a little and outline the lips in more detail.
Of course, you need to leave the light areas of the lips without shading.
I begin to draw the lips with pencils of the group H. At the third stage, even after a slight drawing, the volume of the lips begins to be seen. So I am doing everything right. Also, with a darker pencil, I draw the corners of the mouth and the line between the upper and lower lip.
How to draw lips with a simple pencil: step four
At the fourth stage of the lesson on how to draw lips with a simple pencil, I already draw the lips in detail, leaving the light areas. It is important to draw with semicircular strokes - these are the features of the structure of the lips, which I mentioned above.
Also, in the fourth step, I paint shadows around the lips. More attention should be paid to the shadow under the lower lip - this will give the lips the desired volume. Do not forget about the shadow above the upper lip, but it should be lighter than the shadow under the lower lip.
How to draw lips with a simple pencil: the last fifth step
The final, fifth stage, I finish the drawing. In principle, after four stages, the lips look pretty good anyway - they have volume, both the lips themselves and the corners of the mouth are well drawn, but still, I would work on them a little more. It is necessary to tidy up the shadows around the lips and the shadows on the lips themselves, because the light falls on my right side, and therefore, the lips on the left side should be darker. Also, you need to draw a shadow over the so-called "Cupid's bow" - this is a nice depression on the upper lip.
On this page you can see instructions on how to draw one of the main face sertes in stages using a pencil. It's about the part like the lips. This page presents a way to draw exactly plump lips with a pencil in several stages.
How to draw lips with a pencil step by step? First we will draw Scarlett Johansson's plump lips. Take this photo as an example:
Here Scarlett is captured half-turned, or in ¾. We draw the outlines of the actress's upper lip. Let's use the HB pencil.
Then we finish drawing the lower lip. We paint parted lips, so it is necessary to leave a little free space between the lips, where teeth will appear in the future.
I decided to draw the tip of the nose. You can do this too if you wish. We draw the front teeth.
How to draw lips correctly with a simple pencil?
Now you can start shading the lips. We cover the drawing with a uniform stroke. We also hatch the teeth, since they cannot be completely white in the picture.
Now, looking at the photo, we condense the stroke on some areas of the lips and adjacent areas. Simply put, we look where the darkest places are in the photo and darken them in the picture.
Now let's take a softer pencil like 3B. We put strokes in the shape of the lips.
Gradually draw more and more shadows in the corners of the mouth, in the open space between the lips, in the dog's fossa (this is the name of a small depression between the nose and the upper lip).
If you drew a nose, then darken it too.
And finally, we take the softest pencil in our hands (mine is 8B), and put the final touches - cover the darkest areas of the drawing. Compare your drawing with a photograph as often as possible, try to accurately convey the features of the lips. So, we have learned how to draw the lips of a girl.
I will warn you right away that drawing an open smile with teeth is more difficult than drawing closed lips. If you're just learning how to draw, start with a simpler drawing. And then try to draw Angelina Jolie's smiling lips in stages.
Draw the outlines of the upper lip and mark the location of the lower lip.
Draw the upper lip and start drawing the lower one.
The lower lip is ready.
With two lines inside the mouth, I marked the size of Angelina's teeth.
Mark the width of each tooth in small segments. Don't draw too many of them. 6 left and 6 right will be enough. Otherwise, the actress may turn into Godzilla ...
The two front teeth are the widest, the rest are narrower.
And now we mark the lower teeth. Not all smiling people can see them, because everyone's smiles are very different. Angelina Jolie's lower teeth are clearly visible, as she has a large mouth and smiles broadly.
When a person smiles, folds are bound to form around the mouth. I drew a nose and two such folds.
Now we will shade the drawing of the lips. As in the previous case, first evenly cover the image with an even stroke, using a hard-soft pencil.
Then, looking at the photo, darken some areas of the skin.
Take a 3B or 4B pencil and start drawing shadows under the nose and above the upper lip.
Now let's darken the gums. They should be darker than the tone of the lips, as they are in the shadow of the lip.
The lower teeth are one tone darker than the upper ones, since less light falls on them. The boundaries between the teeth should not be outlined too brightly, otherwise it will seem that there are large cracks or teeth between Jolie's teeth.
It remains to draw a shadow under the lower lip, thereby emphasizing the volume - the actress has quite plump lips. We drew a smile step by step with a pencil.
How to draw male lips? I propose to draw the lips of the famous French actor Jean-Paul Belmondo.
Draw the contours of the lips. The actor's lips are wide enough and horizontally elongated.
If you look closely at the lips, you can always see thin folds on them. With a sharpened pencil, draw these folds in the shape of the lips. In this photo, the actor is about 50 years old. Accordingly, there are age-related wrinkles near the lips. We mark their location.
Now let's start shading. Fill the entire drawing with strokes in one direction.
Shade over the darker areas of the lips, creating volume. To draw realistic lips, you need to show their volume. A simple pencil to help us.
Take a soft pencil (for example, 4B). With its help we create the depth of the drawing. We shade the upper lip. We put the strokes, emphasizing its shape. We darken the place where the lips meet each other with a strip.
Now we shade the lower lip as well. Note that the middle of the lower lip is lighter than the rest of the lip. This is due to the fact that more light falls on the most prominent areas of the lips. Accordingly, there is almost no need to hatch this area. The area under the lips is quite dark, as it is in the shade.
At the last stage, using the softest pencil, we emphasize the corners of the lips and additionally darken the area under the lips. Pay attention - above the upper lip, along its entire length, there is a thin light stripe. If you look at the photo or in the mirror at your lips, you will see that in reality this area is really well lit. This streak of light also helps to create volume and realism. The man's lips are ready.
Step 1. Okay, I've included three kinds of smiles, a nice big open smile that bares teeth, which is more realistic, and two anime types of smiles that are usually seen in your favorite anime or manga show. For a realistic smile, draw a single vertical line and then a soaring dive. The other two just need a horizontal line, slightly curled at the corners, or dimpled.

Step 2. You will now draw out a full mouth set up for two anime-style smiles, including the top row of teeth, for the mouth on the left. How to compose a real smile, draw the upper lip and then another line in the middle. It now looks like an upper and lower lip, but it doesn't.

Step 3. Draw a hint on the lower lip for two anime-style mouths, and then draw the bottom row of teeth, for the mouth to the left, the mouth to the right. Next, you have to draw another line, that you drew the bottom of the arch in step one, and then add a small dash in each corner of the smile.

Step 4. Now you can start drawing from the arch on the top row of teeth and then draw square shapes for the bottom row of teeth. The other two mouths are all set up.

Step 5. Cap in the teeth and then sketch out the lower lip. When you're done, you can start erasing the lines you drew in step one to clear up that smile.

Step 6. And there you have it, the completed tutorial shows how to draw a smile, and how to draw an anime smile. It was super fun it was not that. Color them in, or use these smiles for your next character drawings.
What is needed
- Paper.
- A simple pencil.
- Eraser.
- Pencil sharpener.
- Colored pencils, markers, paints (optional).
Let's start with the simplest. A smile can be drawn in the form of an emoticon or a joyful sun. Probably, everyone in childhood more than once depicted him on a piece of paper. If this is your first time doing this, take a look at the photos in the article that will show you how to draw a sun with a smile.

How to draw a smiling sun
First we outline a circle, it will be the base of the image. You can use a compass or circle an object (for example, a coin).
Now we mark the location of the rays. They can be depicted in different ways: lines, stripes, in the form of trapezoids, triangles, in the form of drops, sunflower petals. The rays can be made different in size, then the sun will look even more interesting. Choose the shape you like and draw. Erase the basting lines with an eraser.
To make the sun look friendly and optimistic, let's draw joyful eyes, a small nose, eyebrows and a smile. It can be depicted as a line with the tips raised up, in the form of the letter U, a semicircle. Or you can use the example in the article and look at the photo of how to draw the sun with a smile that reveals teeth. Add freckles, a bow and handles if desired to make the luminary look even nicer. Once again we outline all the contours so that they become clearer, and color the drawing.

When drawing, do not press hard on the pencil. Erase barely visible lines with an eraser is much faster and easier than bold strokes, which can simply smear over the picture and ruin the whole look.
If you are using an eraser, again, do not press hard on the sheet. From such active friction, the pencil can simply be absorbed into the paper, and then you can hardly remove it.
Instead of an eraser, you can use a gray soft rubber band - a nag. She instantly removes unnecessary tones.
Before drawing, think about where the parts of the face will be located and how much space on the paper you can allocate for the lips. Aspiring artists often get carried away and forget that the space for creativity is limited. And then you have to draw the mouth too small or not the way it was originally intended.
Be consistent. Do not jump from drawing one part of the lips to another.
Before drawing a smile, study the features of the structure of the lips. This will help make your drawing more realistic.
We take into account the physiology of the mouth
Everyone's smile is different, but there are certain characteristics that are characteristic of the lips of any person.
The female mouth is distinguished by soft, rounded shapes and special grace. Male lips, on the other hand, will be restrained and have sharp outlines.
There are thin folds of skin on the surface of the lips. They are most clearly manifested when a person pronounces the vowel sounds "y" and "o". With a wide smile or laughing, the skin stretches, so the grooves become barely visible. If you are thinking how to draw an elderly person's smile, then remember that with age, the folds become very deep and smoothly flow into the space near the mouth.

The upper lip is almost flat and slightly curved. It also protrudes slightly forward, so it almost always forms a shadow. How dark it will be depends on the position of the head and the direction of the lighting. The lower lip is more voluminous and resembles a half-roll in shape.
There are small dimples in the corners of the mouth. The wider the smile, the more noticeable they will be. These cavities always cast a shadow, the brightness of which also depends on the degree of openness of the mouth.
When the lips are closed, this should be emphasized. The contact line must be highlighted with very rich shading.
A small depression can be seen under the lower lip. It should be emphasized in the drawing with a line or penumbra.
How to draw a smile with a pencil step by step
When all the features of the mouth are studied, you can start drawing a smile with closed lips.
Step one. Draw a horizontal line on a piece of paper. It will be the middle of the lips, the place where they meet. To make a smile, make the edges of the line slightly raised up.
Step two. Sketch the outlines of the mouth by drawing two arcs at the bottom and top of the line. The bottom should be slightly larger.
Step three. Draw the correct outlines. Tighten the corners and draw two bumps on the upper lip.
Step four. Erase all unnecessary lines with an eraser.

Step five. Mark with a pencil the folds extending from the horizontal line. They will add volume to your lips.
Step six. Add shadows in the right places, indicating depressions and dimples. The smile drawing is now complete. It can be colored if desired.
How to draw a smile with teeth
Step one. Let's start with the upper lip. Let's draw a slightly flattened oval. Below from it we outline the English letter "U", which will be the lower lip. Their edges should be in contact with each other.
Step two. In the middle of the oval, draw another English letter - Y or a slingshot. It should touch the top and bottom edges.
Step three. Inside the letter U, you need to draw another one of the same, but smaller in size. The contours of the lower lip are outlined.
Step four. Draw a curve inside the second U. But not in the middle, but closer to the lower lip. This line will be the border for the gums and teeth. On top of it, outline the "fence". Make horizontal curves for the teeth. Remember to leave room for your gums. Now sketch out the lower teeth.

Step five. Erase unnecessary details and sharpen the rest of the contours. Now use the rules that tell you how to draw a smile, taking into account the physiology of the lips. With a light touch of the pencil, mark dimples around the corners of the mouth, creases and shadows in the right places. Your drawing is now more realistic.
You can portray a good mood with the raised corners of the lips. But with the eyes, not everything is so simple. With their help, you can draw different smiles.
The meaning of eyes in a smile
A sad smile can be shown with raised eyebrows. If you want to depict a happy person, draw a wide mouth and lower eyelids in the shape of a rainbow. In a brooding person, the eyes are slightly narrowed, and the eyebrows are slightly drawn to the bridge of the nose.
If you can't seem to draw a smile with a pencil, postpone this activity and rest. Next time I will definitely succeed!
How to draw beautiful lips in a smile? How to draw a smile?
Lips in a smile draw, as well as just a beautiful and regular mouth, is quite difficult for beginners in the art business. But with a strong desire, it is quite possible. Let's see together. So:
The figure below shows some, more precisely, the main methods. The easiest option - we just define the shape of the lips. We draw ovals, not forgetting to take into account some of the nuances of the shape of the lips itself, the angle of drawing in order to more correctly show the profile, and so on.
You can create a cylinder shape with several lines, and already on its basis, draw a smile by hand. In any case, first of all, you need to make a sketch, sketch out the lips, and then draw the outline more clearly. And of course, in order to add volume, you need to understand which area of \u200b\u200bthe picture you want to darken by making light strokes, and which one to highlight with glare, for example.
We darken, as a rule, with thin strokes with shading the corners of the mouth, lips from the center to the edge. We make highlights in the central part. For a start, this approach will be enough. It is important to understand first of all the very principle of drawing. We will remove all the lines we do not need with an eraser.
The second option is an open smile. Of course, this is a complicated option for those who already know how to draw. It is also worth working on the transfer of facial expressions in compliance with the basic drawing mechanisms. Good examples with correct lines are in the picture above. It is easier to draw such smiles immediately through the cylinder. In particular, it is easier to draw teeth in a smile this way.
Naturally, we will again talk about adding volume to the drawing by highlighting some areas with light and darkening others with a pencil.
You can try to work in color. In my opinion, less subtle and artistic, but it is quite clear that we are talking about a smile. As a rule, the technique remains the same, but bright paints, pencils, markers and other means that do not require shading are used. Enough highlights to add volume to the lips.
It is worth noting that it is not so often required to draw separately the lips in a smile, since this is more of a portrait work, requiring the ability to draw not only separately, but also in general terms, a general plan. Therefore, I would advise you to train initially according to the schemes, and in the end you already draw without such assistants. It is important to fill your hand, to understand the principle, because in serious work it will hardly be possible to draw cylinders and circles right on the portrait itself.
More persistence, patience and everything will work out!
You can draw a smile like this:
First, draw a rectangle of the desired size
Draw a horizontal line just above the middle. This is necessary in order to distinguish between the upper and lower lip.
Draw the lower lip by drawing lines from one corner of the line to the other.
The horizontal line is no longer needed, so you can remove it.
Instead of this line, draw a slightly curved one.
Since the upper lip is uneven, edit the line by drawing a dimple in the center.
We erase the extra lines.
Draw the upper lip on top.
Erase the rectangle. You won't need it anymore.
Under the upper lip, mark the place of the teeth with a line. And draw teeth - rectangles with rounded edges.
When we finish drawing the teeth, erase unnecessary lines and correct them, if necessary.
We paint.
A smile is more difficult to draw than just lips.
First you can practice sketching the mouth (lips).
Often, the shape is set in ovals or small circles, and then the contour is drawn at will - these are thin sponges or more plump.
For a smile, you need to understand, draw the lips a little thinner and wider, opening the teeth.
You can show the teeth slightly, but in a wide smile or in laughter, you will have to draw them thoroughly, as shown by the increase in emotions (smiles) in the first line of the picture.
And you also need to start from the perspective. Half-sided, whether you want to convey a smile in profile or in full face, everything must be taken into account.
Perhaps everyone can just draw lips, but when it is necessary to draw a beautiful smile, many people have some difficulties. Below I will give a picture, looking at which anyone who wants to draw a smile can do it without difficulty.
As you can see, in the picture I gave above, there are examples of how you can draw just lips.
But on this one, how you can draw a smile:
bab407f51c0ac54eadfd70a.jpg
According to the examples I have given, you can draw both a smile on which the teeth are not visible, and a smile on which the teeth are visible. Choose and draw any option you like.
First you need to understand that there are different lip shapes. I have given below the main types of lips and schemes in order to draw them.
And to draw a smile, you need to round the line dividing the lips slightly upward. Accordingly, the lower and upper lips should stretch slightly, and the tubercle on the upper lip should also grow. This is all very important to take into account.
Of course, you can see a very wide variety of beautifully smiling lips, but before you start drawing a smile, take the necessary items for this:
Colored and simple pencils;
Eraser, for periodic correction of the picture;
Sharpener if pencils break;
A blank sheet of paper.
These templates can act as samples of a smile.
When drawing any of the offered smiles, the following stages can be distinguished:
First step. Show the shape of the smiling lips first.
Second phase. Detail the teeth that are visible along with the lips.
Stage three. Apply shadows to the smile drawing.
These are the main stages of drawing a smile.
To draw lips in a smile or just a smile, we must first draw the lips. The lips should be beautiful, of the correct shape, and I would advise you to draw women's lips if you are faced with a choice. Next, we need to shape the lips, make them plump and attractive. The teeth do not need to be painted. More detailed instructions in the video below.
Already painted +79 I want to draw +79 Thanks + 529
We really hope that our lessons will help you in drawing human eyes with a pencil step by step. Experiment and develop your own painting method, find the best ways to achieve a specific texture or effect.
How to draw a realistic eye with a pencil step by step
- Step 1
1. Draw a line drawing with a hard pencil:
2. Look where the darkest areas should be (and darken them): - Step 2
3. Look again where the darkest areas of the iris should be:
4. Take a close look at the eye and start working on the shape with shadows, trying to create depth:
- Step 3
5. Blend the iris:
6. Repeat blending several times:
- Step 4
7. With a nag (sculpting a sharp tip), try to rub some light lines so that the iris does not look "empty":
8. Work a little more with the nag until the result is satisfactory:
- Step 5
9. The white of the eye is not so white, try to sketch light and shadow, highlighting the shape:
10. Blend using tortillon:
- Step 6
11. Since the last stage looks too dark, use a nag to highlight:
12. Let's start with the upper eyelid, drawing in the darkest part:
- Step 7
13. Basically, drawing an eye is a matter of realistic light and shadow:
14. Use a paper towel to blend the eyelids. It still looks a little flat, but we will paint the eyelashes before adding highlights to the eyelids:
- Step 8
15. Before drawing eyelashes, determine where they grow from:
16. Try to draw the upper eyelashes curved like bows. And remember - they are of different lengths:
- Step 9
17. Start working on the lower lashes. While they may not be too realistic:
18. With light strokes, we begin to work on the area between the eye and eyebrow:
- Step 10
19. Use a paper towel to blend:
20. Repeat the blending process several times and don't be afraid to shade:
- Step 11
21. When starting to work on the eyebrow, mark the most prominent lines:
22. Darken the areas you see fit and blend lightly. When blending, try different tools and choose the ones that work best for you:
- Step 12
23. At this stage, I start to darken (and shade) everything that seems "flat" and "empty":
24. We start working with the lower eyelid:
- Step 13
25. Work on and shade the most visible lines and areas:
26. You can add a little "realism" by drawing some wrinkles with pencil lines over the feathers:
- Step 14
27. Repeat the last step several times. I added shadows where the nose is supposed to be:
28. We continue to work:
- Step 15
29. Blend using a paper towel:
30. The work is over!
Video: how to draw a human eye with a pencil
How to draw a girl's eye with a pencil

How to draw a realistic girl's eye
- Step 1
Sketch the outline.

- Step 2
Take a soft brush and dip it in graphite powder (you can get it by sharpening a 5H pencil). Then we will cover our sketch with two or three layers of tone. The brush should gently blend and smooth the image. Try to avoid getting tone in highlights on the iris. If graphite does get on the glare, clean this area with an eraser (nag).

- Step 3
Let's repeat the previous step using a smaller brush. Begin to shape the shape of the eye, shading the areas that should be darker.

- Step 4
Use a nag to clean areas that should be light.

- Step 5
Use a 2B pencil to mark the darkest areas like the pupil, darken the top of the iris and the crease of the upper eyelid.

- Step 6
Use light pressure to draw the iris around the pupil (5H pencil).

- Step 7
Darken the iris with a 2B pencil.

- Step 8
Use a nag to work on the iris to soften the contrast. Add graphite as needed to create the desired tone. We pass to the white of the eye (pencil 2B). We draw eye shadows on the squirrel.

- Step 9
Now we start working on the skin. We use the HB pencil. Use light circular motions to add tone to the upper eyelid and under the brow. Start with the areas that should be darker (in this case, the skin near the crease of the upper eyelid) and work your way up to the lighter areas. Use a paper towel and a paintbrush to smooth out any rough spots or spots.

- Step 10
Add tones to the skin in the lower eyelid area.

- Step 11
For now, we continue to work with the HB pencil. Add shadows to the skin. Use 5H and 2B pencils to show the thickness of the lower eyelid and darken it.

- Step 12
Use an HB pencil. To show the wrinkles, draw thin lines on the skin, and then use a nag to create light lines next to dark ones. Blend the paper using a paintbrush to soften the lines. We use the same method for the highlight in the corner of the eye (Third eyelid). We draw an eyebrow. When drawing an eyebrow, you need to sharpen the pencil sharply.

- Step 13
We draw eyelashes (pencil 2B). First we show the lashes at the outer edge of the upper eyelid. Start painting at the root of each hair. Follow the direction of hair growth and decrease the pressure on the pencil so that each hair is thicker at the root, and as if pointed towards the end. Show the reflection of the eyelashes on the glare of the iris.

- Step 14
Now let's show the lashes at the outer edge of the lower eyelid. Note that the eyebrow and lashes located on the outer edge of the lower eyelid should be lighter than the eyelashes on the upper eyelid.

- Step 15
The work is ready.

Video: how to draw a realistic girl's eye
How easy it is to draw female eyes in stages
- Step 1
First, outline the boundaries of the future drawing. This will greatly facilitate the further drawing process.

- Step 2
Use two ovals to mark the location of the eyes.

- Step 3
How to draw the eyes depends on your personal preference. Therefore, use light lines to outline such a cut as you like.

- Step 4
Now move on to the rest of the details. Draw the outline of the bridge of the nose.

- Step 5
An important role in how to draw eyes is played by the image of the direction of the gaze. Therefore, designate the irises so that the expression in the eyes is meaningful.

- Step 6
Then draw in the pupils. Their size depends on the lighting: the brighter the light, the more they taper.

- Step 7
The eyeball has a rounded shape, which is why it is visible above the cut of the eyes.

- Step 8
Also, the role of eyebrows should not be underestimated. Draw them and make the look expressive / daring / joyful or so on.

- Step 9
Correct the resulting irregularities with a softer pencil, paint over the pupils.

- Step 10
Draw beautiful, thick eyelashes if the eyes are female. If you are drawing male eyes, you can skip this step.

- Step 11
Now draw the lower lashes.

- Step 12
Draw the eyebrows more specifically, clarify the shape of the irises.

- Step 13
You can shade in the upper eyelid area with a soft pencil.

- Step 14
The shading around the eyelashes will give a special appeal to the look. Use the same hard-soft pencil.

How to draw a woman's eye with colored pencils

Video: how to draw a live eye
How to draw an eye with a simple pencil
In this tutorial I will show you how to draw a realistic eye with a simple pencil step by step.
Tools: pencil 3B, 5B, nag. The lesson has 7 steps.

Well, well, we figured out what are types of shading, learned what exercises to doand also tried to draw animals step by step.
This lesson will focus on the topic: human. I have not found a lot of material on this topic on the Runet. Therefore, I decided to write my point of view on this issue. But before starting the story itself, I will tell you a few tricks, or better to say tips, in order for you to get a good drawing.
When you get to work, first of all, learn that you need to start drawing without pressing and drawing lines, touch easily without pushing the paper. Firstly, later you will be able to unnoticeably correct mistakes and incorrect lines, and secondly, the texture of the paper will not be erased, which gives the picture a feeling of freshness and transparency in the shadows.
When correcting a drawing, do not overdo it with the onslaught of the eraser on the paper. You run the risk of smudging the pencil into the paper, especially when rubbing it over a saturated drawing. In such situations, use a nag (this is a gray soft elastic band) or formoplast. They can easily remove unnecessary tones.
Remember one piece of advice in any business you need to follow order and consistency. Whatever you do, do it from the bottom and not somewhere from the middle, or the end. This only leads to confusion. The most important skill here is the ability to analyze what you see. Select the main elements in the object, and later what details are characteristic of it. Move from general to specific. Before tackling it yourself, you need to study the entire model, that is, to understand its position in space, how it is located relative to the eyes of the painter (or better to say the observation point).
Step one. We will now see as ... Draw one vertical line and a horizontal curve on it, as shown.

STEP 2. Draw the upper lip and below it another line in the middle. For now, it will look like a top and bottom lip, but it really isn't. Read on!  STEP 3. Draw arches for the upper row of teeth, and then the square shapes of the lower row of teeth.
STEP 4. Delete the auxiliary lines that you made in the initial stage, draw the contours. Draw the lower lip. Look carefully as shown in the figure.

