How to duplicate a steam client to another disk. Steam: transfer games to another disk
Everyone probably knows that Steam launched a mega sale of games on New Year's Eve. So, for example, Counter-Strike could be bought for 99 rubles, Counter-Strike: Source for 147 rubles, and the entire set of games from Valve (these are 28 games) on the last day of the sale cost me only.
Considering that steam stores all games and data from them on the system disk, with the dramatically increased number of games, I had a need to transfer these Steam games to another section. But Steam itself does not allow this and expects to see all the games in its own folder. The only solution to this problem is to move the folder to the desired location and create a symlink (symbolic link) on it in the place where it was originally. Enough detailed instructions in the pictures - under the cut.
First, unload Steam by clicking "Exit"
To finally make sure that Steam is not blocking files, let's kill the Steam processes with the command:
taskkill / F / IM steam.exe
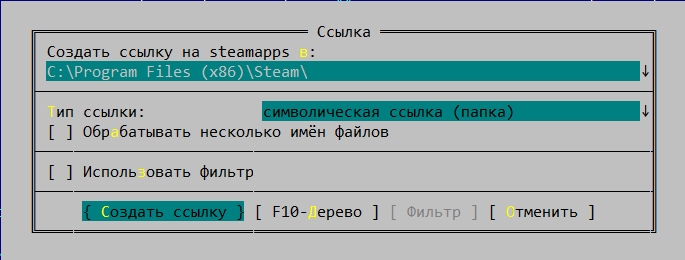
Now, in any convenient way, we transfer the files with games (that is, the folder c: \\ Program Files (x86) \\ Steam \\ steamapps) to another section. Let's say the root of the logical drive D :. Now all the Steam games we have are in the folder. D: \\ steamapps, but Steam does not know about it. Let's create this very symbolic link.
If you have Windows 7 or higher installed, open a command prompt and write there:
mklink / D "c: \\ Program Files (x86) \\ Steam \\ steamapps" "d: \\ steamapps"
Seeing in response a message that a symbolic link has been created, you can launch Steam and enjoy your favorite game.
If you have more old version Windows, you will have to create a symlink using FAR. For those who are not in the know, this is a very convenient window file manager, created back in 1996 by Evgeny Roshal. Open the download page, select the required architecture (x86 or x64), download Far Manager second version and install.

In FAR, in one window, go to the folder c: \\ Program Files (x86) \\ Steam \\, in another, open the D: \\ drive, move the cursor to the steamapps folder, press the key combination Alt + F6 and create a symlink.
Now you too can open the stim game and start playing. All subsequent installations will be made to a folder on the D: \\ drive
You went to this article, then you are interested in the question. How to transfer a Steam game to another disc.Now I will tell you how to do it.
How to transfer a Steam game to another disk
Now Steam provides the ability to transfer games to another library, that is, to another disk. This is necessary in order to adjust to your memory on the computer, or perhaps it is more convenient for someone to store games on another disk.
To transfer a Steam game, you need to create a library where you would like your game to be stored. To do this, you need to enable the Steam client and go to the client settings. Next, you need to go to the downloads item, and then to the "Steam library folders". This will open an existing library. You need to click the add folder button, and then specify where the library will be stored. After these actions, a new library is created on the disk. Now let's move on to transferring the game.
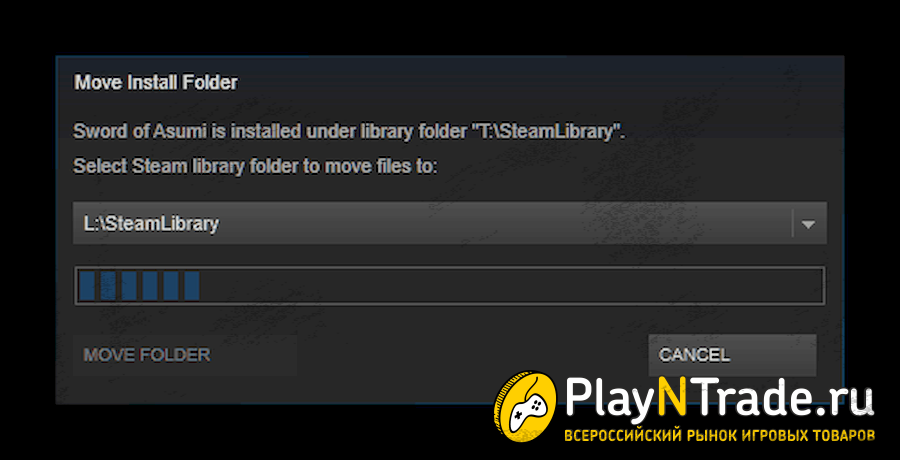
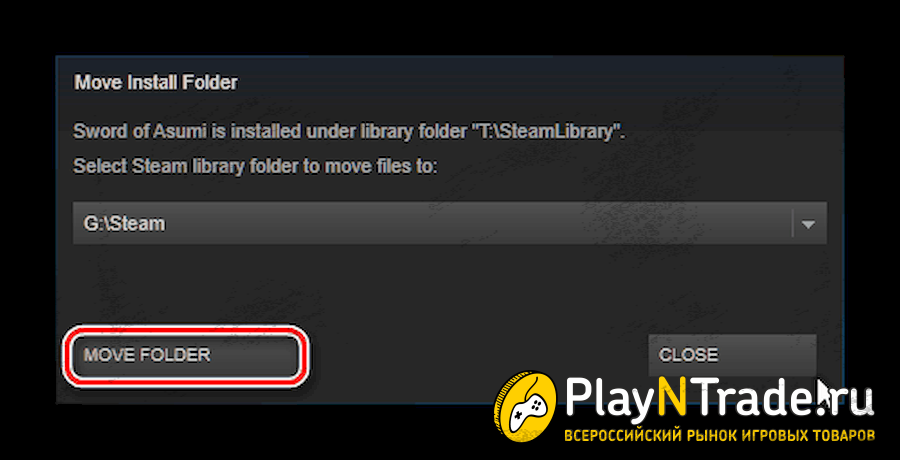
Open the game properties (right mouse button on the shortcut), then in the "Local files" tab, after that a new button "Move install folder" will appear. You need to click on it. Select the library we just created and click "Move folder".
It remains only to wait until the game is transferred. That's all.
Today I told how to transfer a steam game to another disk.Matros was with you. See you at Play`N`Trade and enjoy your game.
Now you can create several libraries for games in different folders. Thus, all your games can be equally spread across disks and partitions. The installation folder is now selected during the installation of a freshly purchased game, but the possibilities to transfer are already installed game not. But you can get around this with the help of certain crutches.
If you cannot transfer the game in one fell swoop, then you can do it in stages.
So. First, from the menu, select the command "Steam\u003e Backup and Restore Games ...":
To start the transfer, select "Create a backup copy of the program" and click "Next".
In the list, we find the game that we are going to move. Several can be noted, but first we will focus on one. In this case, the Steam client will inform you how much disk space the created backup will take. You need to worry about its presence right away.
Click "Next" again.
Now we select the place where the backups will be written. The file system used is irrelevant. I'll tell you about the reasons further, but for now, click "Next".
In this window, you can set how the backup file is split into parts. This is conceived in case all this stuff will be transferred to another computer, and in our case it will come in handy if we write to a medium with a file system that does not support large files, for example FAT32. Click "Next".
The archiving process has begun! It remains only to wait for its completion.
We now have an archive of the game. The next step is to delete the game files from its current location. To do this, open the properties of the selected game and on the "Local files" tab, click the "Remove from computer ..." button.
And we agree to the request for seriousness of intentions.
Now we need to create a new library for the game on another disk. To do this, give the command "Steam\u003e Settings" and in the window that opens, open the "Download + Cloud" tab:
Press the button "Steam library folders":
To add another folder, click the "Add Library Folder" button and specify the required folder in the directory tree. You can also specify the root of the disk, because the folder "Steam" will be created inside the specified folder, and there will already be games and programs in it.
Now we close all windows and restart the client if it asks for it.
The last step will be to restore a previously saved game from a backup. To do this, again give the command "Steam\u003e Backup and Restore Games ...", but this time select "Restore from Backup". Well, click "Next":
Now we click the "Browse ..." button and specify the folder with the backup copy of our game, the folder inside which there are folders named "Disk_1", "Disk_2" and so on. If the folder is selected correctly, the name of the reserved game will appear in the window:
We now have a choice of where to restore the saved game. Yes, Fallout NV turned out to be a bad example for porting a game.
Click "Next" to start the recovery process. You may be prompted to accept the license agreement, and only then the restoration will begin. Additionally, you will be prompted to create shortcuts.
By the way, you can also create a new library folder from this window. It is enough to select the appropriate item from the drop-down list.
And now the restoration is over. Steam will show a window like this:
Now the folder with the backup copy of the game can be safely deleted, because absolutely all game files have been moved to the new location, even those that were added to the game folder on their own.
Let me remind you that not all games can be transferred this way. Some, even during installation, cannot be placed in another folder.
This method has not been tested on the Linux version.