Black screen when starting Windows xp. Black screen after loading Windows. Scan the system for viruses
A black screen when loading Windows is a problem that many users face sooner or later, but not everyone knows how to fix it. What should be done? First you need to study the possible reasons. There are many of them and they are different. They can be both technical and software, and sometimes the problem lies in simple inattention.
Problem with wires and/or connectors
A typical situation is problems with cables, connectors and power buttons.
Checking the power supply to the monitor
- If you have a desktop computer, then First check the power supply to the display. Some users get so used to working on a laptop that they don’t notice the obvious when they switch to a desktop. The power button on the monitor is simply turned off. It is no coincidence that the instructions from IBM specialists, developed for the first PCs, included checking the power supply as the very first point.
- The second common reason for a sudden black screen when turning on is insufficient contact of the power cable. In practice, there were often cases when the cable plug was loosely held in the socket and was disconnected when the display was moved or the active participation of household members, including furry ones. In the office, poor contact between the cable and the monitor is often caused by cleaners touching the wires while cleaning.
Checking the contact between the video card and the monitor
The second reason for the situation when the coolers work, but the computer does not turn on and shows a black screen, is a problem with the cable between the video card and the display. There may be two options:
- The cable has come out of the socket.
- The cable is not connected to the main output of the video card.
With the first case everything is clear. Just check the integrity of the cable itself and the reliability of its fastening in the connectors. But the second case is worth clarifying. Inspect the back of the computer.
If there are two connectors for connecting the monitor cable, then we are dealing with one of the following situations:

In both cases, there are two options for connecting the cable. Turn off the computer, switch the wire to another connector and turn on the computer again.
Perhaps someone simply switched the cable to a different socket by mistake. The modern HDMI connector is not equipped with screws like the old VGA, and it can be accidentally pulled out of its socket and then plugged into the wrong socket or not inserted fully.
Is the screen still black after restarting the computer? You may have a technical problem (more details below).
Remember that whenever you switch the video cable, it is better to turn off the power to the computer and monitor.
“External monitor”
A laptop almost always has an output for connecting an external monitor. Therefore, if when you turn on the laptop you hear the sound of the coolers, but the screen is black, then it is likely that someone switched it to the external monitor mode. Find the external monitor control function keys on your keyboard and try turning on the internal display. Here's what they look like on an ASUS laptop: 
The F7 key turns off/on the internal screen, and F8 controls the combination of output to the external/internal monitor of the laptop. They should be pressed together with the function key, usually designated Fn.
This is what the selection of operating modes with an external monitor looks like in Windows 8 and 10. 
You switch different modes by successively pressing the Fn and F8 key combination for the ASUS laptop keyboard shown above. This way you can accidentally turn off the internal laptop monitor and get a black screen when you turn it on.
Software problems
Boot Loader Failure
A black screen and a cursor on it after booting a laptop or computer may indicate a failure in the operating system loader or one of the drivers. If the system startup options menu appears, try booting into Safe Mode. And if not, then there is only one way out - . How to make a bootable flash drive is described.
Wrong refresh rate or too high resolution
The second common problem with a black screen when loading Windows may be an incorrectly set refresh rate on the video card. The fact is that old CRT monitors operate with a high screen refresh rate, up to 100 Hz and higher. And modern LCDs can only support 50-60 Hz. This is due to the design feature of such monitors.
If you get a black screen when switching from an old monitor to a new one, then you need to do the following.

For the same reasons, you can get a black screen on a laptop connected to an external monitor. Try adjusting the frequency and resolution for the external display as shown in the picture above.
Technical difficulites
What to do if you couldn’t overcome the black screen when you turn on the computer using the methods described in this article. Perhaps the reason lies in a malfunction of parts of your PC.
If you are not a specialist in the field of computer equipment repair, we recommend that you contact the service for professional support!
The video card has failed
With such a malfunction, the laptop or PC fan works, but it does not start and we see a black screen on the screen. According to POST standard we should hear one long and two or three short beeps from the speaker(built-in speaker). The specified sound indication is typical for AWARD BIOS installed in many mass-produced laptops and computers.
POST is a BIOS self-test system. We recommend reading the article about.
Just be sure to make sure that the speaker is there and connected to the board. In some modern computers, manufacturers do without it, replacing it with LEDs on the motherboard and even small digital indicators. But the latter can only be found in expensive motherboards for overclockers.
The monitor has failed
A malfunction of the display itself manifests itself in exactly the same way, only without sound signals. The computer does not turn on, although the coolers are working, and the screen is black. As a rule, in this case you should also see other signs of desktop activity: the drive’s LED is blinking, for example. You can check whether the display is broken by connecting it to another PC or connecting the computer itself to another display or TV. Many video cards today support HDMI, which is found on modern TVs.
If the laptop does not turn on and shows a black screen, this may indicate a malfunction of the cable connecting the system board and the display. You can check this by connecting the laptop to an external monitor. If there is an image, then the video subsystem is working, but the display or its cable is not.
Today we will look at:
It’s not difficult to imagine what a novice user experiences when looking at a black screen that seems to be loading an operating system. In most cases, in such a situation, all the user can do is aimlessly move the mouse cursor across a blank screen. You will be pleasantly surprised, dear friend, but even a primary school student can solve the problem “Black screen when starting Windows 7”, guided by the material in the presented article.
A few words about the “black” reason
As practice shows, this kind of trouble mainly occurs as a result of improper shutdown of the computer (this also includes interruptions in the centralized power grid), or when the user completely ignores issues of preventive maintenance of the electronics entrusted to him. In any case, the file structure of the computer's hard drive is damaged, and this in turn leads to banal software failures.

Often, the so-called “Malevich Black Square Effect” manifests itself as a result of viral infection. Malicious program code destroys the integrity of system files, the result is that after the OS starts, the desktop disappears, that is, the user is greeted by emptiness, and that’s all.
And finally, the third “black” reason is a technical malfunction of the video card or monitor, or a simply missing video signal due to mechanical damage to the connecting cables.
Where to begin?
First of all, you need to find out whether everything is in order with the image output device, that is, check the functionality of the video card. Moreover, visually observable information at the initial stage of loading is not always indisputable confirmation that everything is in order with the graphics adapter - this is a misconception.
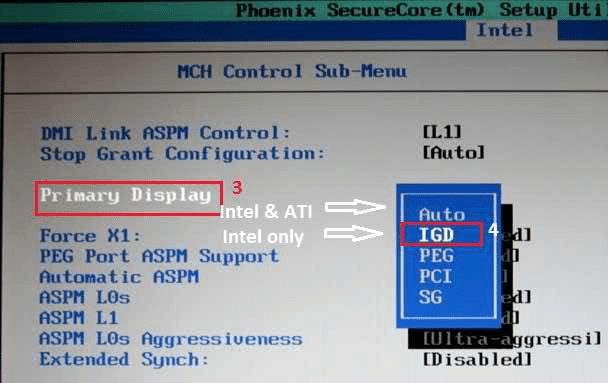
However, if during the OS boot process you observe an incomprehensible flickering or other “visual artifacts”, it’s time to sound the alarm. If possible, switch to a different video scheme, that is, disable the discrete video card and use the integrated video chip.
The second stage of diagnostics: check if everything is in order with the connecting cables, maybe a wire is broken somewhere (bend it slightly, twist it, in general, move it). It is possible that your pet has clearly overplayed the hanging wire (bite marks, exposed winding, etc.).
It makes sense to disconnect all peripheral devices from the system unit or laptop. Perhaps a “black conflict” is the result, so to speak, of lost drivers of some external device, for example, a printer, a removable drive, etc.
Software fault diagnosis and recovery
There are quite a few methods to restore the former “beauty of visualization”, but we will focus on the most basic of them. Remove the disk from the optical drive, if there is one, and disconnect the flash drive if you have not already done so.

If all the paraphernalia of your desktop appears on the screen, you are lucky. Now you can safely proceed to the next stage of system recovery.
- In the search box of the Start menu, enter “recovery”.
- In the window that opens, click on the link of the same name.
- Next, select a workable rollback point and start the process of “recovering” the OS.
If the above-mentioned service has been disabled on your PC and a rollback copy simply does not exist, then try using the method described below.
Checking your hard drive for errors
As a result of intensive use of the hard drive, systematic violation of operating rules (incorrect switching on/off of the system) or ignoring issues of optimization and maintenance of the data storage device (HDD), the occurrence of various system errors is only a matter of time. By the way, obsolescence of the disk surface and mechanical parts of the hard drive also lead to software failures and hardware conflicts.

- So, press the key combination “Win + R”.
- In the Run service console, enter "cmd".
- Next, in the command window, write - chkdsk with: /f
To the request for a reboot, we affirmatively agree.
Virus infection and editing the Windows OS registry
It is not uncommon for a malicious program to make changes to the operating system registry. Therefore, you need to make sure that the correct values are written in the branch responsible (for screen blackness).

It is also worth checking another registry key:

Well, the last thing you need to do is scan the entire hard drive for the item. It is likely that the remnants of the digital infection will make themselves felt again after a certain time.
In conclusion
Let's hope that the recommendations in this article helped you. However, you should not let your guard down. Install a reputable antivirus program and remember to perform ongoing preventative maintenance on your computer. Stability for your system!
Hello. Do you have any USB ports? How did you determine this? The system, as far as I understand, does not boot. Or is it impossible to boot from a flash drive?
Disconnect all devices from your computer. Leave only the mouse, keyboard and monitor.
To solve the error No boot disk has been detected or the disk has failed, you can try resetting the BIOS settings to factory settings.
About fifteen years ago, my friend, an avid Beatle fan, decided to write a book about the Beatles. Until then, he had no experience working on a computer. I turned to a private craftsman (he didn’t know me at that time), he assembled a computer for him, as I understood, from what was no longer needed and thrown away anyway...)) Four memory sticks, a Pinnacle card, a DVD-writing drive drive and three hard drives of different capacities... Later, for some reason, his Internet provider installed an additional network modem...
In short, the computer's power supply was clearly overloaded and the computer was not cooled well. The system “crashed” twice a week... The person who assembled the computer quickly got tired of it and found a plausible excuse to get rid of this client’s problems.
This is where I turned up.)))
Reinstalling the system was not always successful. I didn’t have to do it every time and, at some point, I began to use a block of three fans from an old Soviet computer. I removed the cover of the system unit, disconnected two of the three hard drives, directed the air flow inside the computer and... installation success is almost guaranteed.....
After some time, my friend learned to install the system on his own, without my help, and when he got tired of it, he bought a new computer.
The case I described is, of course, not entirely common, but, as it turned out later, good airflow during installation of Windows never interferes - it helped me two or three times in my memory.
I have a terabyte “Seagate”, which was not helped by any cooling and I was never able to install the system on it. And judging by the state of its connectors, approximately several thousand people tried to do this before me...)))
However, for me it has “taken root” in the box for the NexStar self-powered external hard drive. Every cloud has a silver lining.)))
Very often people underestimate the importance of the power source, or more precisely, the power system, and even more precisely, the frequency parameters of the integrating chains. Usually, after estimating the power consumption by eye, they install a power supply with a small margin, without thinking about other parameters at all.
During the operation of computer chips, high-frequency “crawls” occur on the power buses, which can greatly affect the performance and even the serviceability of RAM chips, etc. It is important that the thickness of the tracks on the printed circuit board is sufficient and that ““ smoothing capacitors.
When developing computer technology, experienced specialists place several capacitors on a chip, differing in capacity by one order of magnitude, to effectively smooth out ripples. For example, 1uF electrolyte, 0.1mf and 22nf ceramics, in close proximity to the chip.
Soviet electronics, which over the past three decades have all gone into dredges, were not without reason “stuffed” with ceramic thermostable capacitors with a high palladium content.
Nowadays, everyone wants to save money, we want to buy a “cooler” motherboard and cheaper, and manufacturers want to sell us more and do not install smoothing capacitors in the required quantity (to reduce the cost). Everyone saves and relies on each other, but the end result is a lottery.
As a result, we get a power supply of, say, 500 W (power supply manufacturers also like to save money), in practice, at half the load it no longer “pull”, and if you look at the power bus with an oscilloscope, the ripples can reach half a volt or more.
A sign that the “mother” is not in order is the swelling of electrolytes - high-frequency “breakthroughs” are destructive for them, they overheat and explode when swelling.
Installing Windows puts a serious load on the entire system. The hard drive and processor memory are working at full capacity, it all gets hot and can give an error at any stage of installation. A comparable load can occur when playing, for example, tanks. But if we are “knocked out” of the game, so what? - they came in again and didn’t pay attention... But if Windows failed during installation - yes, we’ll notice right away...
My life experience suggests that most failures occur for reasons not related to the programs - dust interferes with cooling, the fan is not lubricated and rotates poorly, electrolytes are swollen, microcracks have appeared, again, from overheating, and people also have a lot of cockroaches in their apartments, who strive to hide in a warm computer and lay their offspring there...
Sometimes, when loading the system, users encounter such an unpleasant problem as the appearance of a black screen on which only the mouse cursor is displayed. Thus, it is simply impossible to work with a PC. Let's look at the most effective ways to fix this problem in Windows 7.
Most often, a black screen appears after the Windows welcome window has been opened. In the vast majority of cases, this problem is caused by an incorrectly installed Windows update when some kind of failure occurred during installation. This makes it impossible to launch the explorer.exe system application ( "Windows Explorer"), which is responsible for displaying the graphical shell of the OS. Therefore, instead of a picture, you just see a black screen. But in some cases the problem may be caused by other reasons:
- Damage to system files;
- Viruses;
- Conflict with installed applications or drivers;
- Hardware faults.
We will explore options to resolve this issue.
Method 1: Restoring the OS from “Safe Mode”
The first method involves using "Command line", launched in "Safe Mode", to activate the explorer.exe application and then roll back the OS to a working state. This method can be used when the device has a restore point that was created before the black screen problem appeared.
- First of all, you need to go to "Safe mode". To do this, restart the computer and when you turn it on again after the sound signal, hold down the button F8.
- The system boot type selection shell will launch. First of all, try activating the Last Known Good Configuration by using the arrow keys to select the indicated option and press Enter. If the computer starts normally, then consider that your problem is solved.

But in most cases this does not help. Then in the boot type shell, select the option that requires activation "Safe Mode" with the support "Command line". Next click Enter.
- The system will start, but only a window will open "Command line". Type into it:
After entering, click Enter.
- The entered command activates "Conductor" and the graphical shell of the system will begin to display. But if you try to restart again, the problem will return, which means that you should roll back the system to a working state. To activate a tool that can perform this procedure, click "Start" and go to "All programs".
- Open the folder "Standard".
- Login to the directory "Service".
- In the list of tools that opens, select "System Restore".
- The starting shell of the standard tool for resuscitating the OS is activated, where you should click "Further".
- Then a window opens where you should select the point to which the rollback will be performed. We recommend using the most recent option, but which was certainly created before the problem with the black screen appeared. To expand your choice, check the box "Show others...". After highlighting the name of the optimal point, press "Further".
- In the next window you only need to click "Ready".
- A dialog box will open where you must confirm your intentions by clicking "Yes".
- The rollback operation will begin. At this time, the PC will restart. After turning it on, the system should start in standard mode, and the problem with the black screen should disappear.


Method 2: Recovering OS files
But there are cases when the OS files are so badly damaged that the system does not boot even in "Safe Mode". It is also impossible to exclude the possibility that you simply may not have the required restore point on your PC. Then you should perform a more complex procedure to resuscitate the computer.
- When you start your PC, go to the boot type selection window, as demonstrated in the previous method. But this time, choose from the items presented "Troubleshooting..." and press Enter.
- The recovery environment window opens. Select from the list of tools "Command line".
- The interface opens "Command line". In it, enter the following expression:
Be sure to click Enter.
- The shell will start "Registry Editor". But you need to remember that its sections will not relate to the current OS, but to the recovery environment. Therefore, you need to additionally connect the registry hive of the Windows 7 that needs to be fixed. For this purpose in "Editor" select a section "HKEY_LOCAL_MACHINE".
- After that press "File". In the list that opens, select "Load bush...".
- The hive loading window opens. In it, go to the partition of the disk on which your operating system is located. Next, go sequentially to the directories "Windows", "System32" And "Config". If, for example, your OS is located on drive C, then the full path to go to should be as follows:
C:\Windows\system32\config
In the directory that opens, select the file called "SYSTEM" and press "Open".
- After this, a new partition will be created in the folder "HKEY_LOCAL_MACHINE". Now you need to open it.
- In the directory that opens, select the folder "Setup". On the right side of the window, among the elements that appear, find the parameter "CmdLine" and click on it.
- In the window that opens, enter the value in the field "cmd.exe" without quotes, then click "OK".
- Now go to the parameter properties window "SetupType" by clicking on the corresponding element.
- In the window that opens, replace the current value in the field with "2" without quotes and click "OK".
- After that, go back to the window "Registry Editor" to the section that you previously connected and select it.
- Click "File" and select from the drop-down list "Unload the bush...".
- A dialog box will open asking you to confirm your decision by clicking "Yes".
- Then close the window "Registry Editor" And "Command line", thus returning to the main menu of the recovery environment. Click here on the button.
- After rebooting the PC will automatically open "Command line". Enter the command there:
Click here Enter.
- The computer will be checked for the integrity of the file structure. If violations are detected, the recovery procedure for the corresponding element is automatically activated.

- Once the recovery is complete, enter the following command:
shutdown /r /t 0
Click Enter.
- The computer will restart and turn on normally. It is important to take into account that if the system files were damaged, which caused the black screen, then it is quite possible that the root cause of this could be a virus infection of the PC. Therefore, immediately after restoring the computer’s functionality, check it with an anti-virus utility (not a standard anti-virus). For example, you can use Dr.Web CureIt.


If none of the above methods help, then in this case you can install Windows 7 on top of the working operating system while maintaining all settings, or completely reinstall the OS. If these actions do not produce results, there is a high probability that one of the computer’s hardware components has failed, for example, the hard drive. In this case, it is necessary to repair or replace the broken device.
The main reason why a black screen appears when the system boots into Windows 7 is an incorrectly installed update. This problem can be “treated” by rolling back the OS to a previously created point or performing a file recovery procedure. More radical actions also involve reinstalling the system or replacing elements of the computer hardware.
Flew off windows 7 activation, desktop background, has become similar to the famous painting by the artist Malevich, a black square? in our case black screen. The reason for this problem may be that someone is using a pirated copy of the operating system, or a licensed one, but for some reason the Windows activation key has disappeared and needs to be entered again, but before that you need to do some steps described in this article .
When faced with this problem, you should not worry, because it can be solved with a small number of actions. Let's look at the question of why this happened. When automatically downloading and installing updates, one is downloaded that checks your system for authenticity, it goes under the code name KB971033. It is after it is installed that the background scan begins and the detection of a pirated copy of Windows begins.
After this, if there is an unlicensed version, the so-called black screen, which states that your copy of windows is not genuine genuine. If the system is licensed, but for some reason the screen turns black, it means the activation key has been lost and you will need to re-enter it, but after some steps.
First, you need to delete the downloaded update; to do this, go to the control panel.


Here we need to log into Windows Update.

In the right column at the very bottom, go to the installed updates tab.

And in the list we find what was mentioned above, namely update for microsoft windows (KB971033). Right-click on it and click delete. But if this update is not listed, it may be hidden. Then we will need to enter the command line and try to get rid of it using a specific command.

Open the start menu, write in the search cmd, right-click on the found file and run it as administrator.

In the line we write the following command wusa.exe /uninstall /kb:971033 and press the enter key. The update should be removed.

After uninstallation, so that this problem no longer bothers us, we will have to find this update using a search and hide it from re-installation, because after uninstallation, it can also be automatically downloaded and installed again. To do this, go to Windows Update and in the right column, click on the item search for updates.

We are waiting for this process to complete. You can have some tea for now.

After visiting the Windows Update Center, we will be provided with some important ones, where they are stored and those that need to be hidden. To do this, go to the important updates tab; as you can see, I have as many as 123 of them.

We find the ones we are interested in, right-click on it and select hide update. After it has disappeared, click ok. Now we can safely install the others provided, after which do not forget to restart the computer. Next for complete windows activation, you will need to perform a few more steps, which are described in the article Your copy of Windows 7 is not genuine. Assembly 7600,7601. For users whose operating system is installed in the GPT partition, I advise you to use another activation method, which is described in the article Unknown boot device harddiskvolume1 or how to activate windows 7. Also for users of licensed operating systems who are faced with a problem black screen, this article will help, but instead of the activator, enter your license key again.

ABOUTGive your opinion about this article, and of course, ask your questions if something suddenly goes wrong for you.
Thank you for your attention!